---
title: "Quepid User Manual"
author: "Eric & David"
url: "https://quepid-docs.dev.o19s.com/2/quepid"
---
# Welcome to Quepid!
## You are on your way to better search quality.
Ready to get deeper with Quepid? There are many ways of building your Quepid "qompetency", so the documentation is built around trying to meet you where you are.
The docs are organized in four quadrants using the [Diátaxis](https://diataxis.fr/) framework:
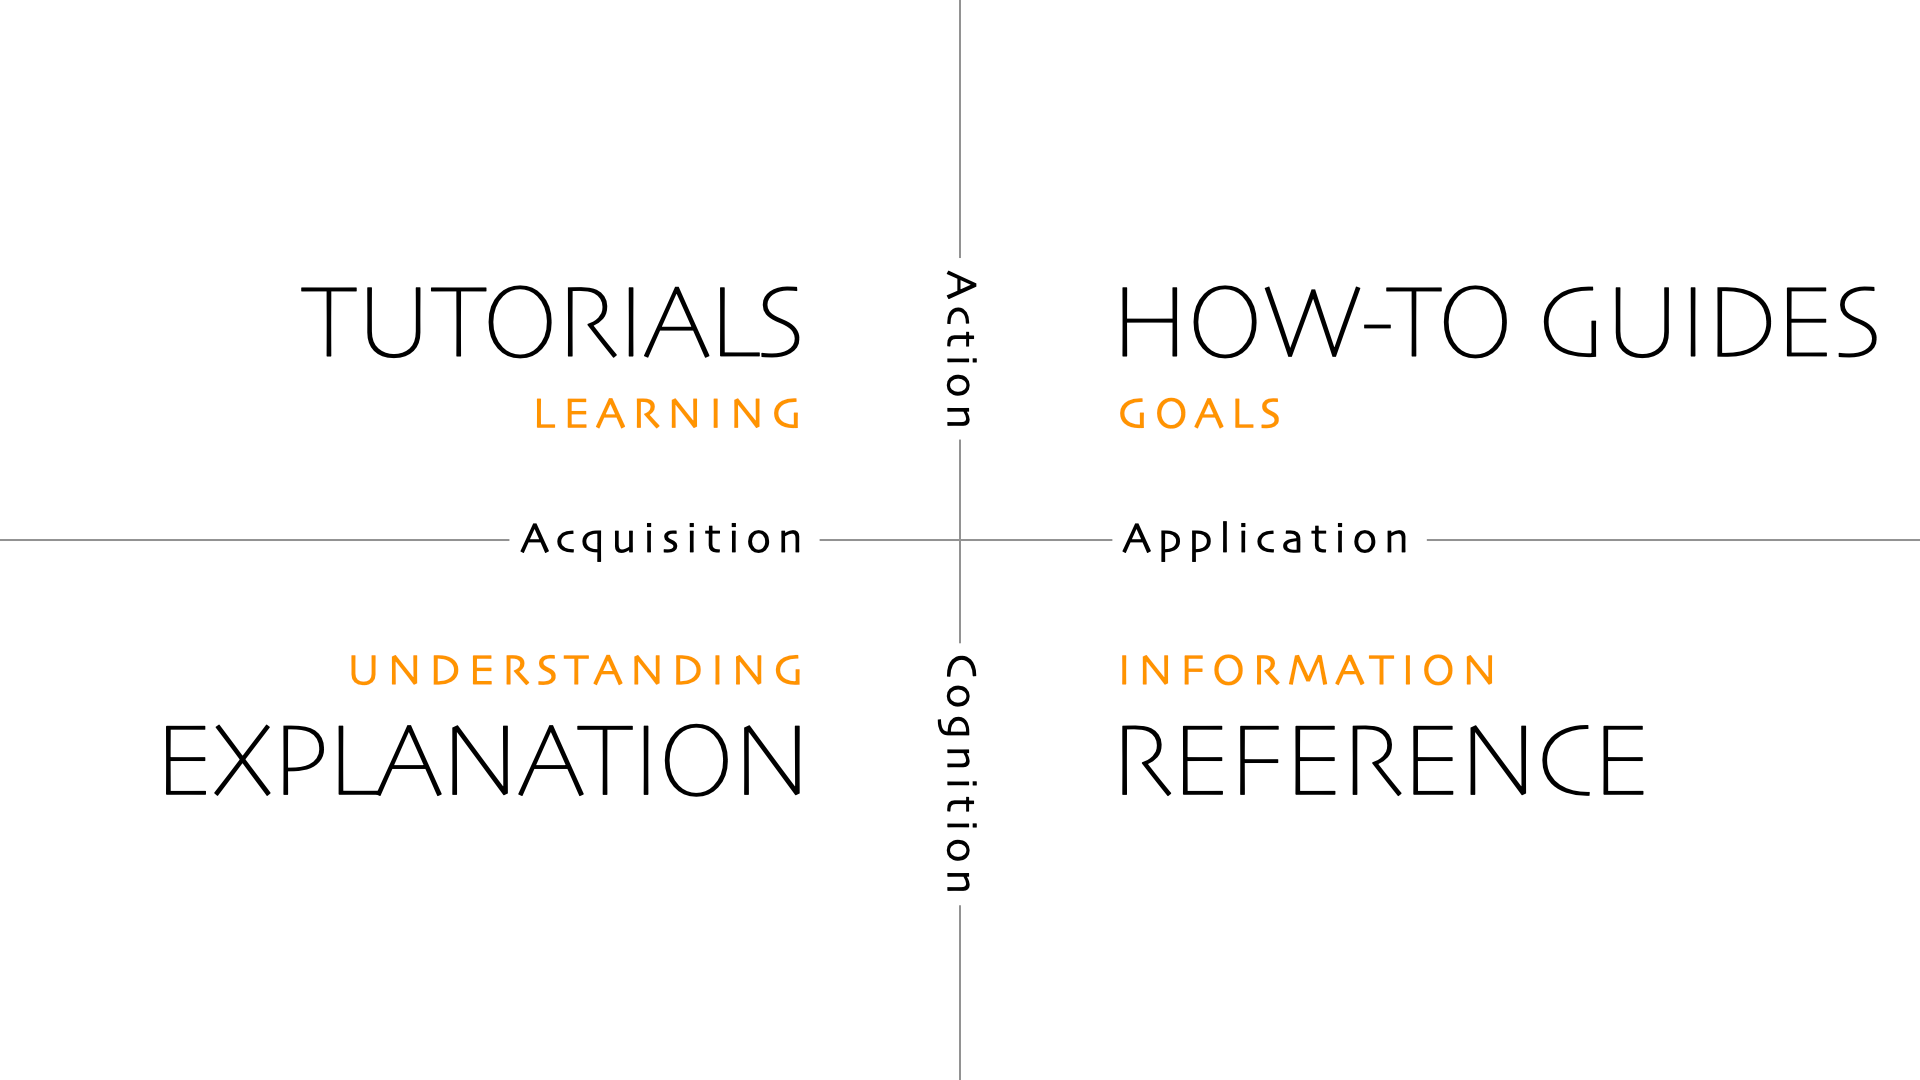
Each Quadrant in listed as a separate chapter. We start with the Tutorials and How-To Guides first, and then have the deeper Explanation and Reference sections.
Many of these pages will link out to other locations that have more details.
Want to contribute to the docs? Ping Eric at epugh@opensourceconnections.com for a invite to become a writer.
# What is Quepid?
Before we go furthur, what exactly is Quepid? Quepid is a tool to help you improve your organization's search results. It is a web-based application and can either be used at https://go.quepidapp.com or it can be installed on your own hardware. Quepid makes improving your app's search results a repeatable, reliable engineering process that the whole team can understand
#### Did you know?
Did you know? Quepid is an [open source](https://github.com/o19s/quepid) project open to everyone! If you have a passion for helping others improve search relevance visit the project on [GitHub](https://github.com/o19s/quepid) to learn how to contribute.
Quepid was created and designed to address three pain-points often experienced during search relevancy improvement:
- **Collaboration** - _Our collaboration stinks!_ Making holistic progress on search requires deep, cross-functional collaboration. Sending emails between teams or tracking search requirements in spreadsheets won't provide the improvements required. Quepid provides a centralized user interface for tracking cases, queries, and the judgments given to search results. Quepid's team management provides the ability to organize users into teams along with their associated cases and custom scorers.
- **Testing** - _Search testing is hard!"_ Yes, it is and search changes are cross-cutting and a lot of changes will cause problems. Testing is difficult because you can't run hundreds of searches after every relevance change. Quepid organizes your test efforts into cases and queries and gives you the ability to 'tune relevance' by modifying your search query. Quepid allows you to quickly re-run your queries after experiments to immediately see the impact on the value of your chosen scorer providing feedback on your experiments.
- **Experimentation** - _Iterations are slow!_ Many organizations simply give up on search due to long experiment iteration, often depriving users of the means to find critical information. If it takes weeks, or in some cases even days, to perform an experiment, organizations will tend to pivot away from experiments. Quepid works to address this common pain-point by combining an easy-to-use user interface with the features and capabilities needed to increase your experimentation throughput.
> For more high-level information on Quepid take a look at the
Quepid Core Concepts.
Now that we are familiar with Quepid's purpose and the search relevance pain-points it was designed to alleviate, let's get into the tutorials!
Tutorials
# Structure of Tutorials
These tutorials are set up to guide you through learning Quepid. Pick the ones that map to your specific role.
The tutorials assume you are using the hosted version of Quepid at https://go.quepidapp.com.
I am a Relevance Engineer
- [Setting Up Your First Case](https://quepid-docs.dev.o19s.com/2/quepid/19/setting-up-your-first-case)
- [Tuning Relevance](url) (and digging into query explanation)
- [Relevancy is a Team Sport](url)
- [Working With the Judges](url)
I am a Judge who needs to Rate Documents
- Judging Documents
I am an Ops Person Setting up Quepid
- Installing Quepid
- Being Able to Develop Quepid
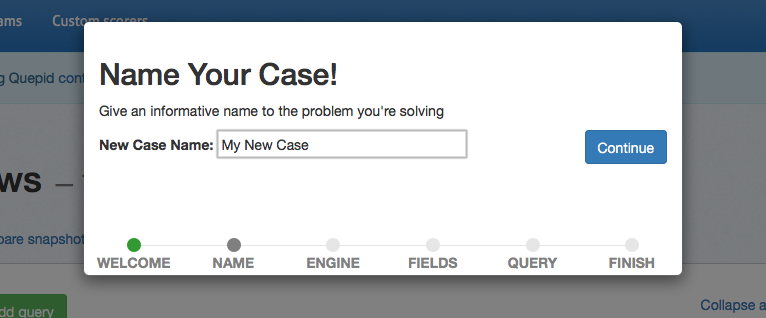
# Setting Up Your First Case
The first time you sign up on Quepid you will be prompted with a big blue button to _Create Your First Relevancy Case_.
A **Case** refers to all of the queries and relevance tuning settings for a single search engine. For example, if we are running a movie rental store and we want to improve our "Star Wars" search results, we may create a new case and call it "star wars." Under this case we will perform our searches and provide our judgments.
## Creating a New Case
Click the _Create Your First Relevancy Case_. If you don't see it, then click the _Relevancy Cases_ menu at the top and click _Create a case_.
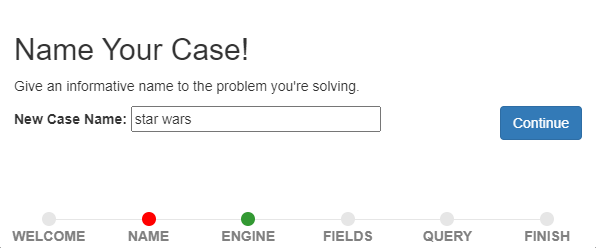
The first piece of information we are asked to provide is a name for the Case. Enter "star wars" and click _Continue_.
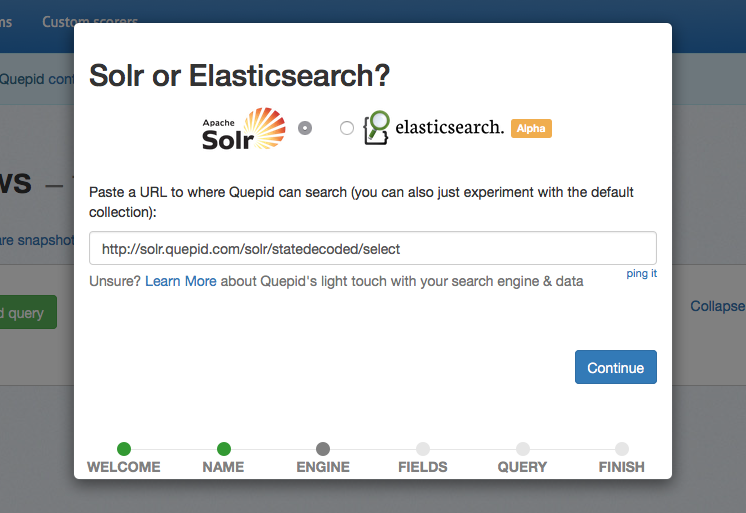
Now, we need to set up the connection to the **Search Endpoint**. We're going to use a publicly hosted Solr search engine as our Search Endpoint. Click the _Create a new Search Endpoint_ button and a panel will scroll open with all the supported Search Engines. We'll use the demo `https://quepid-solr.dev.o19s.com/solr/tmdb/select` setting.

Click the _ping it_ link to verify the connection to Solr works, and you will get a green confirmation message. If you get a red error message, check you can directly connect to https://quepid-solr.dev.o19s.com/solr/tmdb/select URL as some corporate firewalls prevent access to the demo Solr. Once connected, click the _Continue_ button to proceed.
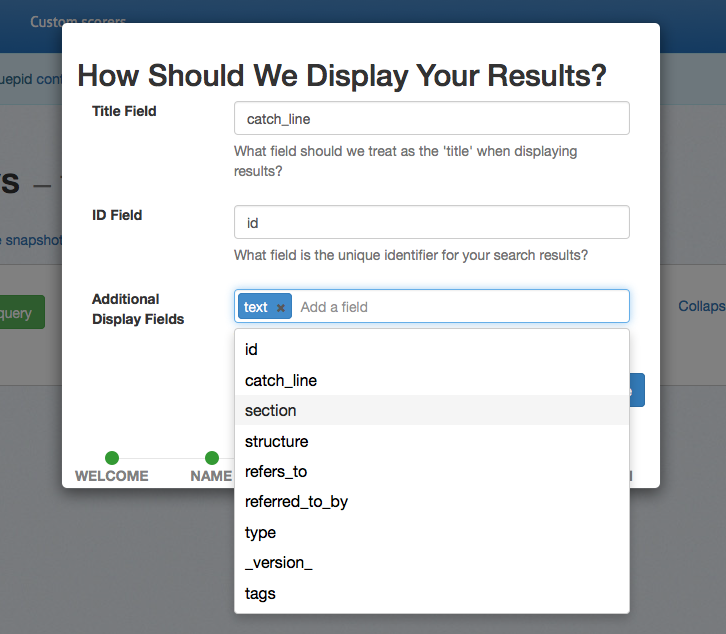
### Picking Document Fields to Display
Now you will be asked for some fields in your search results. This information is determined by how your data is indexed in your search engine. If you don't have or know this information check with your infrastructure team. The information provided here will control how Quepid displays the search results for rating. The field specified by the _Title Field_ will be shown in bold in the search results. For a search index of movies, you probably want this field to be the title of the movie. The _ID_ field is the unique identifier for each document in your index. Quepid uses the value of this field to uniquely identify each document in the search results.
The _Additional Display Fields_ allows you to specify a list of other fields whose values will be shown in Quepid's search results. You can use these fields to provide information about each document to help you provide a judgment on its document. For example, to provide human judgments for a movies search engine, it may be helpful to know the overview of the movie, the cast members, director, or tagline. It can be difficult to judge a movie's relevance to a search query based only on the movie's title. The movie title "Independence Day" doesn't tell us anything about aliens attacking Earth but with the movie's overview and tagline we know more about the content of the movie.
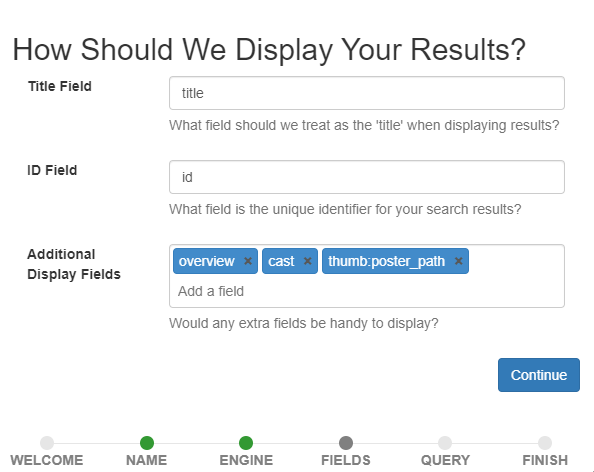
Once you have the fields configured click the _Continue_ button.
### Adding Queries
Now we are ready to add our search queries! You can add as many queries as you need to. These are the queries for which you will be judging the search results. If you are not sure what queries to add, check with your search engineering team. In this tutorial we will add two queries: _star wars_ and _star trek_.
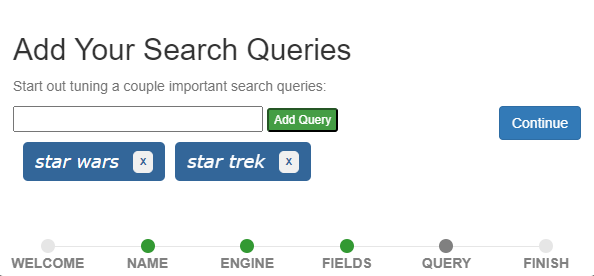
Once those are added click the _Continue_ button.
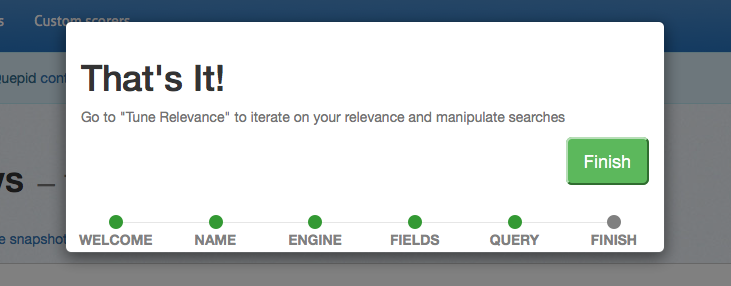
That is all the information we need to provide so click the _Finish_ button.
## Learn about the Case Screen
The first time you go through the case creation wizard you will be prompted to learn more about the interface. We'll follow along with the prompts!
### The Case Header
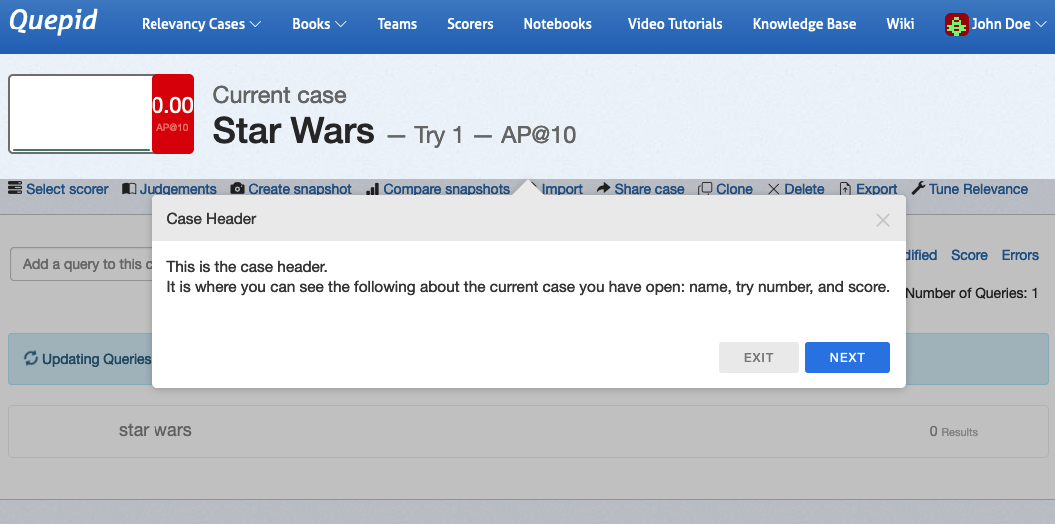
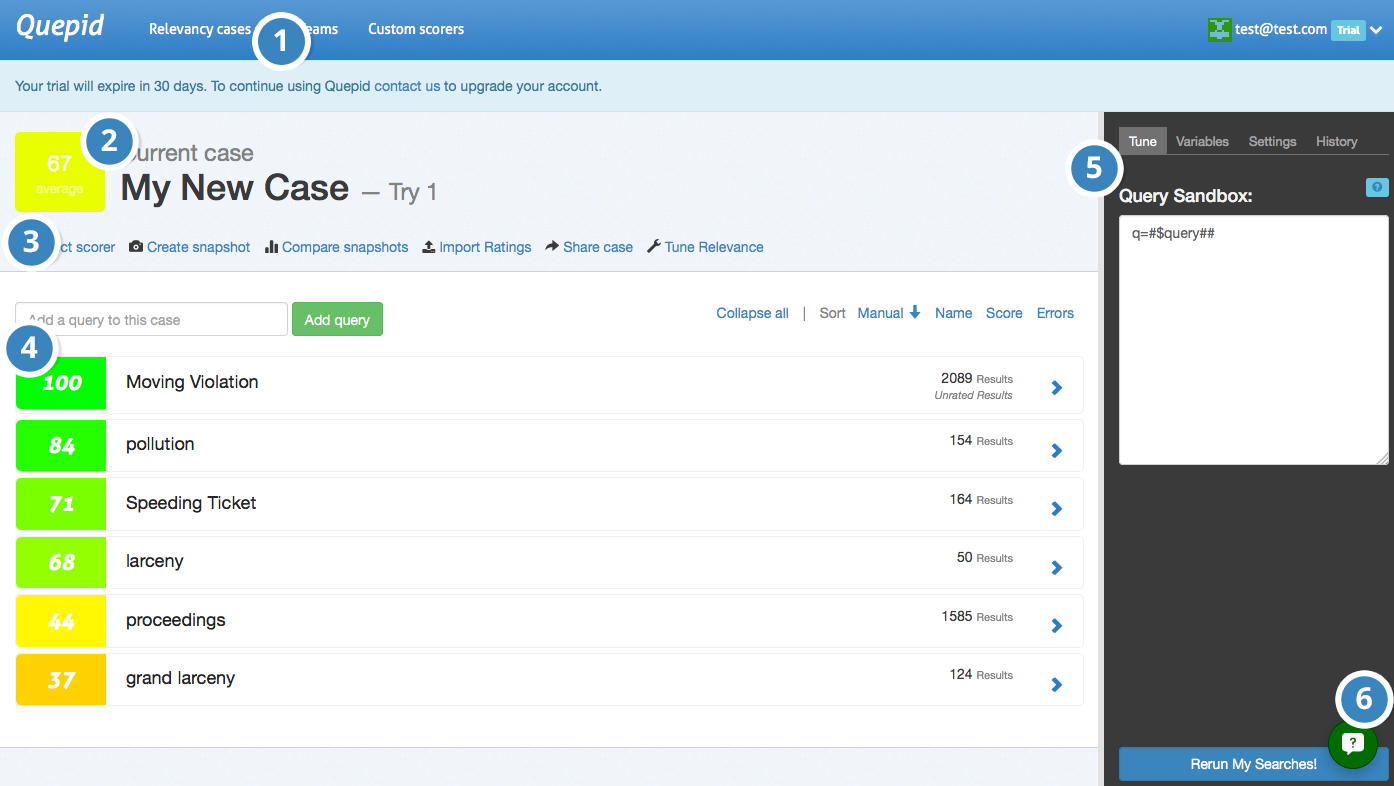
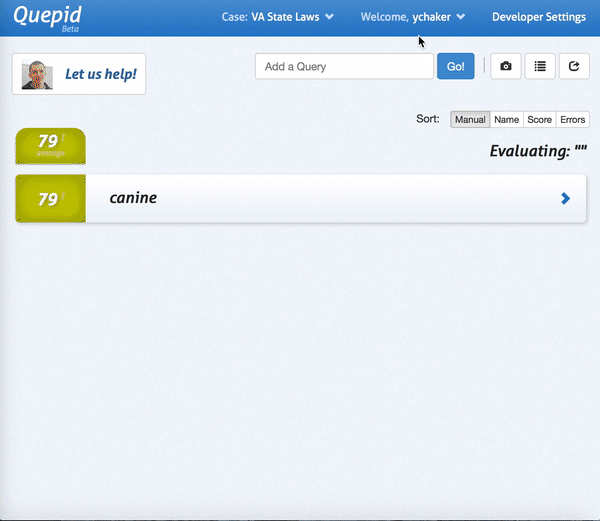
As you can see the **Case Header** is the summary of our **Case**. We are just starting our relevance journey, so we have **Try 1**, and the **Scorer** we have chosen is _AP@10_, otherwise known as Average Precision over the first ten documents returned for each query. We'll learn more later about the different types of Scorers. Click _Next_ in the wizard and then we'll highlight more the **Case Score**
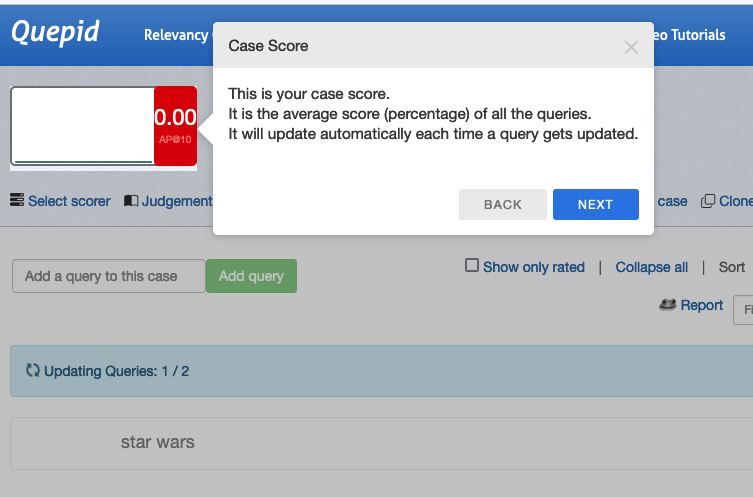
Since we don't have any judgements all of our scores are 0, so it isn't very interesting!
> In this tutorial we use the terms rating and judgment interchangeably. In the context of search relevance, both terms mean the same thing, i.e. a scaled label given to a document indicating the document's relevance to a given query.
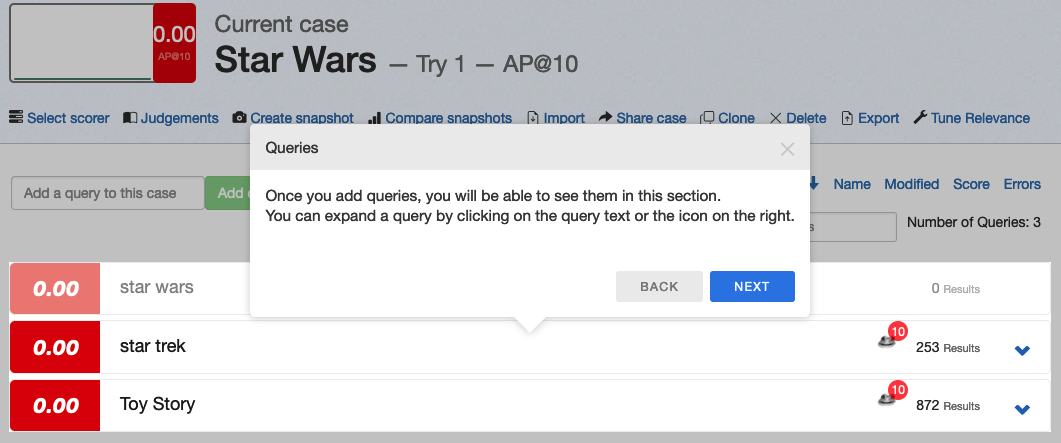
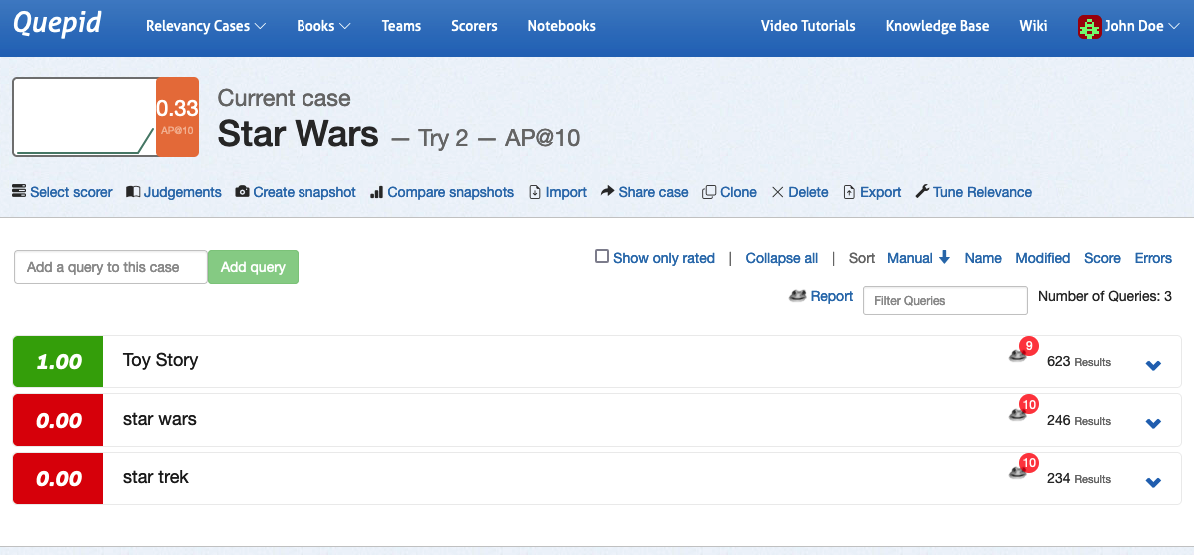
Moving on, we can now see the interface for adding new **Queries**. Go ahead and add the query _Toy Story_ as prompted.
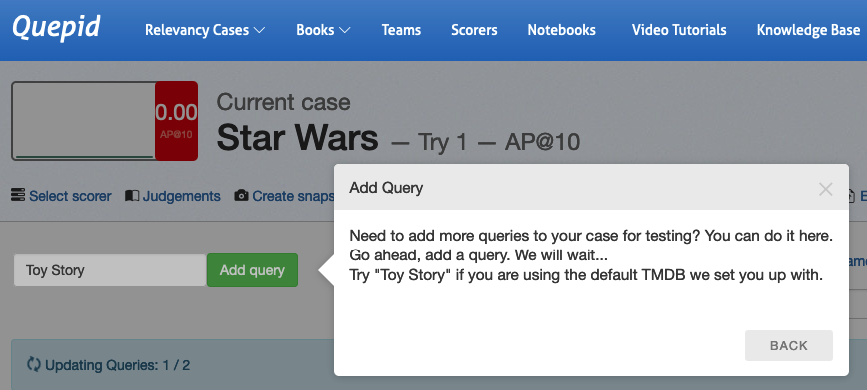
Now you can see that as you added the new query _Toy Story_, Quepid ran it and retrieved 872 matching results.
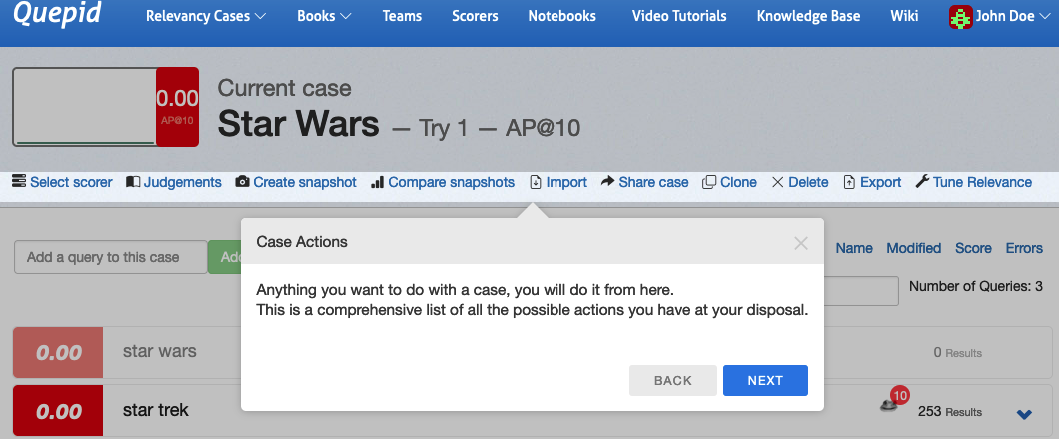
### Case Actions
Now, there are a large number of actions that you can perform on a Case. You will learn about them in future tutorials.
### Relevance Tuning Panel
To actually improve search we need to open up the Tune Relevance panel on the right hand side of Quepid by clicking _Tune Relevance_ link in the Case Actions row.
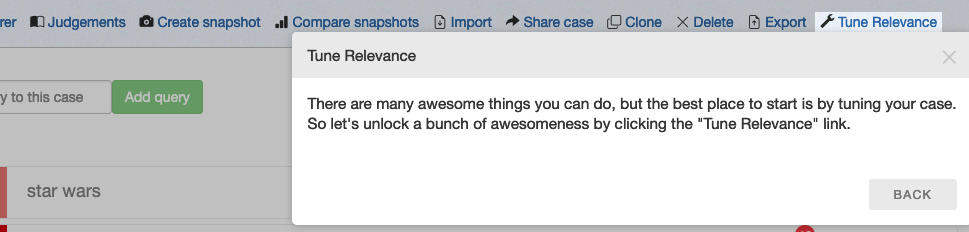
Which then opens up a panel on the right that exposes a rich set of options for playing with your search algorithm

Let's actually see if we can improve our query by instead of searching all the text via the `qf=text_all` clause, changing it to search just over the title and overview fields in the documents by setting `qf=title overview`. Then click the `Next` button and you will be prompted to click the blue `Rerun My Searches!` button. Click it to run with your new query fields defined.
Notice that the **Try** incremented? Quepid preserves a history of your changes via the **Tries**.
Congratulations! You have now set up your first **Case** in Quepid.
# Tuning Relevance
This tutorial assumes you have have finished the Setting Up Your First Case tutorial. It is split into two sections: Creating Judgements and then Tuning Relevance.
## Creating Judgments
In order to do relevancy tuning, you must have some judgements available to you to evaluate your search quality against.
> While you _can_ judge documents right in a Case, in general it's better to use a Book to manage the judgements and let Subject Matter Experts or Expert Users do the judging work!
### Making Binary Judgements
Let's start with the _star wars_ query by clicking it. The list of movies matching the star wars query will be shown. To the left of each movie search result is a gray box. We use this box provide a relevance judgment for each movie. Click the _Select Scorer_ link and click _P@10_. This allows us to make a binary judgment on each search result and label each as either relevant (1) or not relevant (0). Now, for each search result, look at the fields returned (that we selected when we created the case) and click the _gray box_. If you think this search result is relevant to the query click **Relevant**. Otherwise, click **Irrelevant**
 .
Congratulations! You have just provided a human judgment to a search result!
### Graded Judgements for Nuance
As you probably know, search relevancy is often not a binary decision. Sometimes one result is more relevant than another result. We want to see the movie _Star Wars_ returned above _Plastic Galaxy: The Story of Star Wars Toys_. Both movies are relevant, but the former is more relevant.
We'll now change the **Scorer** we are using to one that supports Graded Judgements. Click the _Select Scorer_ link and select the _DCG@10_ option and click the _Select Scorer_ button. With this scorer selected for our **Case** we can judge our search results on a scale of `0` (poor) to `3` (perfect).

> Don't worry about what the scorers actually mean - that is out of scope for us as a human rater. We will leave the scorers to the search relevance engineers!
Look at the title and overview of the first search result. Is this movie relevant for the query _star wars_? Click the gray box by the movie and make your selection. Is it a poor match, a perfect match, or somewhere in between? There is likely no correct answer - two people may give different answers and that's ok. What's important is that you take your time and provide your judgments consistently across queries and search results.
#### Who is keeping score?
As you assign judgments, you will likely notice the score at the top left of the page changes. It's important to remember you are not trying to get a high score, a low score, or any particular score. For our efforts as a rater we are not at all concerned about a score. The search relevance engineers will know what to do with the score! Just remember, it is not your goal or responsibility to have any influence on the score.
_The score is not a reflection of your efforts._
## Tuning Relevance
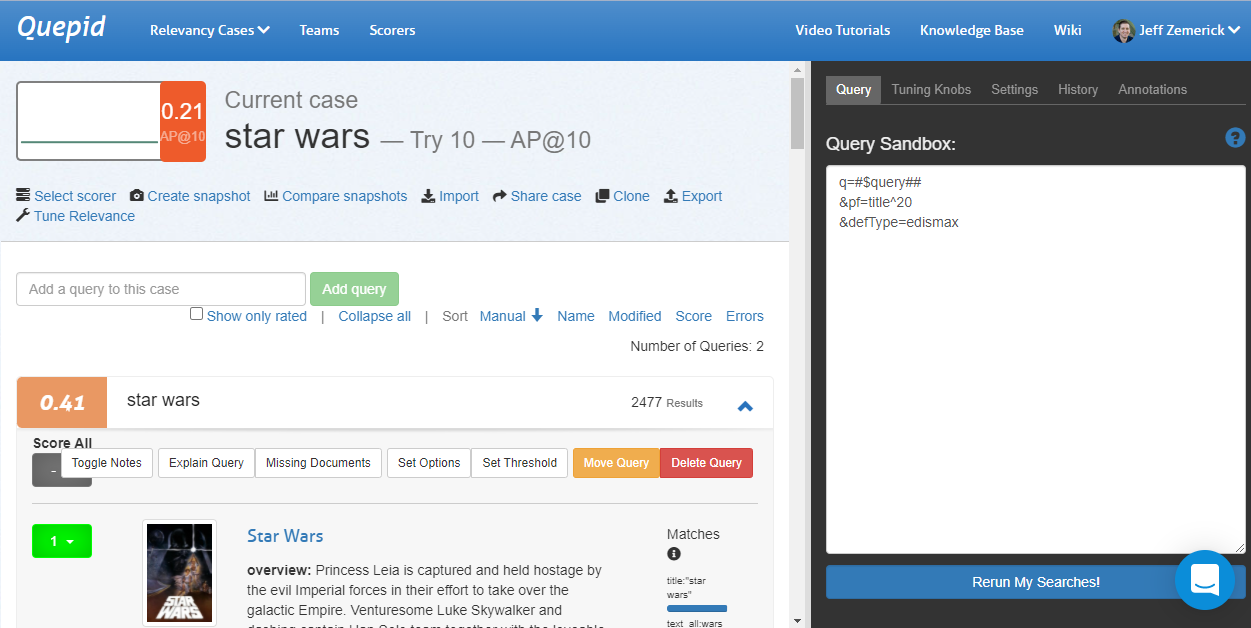
Now let's do some search tuning! Our _star wars_ query returns movies that are at least somewhat related to the Star Wars movies but we are probably wanting to see the actual Star Wars movies first instead of movies such as 'The Stars of Star Wars' and 'Plastic Galaxy: The Story of Star Wars Toys.' So let's do some tuning to see if we can improve our search results. We are using the AP@10 scorer. With our human judgments, our score for the current query is 0.21. Click the _Tune Relevance_ link to open the side window and the Query tab.
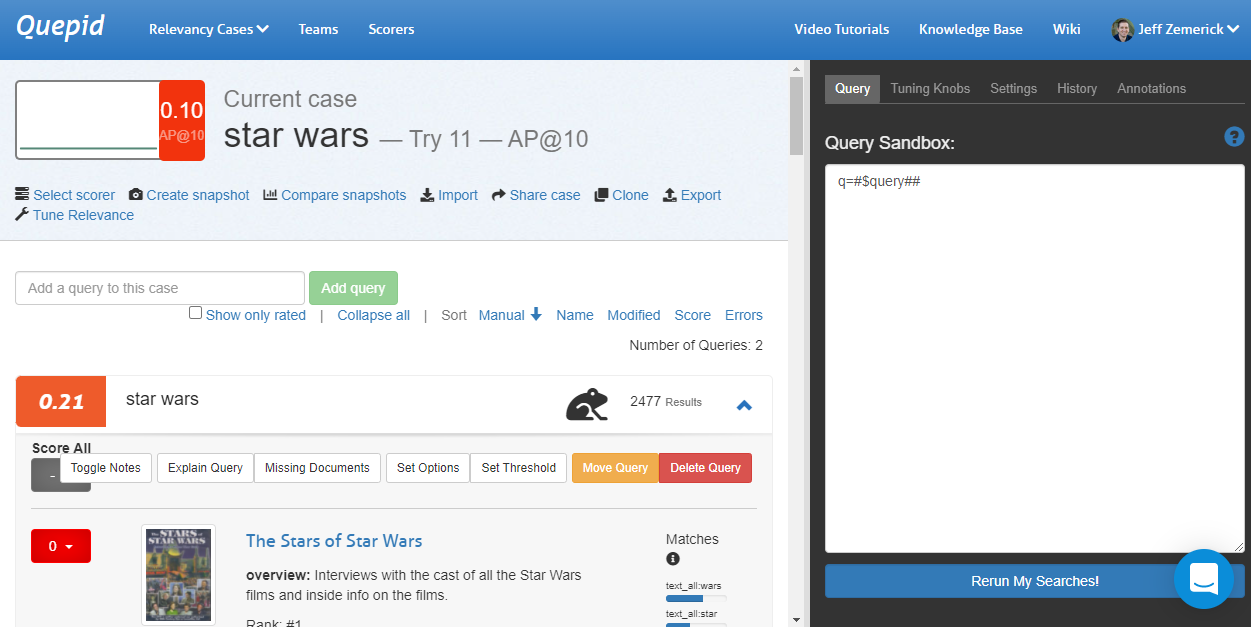
Let's use our search engineering knowledge to improve our query's score! Improving our search is heavily an experimental and iterative process. We may try some things that work and some things that don't work and that's ok! We can learn from what doesn't work in our iterations. To start, let's change our search to use phrase fields `pf` to boost results where the search query (star wars) appears in the title. We'll also use `edismax`. Now, our query looks like:
`q=#$query##&pf=title^20&defType=edismax`
Click the _Rerun My Searches_ button to run our new query. Let's look at our search results now. The first result is the movie Star Wars so that's great and an obvious improvement! The AP@10 score has increased to 0.41. The second movie is 'Star Wars Spoofs' and 'Battle Star Wars.' Are those movies what our searchers want to see? Probably not. The other Star Wars movies would be better results.
Let's iterate on our query and see if we can improve some more. What should we try? Maybe there are other fields in our schema that we could be using. The TMDB database has a`genres` field that contains a list of genres for each movie. We can try restricting our search results to just action movies using the `genres` field. This will help remove some of the irrelevant movies from the search results.
`q=#$query## AND genres:"Action"&defType=edismax`
This provides a huge gain in our score although we might have a few frogs indicating there are new results that have not been judged. Will we always know the user is searching for action movies? Maybe, maybe not - it depends on your use-case. This is just an example of how we can use Quepid to iterate on our queries.
#### What do the frog icons mean?
The little frog icon tells you that you have some documents for a query
unrated, and how many of them. The more unrated documents, the less
confident you can be as a Relevancy Engineer that you have accurate metrics.
### Understanding How the Query was Processed
It can be helpful to understand how the original user query was processed. Clicking the _Explain Query_ button will open a window that has some panes to help you understand what happened to the query. The first pane is the **Params** listing. It is showing exactly what parameters were sent to the search engine for the query, and can help you understand what other influences are made on the query.

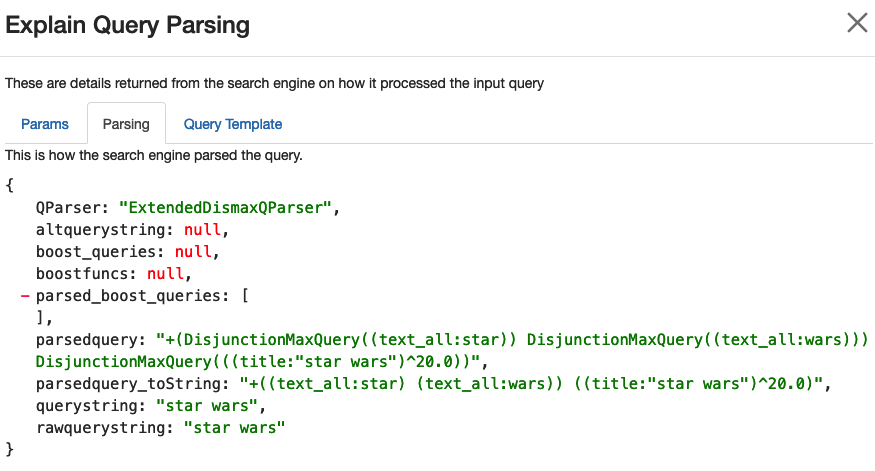
The second panel, **Explain Query Parsing** shows how the original user query was parsed into the final query. Especially for multi word queries you can see how they are expanded into a much longer query, and can help explain why some seemingly random documents might get match!
### Viewing the Query Tuning History
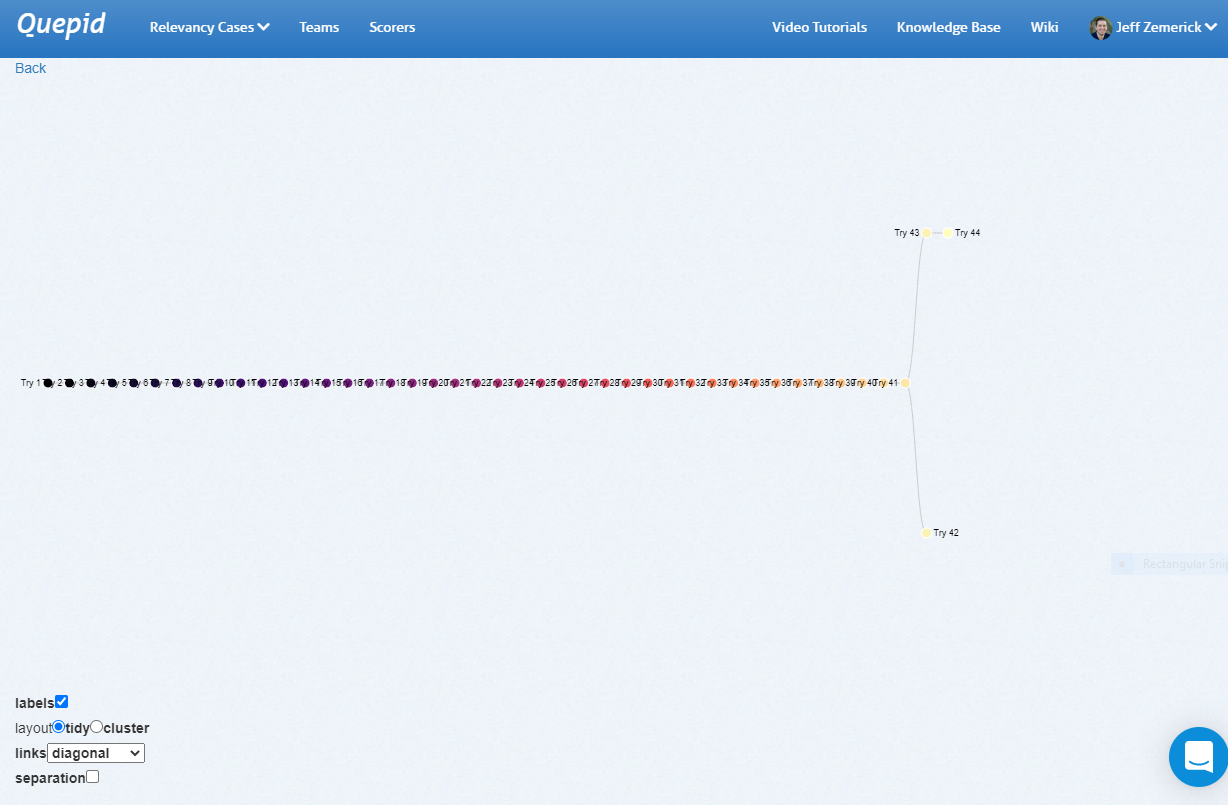
As we iterate, it can be helpful to see what we have previously tried. The **History** tab will show the history of our previous queries.

Since every **Try** is related to it's parent **Try**, you can visualize them in a tree format.
Under the _History_ tab at the top you will see a _Visualize your tries_ link. Clicking this link opens a new window that shows a visual representation of your query history. Hover over each node to see the query that was run. Clicking on a node in the visualization will re-run that query.
The history link visualization provides a powerful way to examine your previous queries. As part of Quepid's goal to reduce experiment iteration time, the history link visualization can help you reduce the iteration time by showing a comprehensive look at your past iterations and helping you to not inadvertently duplicate any previous iterations.
Here is an example of a straight line set of **Tries** that eventually branched:
## Measuring your Overall Progress
**Snapshots** are how Quepid lets you take a point in time and make it comparable to support seeing how things are changing. Is your search relevancy improving, is it declining? Snapshots provide you with that knowledge.
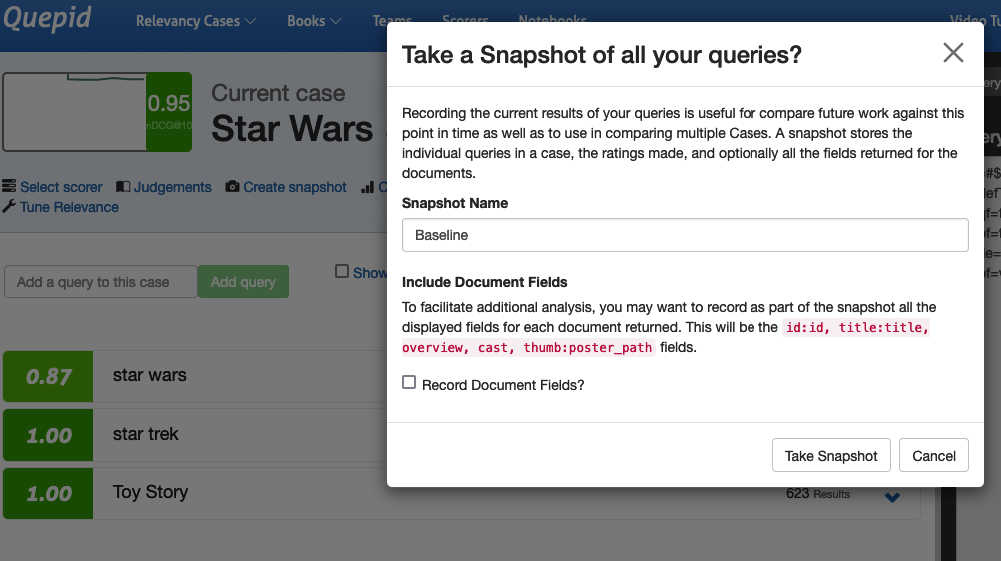
After changes to the query have been made and you are at a point where you would like to record your progress, click the _Create snapshot_ link. Give the **Snapshot** a name like _Baseline_.
Having snapshots available as you work will allow you to compare your progress over time.
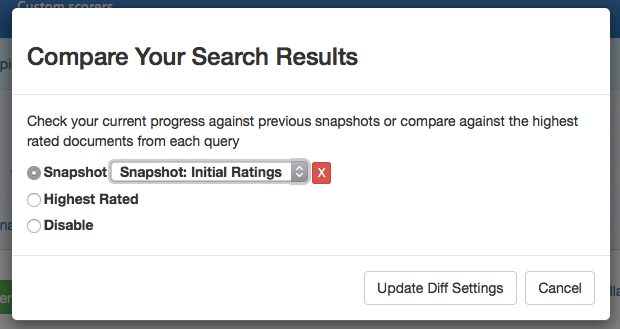
To compare snapshots, click the _Compare snapshots_ link.
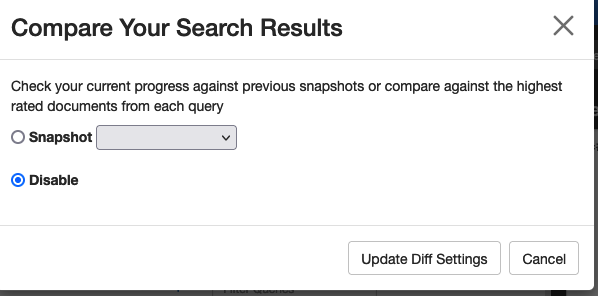
In the window that is shown, select the snapshot you want to compare against and click the _Update diff _settings button. Quepid will update the search results to show both sets to show the current search results against the previous snapshot.
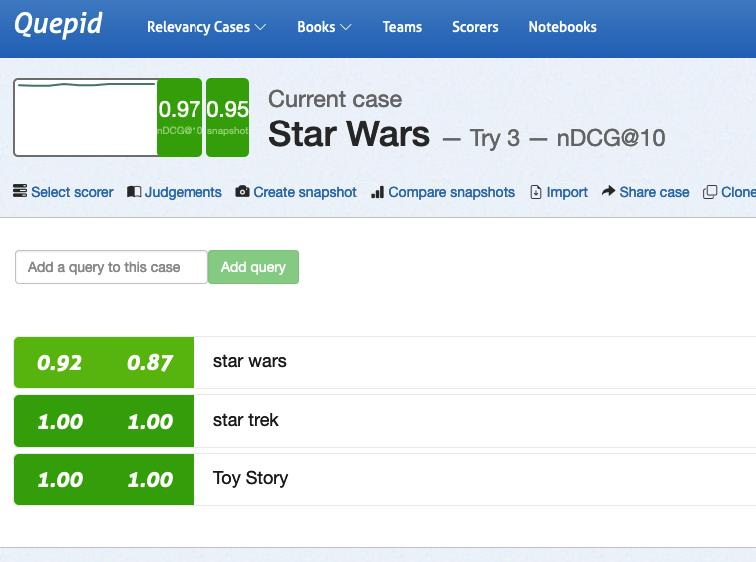
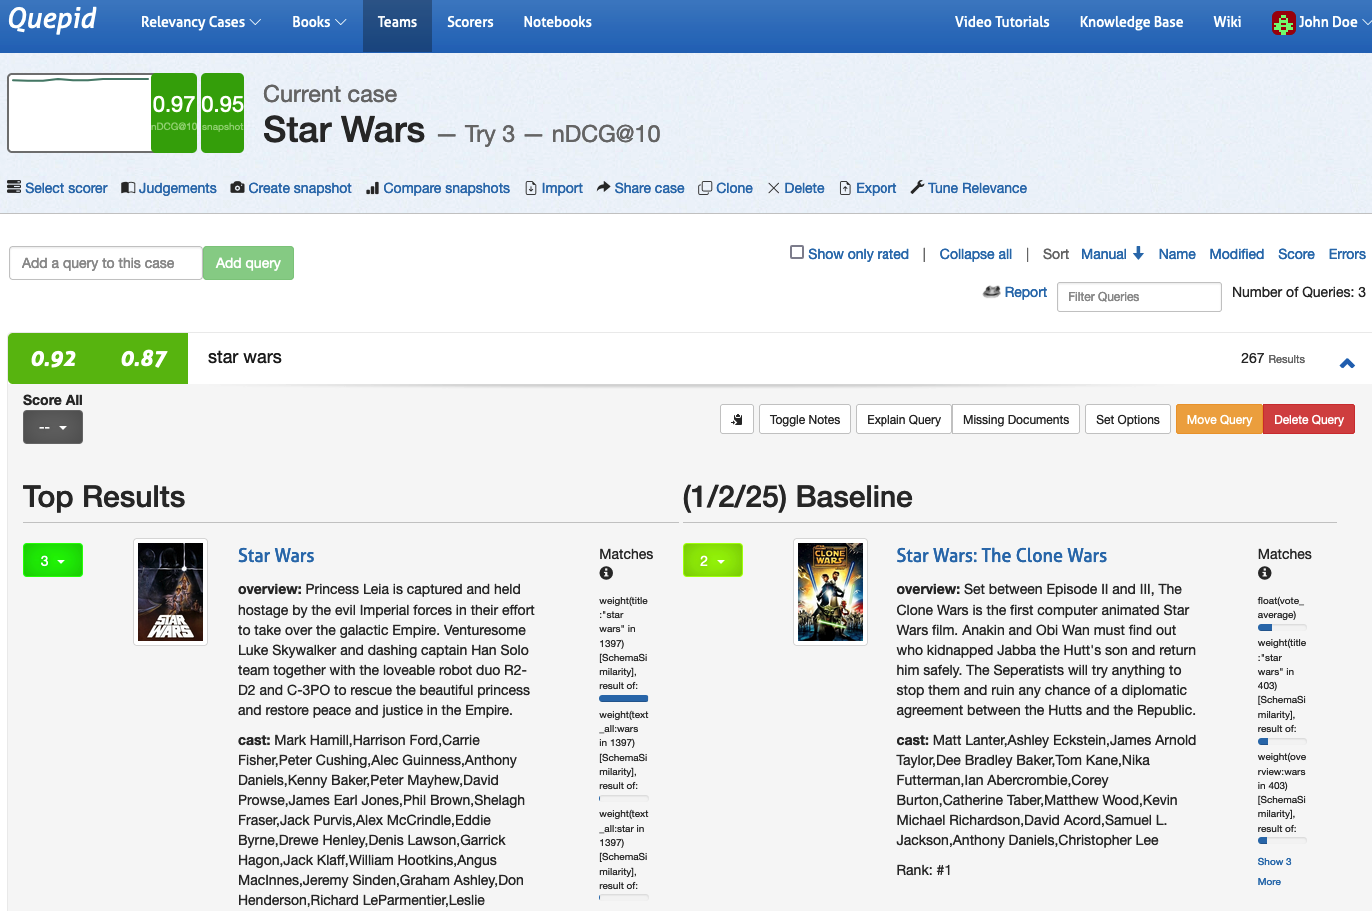
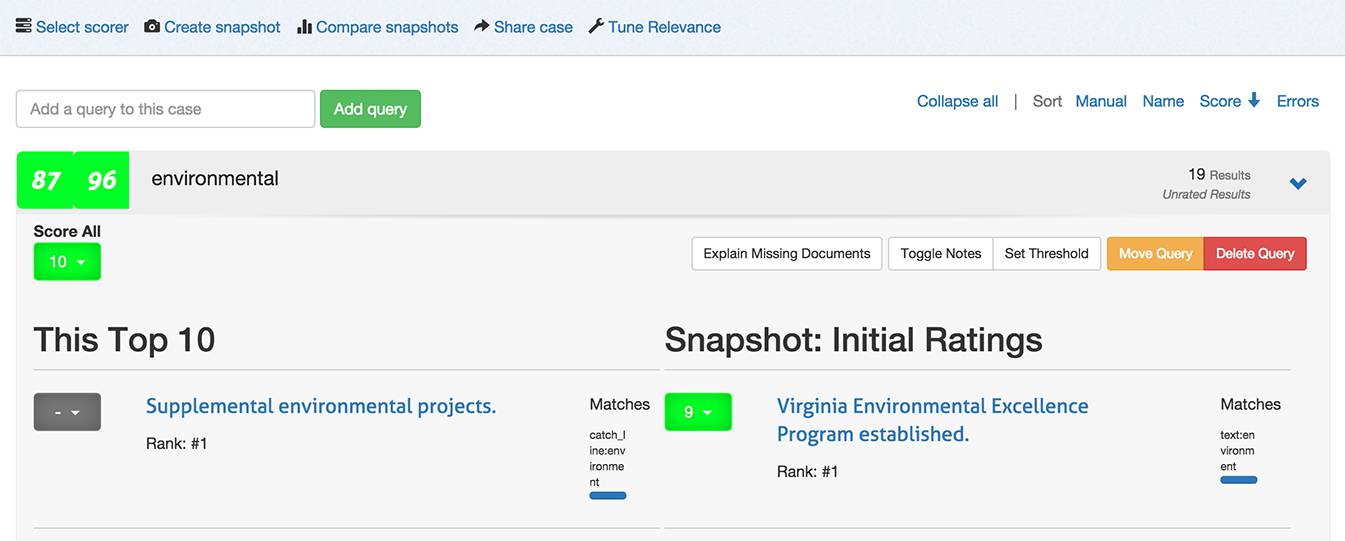
You can see that our current **Try 3** results is on the left, and the previously created **Snapshot Baseline** is on the right. The overall **Case** score bumped up by 2 points from .95 to .97 as measured by nDCG@10.
You can see that this was due to a five point improvement in the _star wars_ query. Opening the query, we can see that "perfect" movie _Star Wars_ moved to the top in Try 3, and pushed down the "good" movie _Star Wars: The Clone Wars_ from the first position.
To stop comparing snapshots, click the _Compare snapshots_ link and select the _Disabled_ option and click the _Update diff_ settings button.
Snapshot comparison is a powerful tool for quickly visualizing the difference in your queries and will assist in your future search tuning efforts. The comparison of the search metrics between these two snapshots provides feedback to the search team! The snapshots can be used to measure progress over time as your search team works to improve your organization's search relevance.
# Collaborative Judgements - Relevancy is a Team Sport
This tutorial assumes you have completed the previous tutorial, **Tuning Relevance**, and have set up a case with queries available. Here, we will guide you through setting up a collaborative environment to collect judgements from human raters.
## Why Collaborative Judgements?
In **Tuning Relevance**, we created judgements in the role of relevance engineers: We followed our intuition to classify a result as *relevant* or *irrelevant*. This method works well for small-scale projects, like rating the top 10 results for a few queries. However, for larger projects, this approach can introduce biases and become inefficient.
By involving a team of human raters, we can scale up and improve the quality of judgements. Human raters evaluate query/document pairs by considering the **information need** of the query.
## Information Needs
An [Information Need](https://en.wikipedia.org/wiki/Information_needs) is a conscious or unconscious desire for information. It helps raters evaluate whether a document satisfies the query's purpose.
For the _star wars_ case, let’s define the information need for three queries:
1. **star wars**: _The user wants to find movies or shows from the Star Wars franchise. Potentially relevant are documentaries about Star Wars._
2. **star trek**: _The user wants to find movies or shows from the Star Trek franchise. Potentially relevant are documentaries about Star Trek._
3. **Toy Story**: _The user wants to find movies or shows from the Toy Story franchise. Potentially relevant are documentaries about Toy Story._
## Adding Information Needs in Quepid
1. Open a query (for example _star wars_) and select _Toggle Notes_
2. Enter the information need in the first field and any additional notes in the second field:
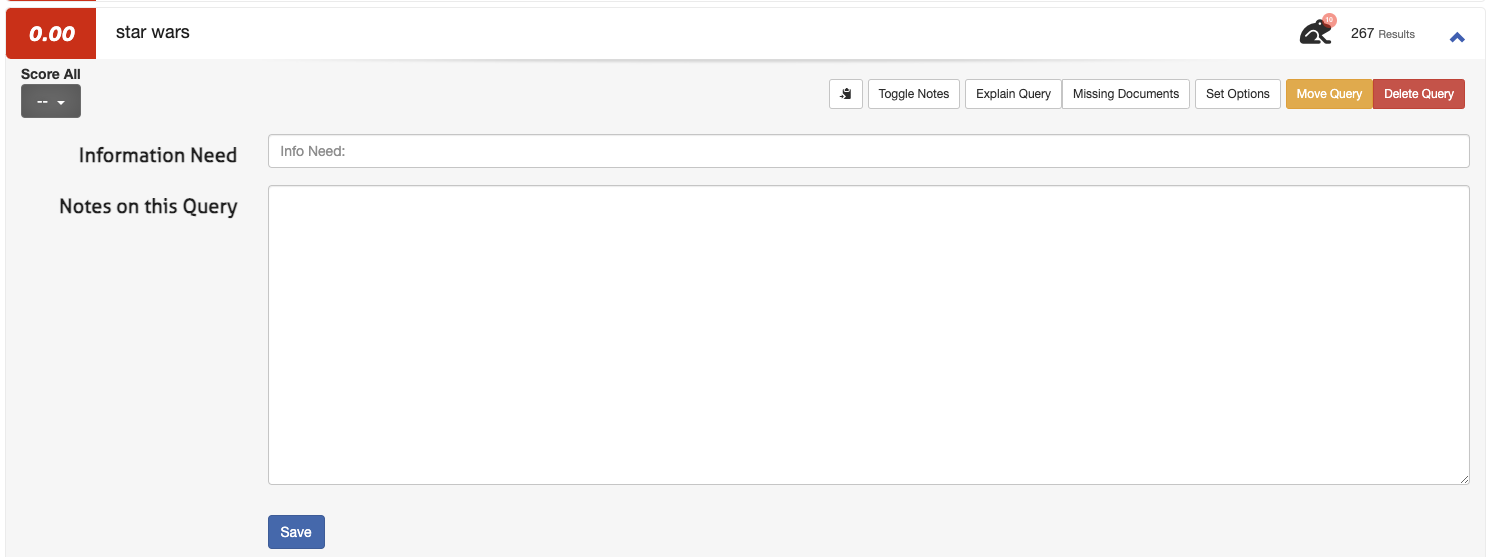
3. Click **Save**
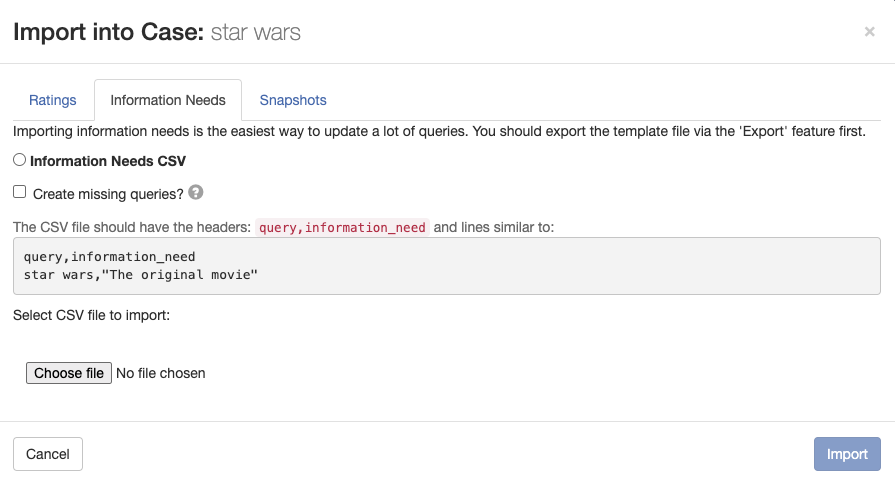
> **Note:** It's easy to define information needs for three queries. You wouldn't want to go that way for dozens, hundreds or more queries. Fortunately, Quepid has you covered! On the case interface you can open a modal to upload queries with information needs by clicking **Import** and selecting **Information Needs**.
> 
## Create a Team
Teams in Quepid allow users to collaborate by sharing information and cases.
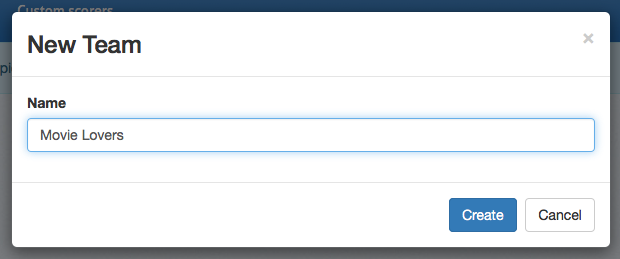
### Creating a Team
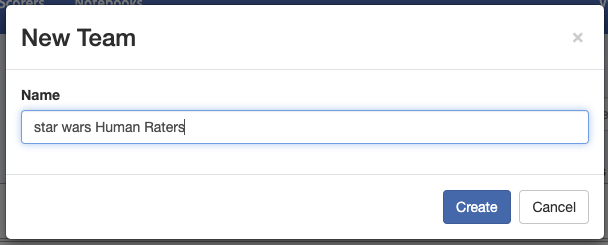
1. Go to **Teams** in the top-level navigation.
2. Click **+ Add New**.

3. Enter a team name (e.g., "star wars Human Raters") and click **Create**.
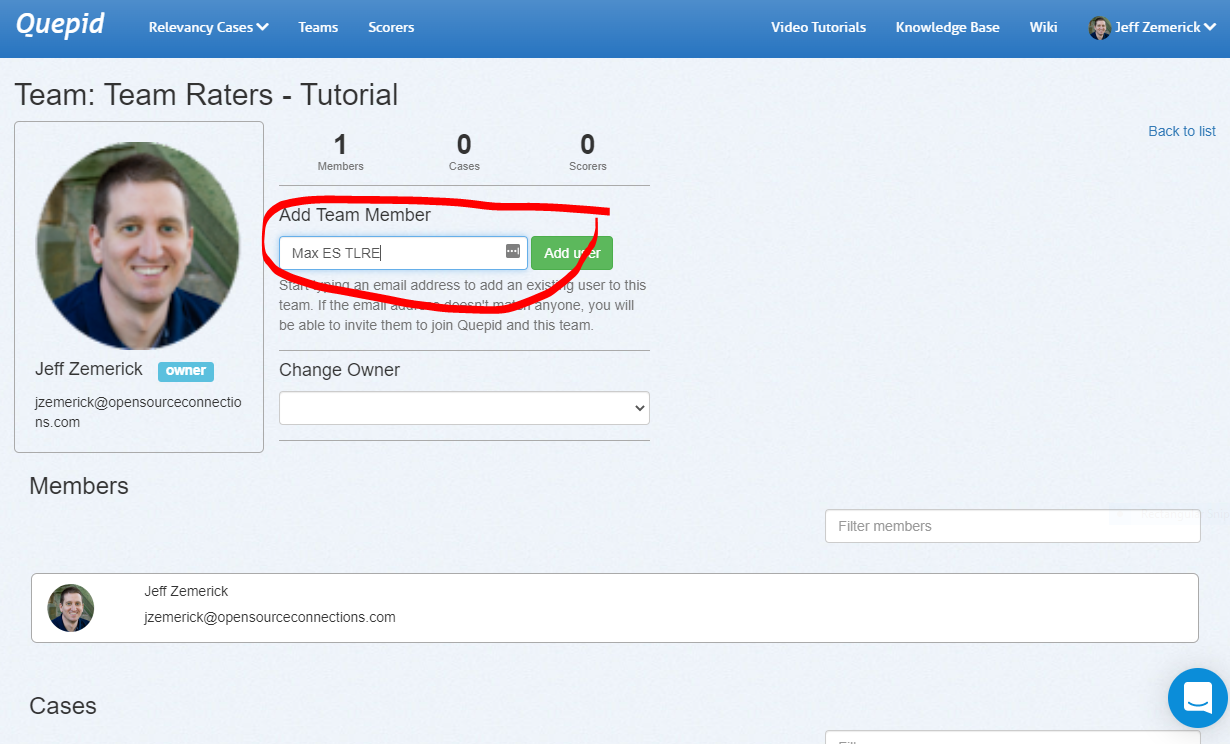
### Adding Team Members
1. Select your team from the overview.
2. Add members by typing their name or email in the input field. Every team member you want to add needs to have an active account in Quepid.
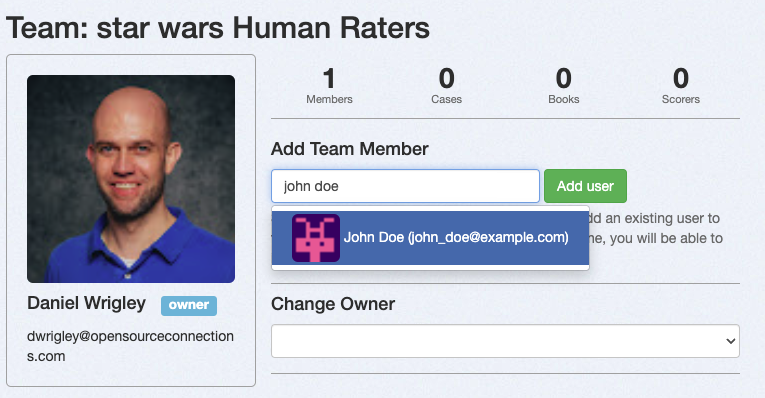
3. Click **Add User** to confirm.
> **Note**: Don't worry if you don't have any team members to add. A Team can consist of one member only as well. That way, you can continue following the tutorial and add team members once they're available.
## Share your Case with the Team
Sharing your case ensures all team members can access the queries, results, and judgements.
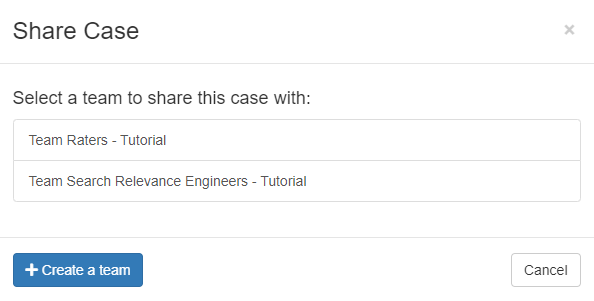
1. In the **Case Interface**, select **Share Case**.
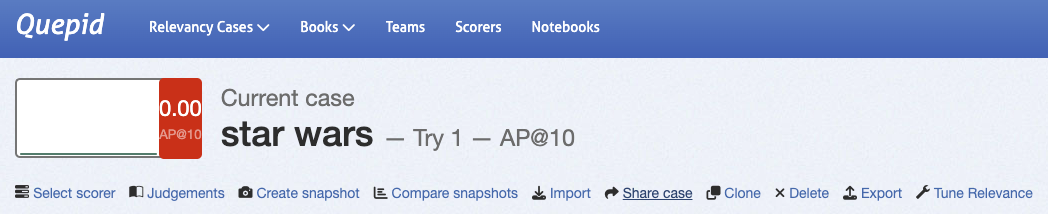
2. Choose the team to share with and confirm.
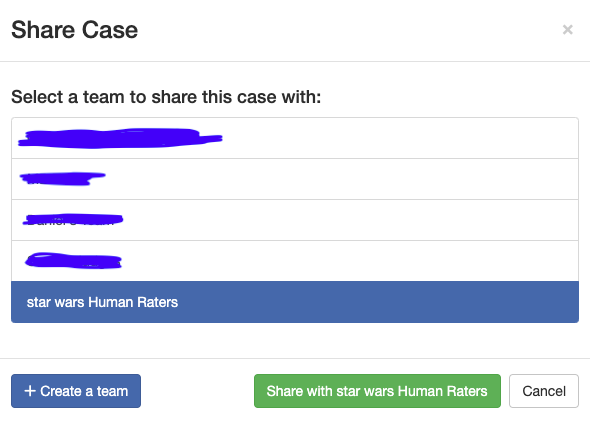
With that, every member of your Team has access to your case and can see the queries, the results, the available judgements, etc.
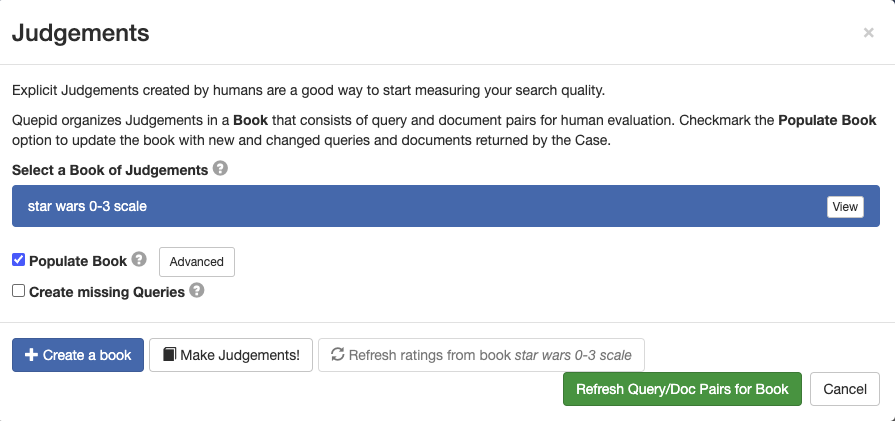
## Create a Book of Judgements
A **Book of Judgements** in Quepid allows multiple raters to evaluate query/document pairs following best practices.
### Creating a Book
1. Go to **Judgements** in the case interface and click **+ Create a Book**.
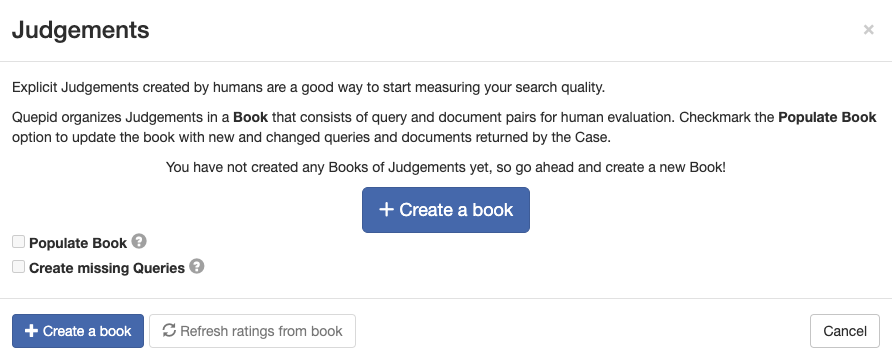
2. Configure the book:
- **Name**: Use a descriptive name (e.g., _Star Wars 0-3 Scale_).
- **Teams**: Share the book with your created team.
- **Scorer**: Choose a scorer (e.g., _DCG@10_ for graded judgements).
- **Selection Strategy**:
- _Single Rater_: One judgement per query/document pair.
- _Multiple Raters_: Up to three judgements per pair, enabling higher-quality assessments.
- **Other Settings**: Leave default unless specific needs arise.
3. Click **Create Book**.
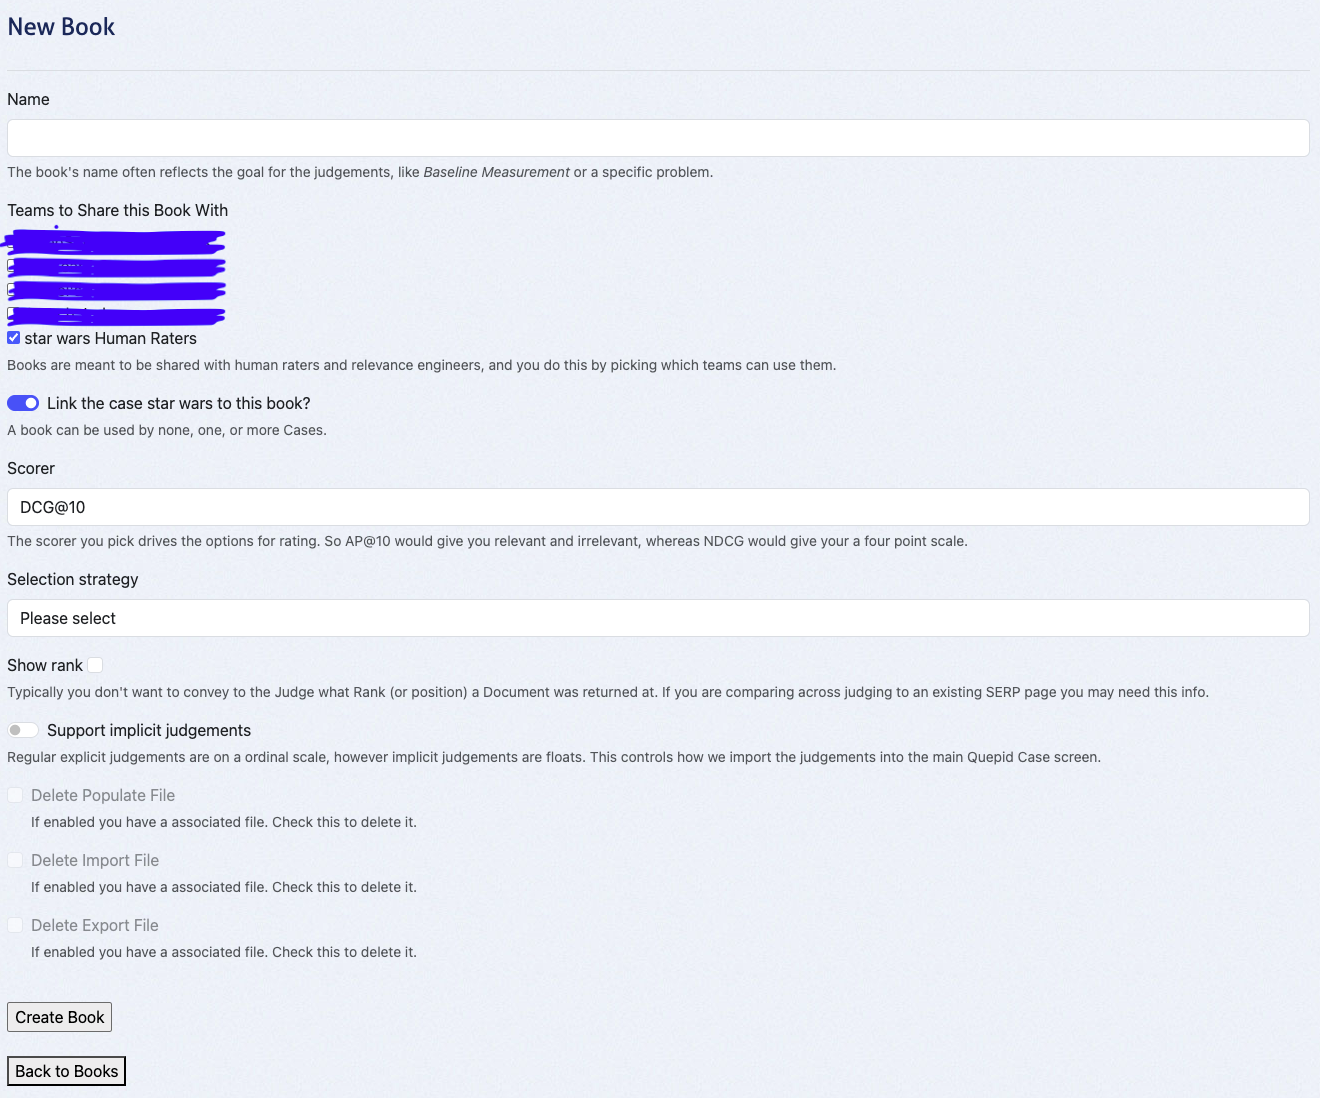
This action leads you to the overview page of your book:
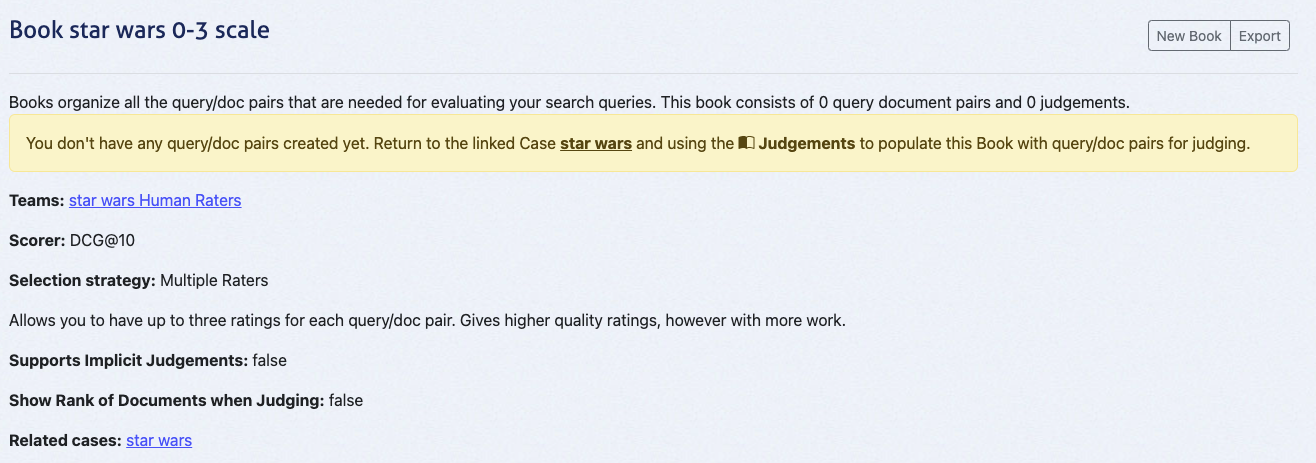
## Populate the Book with Query/Document Pairs
1. In the case interface, go to **Judgements**.
2. Select the created book (e.g., _Star Wars 0-3 Scale_).
3. Click **Populate Book** and confirm by selecting **Refresh Query/Doc Pairs for Book**.
This creates query/document pairs for the top 10 results of each query. For three queries, this generates 30 pairs.
### Verify the Number of Query/Doc Pairs in the Book
1. Navigate to the **Book Overview** via the Judgements tab.
2. Confirm the book contains the expected number of query/document pairs (e.g., 30 for our example).
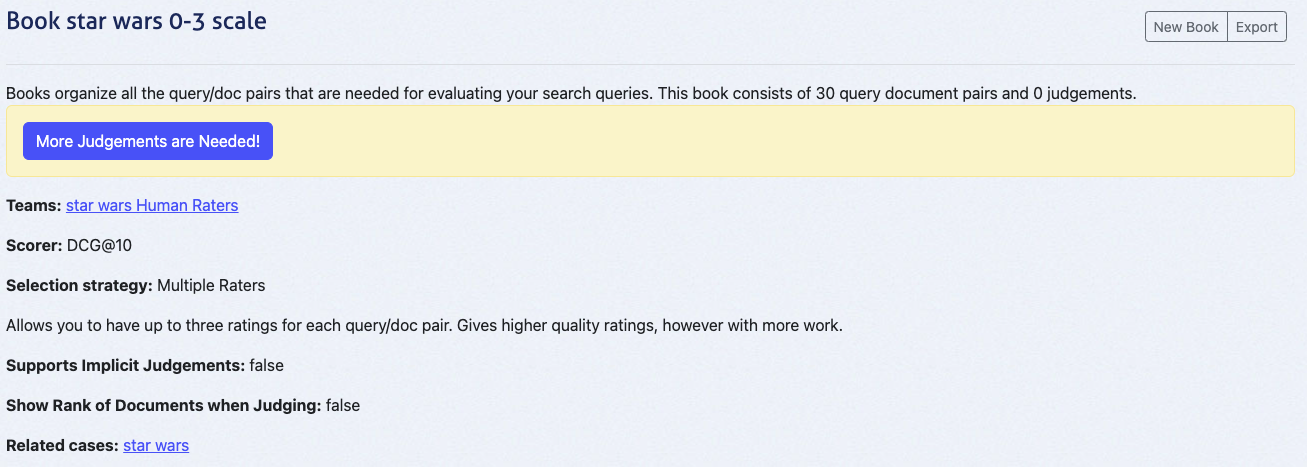
At this point, the book will display "0 judgements" since no ratings have been added yet. The next tutorial, **Quepid for Human Raters**, will cover the judging process in detail.
By following these steps, you’ve set up a collaborative environment for human raters in Quepid. This method scales efficiently, reduces bias, and ensures high-quality judgements.
Happy judging!
This tutorial builds on the previous one, **Collaborative Judgements**, and assumes you have already set up a book with query/document pairs ready for evaluation. In this guide, we will explore the **Human Rating Interface**, which is designed to streamline the process of assigning judgements to query/document pairs.
The role of a human rater is accessible to anyone with the right task description. No technical background is required—just the ability to assess how well a document matches the **information need** for a given query.
## Overview of the Human Rating Interface
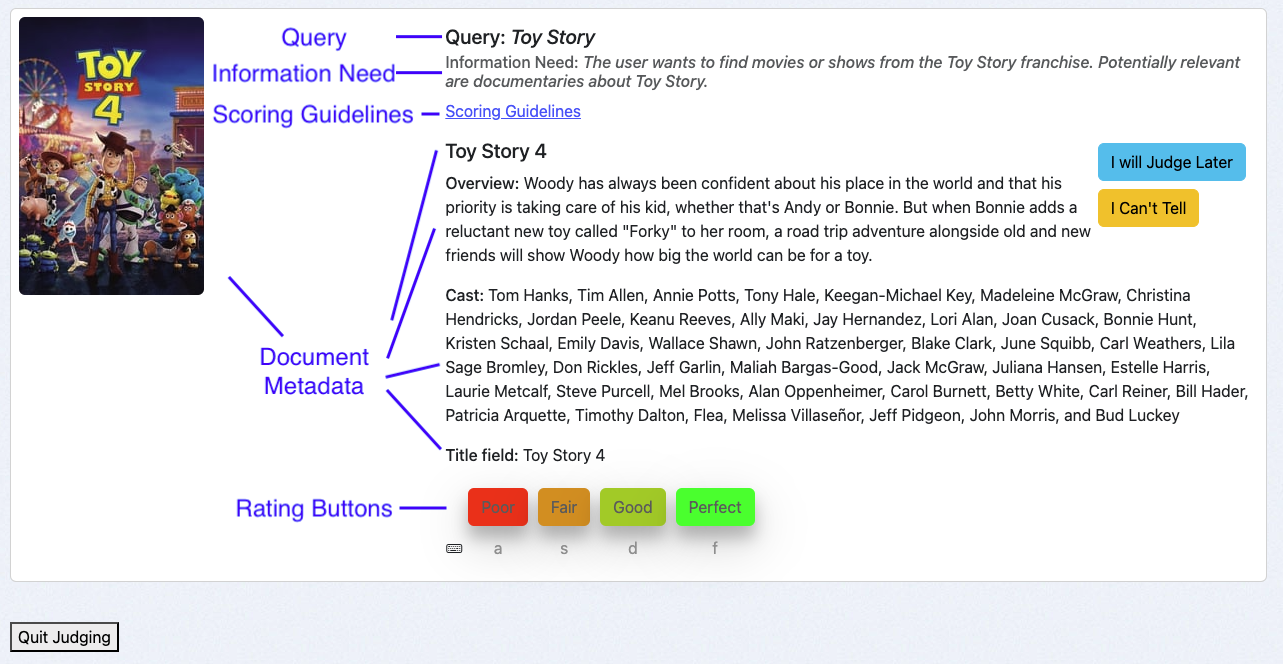
The **Human Rating Interface** is thoughtfully structured to assist raters in providing accurate and consistent judgements. The interface consists of the following key components:
1. **Query**: Displays the query associated with the query/document pair being evaluated.
2. **Information Need**: Highlights the specified user intent behind the query, guiding raters to make informed decisions.
3. **Scoring Guidelines**: Provides clear instructions for raters on how to apply the available grades to the query/document pairs.
4. **Document Metadata**: Shows relevant fields (for example title, cast, or an image) describing the document to be rated, which correspond to the return fields of the case.
5. **Rating Buttons**: Allows raters to assign judgements using a set of buttons. Below each button, keyboard shortcuts are displayed to improve efficiency and speed.
## Using the Human Rating Interface
As a human rater I access to the interface via the book overview:
1. Navigate to the case interface and click **Judgements**.
2. Click on **More Judgements are Needed!**.
The system will present a query/document pair that you haven’t rated yet and that requires additional judgements. This is determined by the Book’s selection strategy:
- _Single Rater_: A single judgement per query/doc pair.
- _Multiple Raters_: Up to three judgements per query/doc pair.
### Best Practices for Judging
To maintain consistency and ensure high-quality judgements, follow these best practices:
#### **1. Review Presented Information in a Consistent Order**
Evaluate the following elements sequentially for each query/document pair:
1. **Query**: Understand the user’s search intent.
2. **Information Need**: Identify the intent and expectations specified for the query.
3. **Document Metadata**: Assess the document’s relevance based on the provided fields.
#### **2. Refer to Scoring Guidelines**
Use the scoring guidelines and any additional instructions provided to maintain consistency across judgements.
#### **3. Use the _I Will Judge Later_ and _I Can’t Tell_ Options**
- If you’re unsure about a pair, use the **I Will Judge Later** button to skip and revisit it later.
- Select **I Can’t Tell** when you cannot judge a pair. This option allows you to provide an explanation, which can be invaluable to relevance engineers (e.g., to identify ambiguities or issues in the task description) and other team members.
#### **4. Take Frequent Breaks**
Judging can be mentally taxing. Regular breaks help maintain the quality of your work and reduce fatigue.
## Examples
Two examples to illustrate a **Perfect** match and a **Poor** match
### A "Perfect" Match
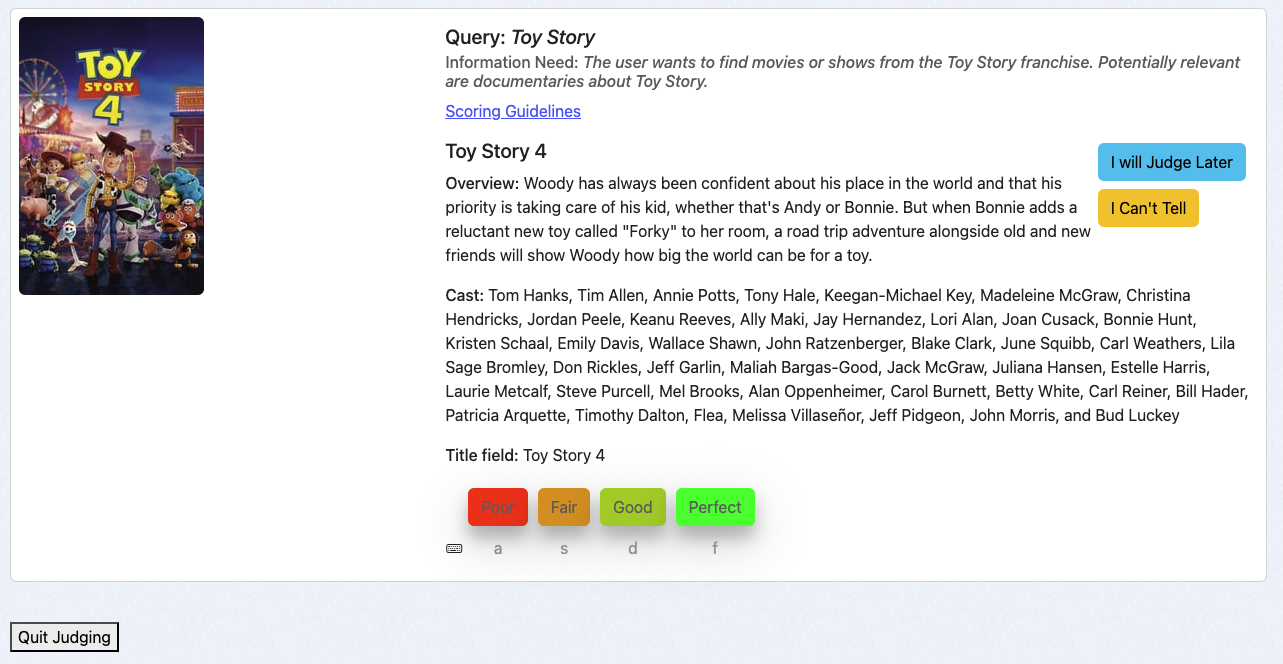
For the query **Toy Story**, the user intends to find movies from the Toy Story franchise. The document **Toy Story 4** is a movie from this franchise, making it a **Perfect** match.
To save this judgement in the Book:
- Click the **Perfect** button or
- Use the keyboard shortcut `f`.
### A "Poor" Match

For the same query **Toy Story**, the document **The Women of Brewster Place** is unrelated to the Toy Story franchise, making it a **Poor** match.
To save this judgement in the Book:
- Click the **Poor** button or
- Use the keyboard shortcut `a`.
### Next Steps
Now that you’ve explored the **Human Rating Interface**, your next step is to continue completing judgements for all available query/document pairs in your Book. Each judgement you provide directly contributes to improving the search experience, helping users find the information they need more effectively.
If you need a refresher on how query/document pairs are set up or the foundational concepts behind this process, revisit the **Collaborative Judgements** tutorial. It provides valuable context and ensures you’re fully aligned with the objectives of this task.
How-To Guides
# How to Deploy Quepid Locally
> This is for 8.2.1 or later
Standing up Quepid locally when you have Docker is very simple. You only need to grab a Docker Compose template from the Quepid Github repo:
```
curl https://raw.githubusercontent.com/o19s/quepid/refs/heads/main/deployment/quepid-docker-deploy/docker-compose.yml > docker-compose.yml
```
1. Update `docker-compose.yml` to set the version of Quepid (like `o19s/quepid:8.2.0`) that you want to run. See [https://hub.docker.com/r/o19s/quepid/tags](https://hub.docker.com/r/o19s/quepid/tags) for a list of all the released versions of Quepid!.
2. Start Quepid: `docker compose up`, append `-d` to have it run as a background process.
3. Go to http://localhost and register your user.
4. Grant your user admin permissions via: `docker compose exec app bundle exec thor user:grant_administrator EMAIL`
To stop Quepid run `docker compose down`.
Your data is stored in MySQL in the `./volumes/myssql_data` directory between usages.
Quepid can be deployed on your own hardware using Docker. The [Installation Guide](https://github.com/o19s/quepid/wiki/Installation-Guide) will walk you through the deployment and creating users.
_This page needs updating_.
_Make sure it's a howto and not a reference_
# How to configure Quepid for SSL and HTTPS
> These directions assume you haven't enabled sending emails from Quepid. If you send emails you MUST set your public url as `QUEPID_DOMAIN` so that links are properly created.
## Running Quepid Directly on HTTP
When deploying Quepid in a development or internal environment where HTTPS is not required, you can run the application directly on HTTP without any special configuration. Simply leave both `FORCE_SSL` and `ASSUME_SSL` unset (or set to false), and do not set `QUEPID_DOMAIN`. Rails will generate relative URLs for all assets and in-app links, which will automatically use the HTTP protocol of the current request. This configuration is suitable for local development, internal networks, or testing environments where SSL termination is not a concern.
## Deploying Behind an SSL-Terminating Reverse Proxy
For production deployments where Quepid runs behind a reverse proxy like nginx or Apache that handles SSL termination, set `ASSUME_SSL=true` and configure `QUEPID_DOMAIN` to your public domain (e.g., quepid.example.com). The `ASSUME_SSL` setting tells Rails to trust the `X-Forwarded-Proto` header from your proxy and generate HTTPS URLs even though Quepid itself is running on HTTP internally. Your reverse proxy should be configured to set the `X-Forwarded-Proto: https` header when forwarding requests. This is the recommended configuration for most production deployments, as it allows your infrastructure to handle SSL certificates and termination while Quepid generates all public-facing URLs with the correct HTTPS protocol.
## Using QUEPID_PROTOCOL for Proxies Without Header Support
Every once in a while you are behind a load balancer that doesn't set the `X-Forwarded-Proto` header, and then Quepid will assume `http`. In that case you need to use `QUEPID_PROTOCOL=https` as an explicit override. Set both `QUEPID_DOMAIN` to your public domain and `QUEPID_PROTOCOL=https`, and leave `ASSUME_SSL` unset. This tells Rails to always generate HTTPS URLs for assets and emails regardless of the incoming request protocol or headers.
This configuration is useful for legacy proxy setups, CDNs, or load balancers that don't properly forward protocol headers, ensuring that all generated URLs use HTTPS even when Rails cannot automatically detect it from the request context.
# How to Configure Login Options
You can log into Quepid in a number of ways, including with email/password, or using oAuth providers like Google Auth or Keycloak.
## Disabling Email/Password Sign In
By default `.env` file contains:
```
# Whether or not signing in via email/password is enabled.
EMAIL_SIGNIN_ENABLED=true
```
Setting it to `false` prevents you from being able to sign in using an email/password combination.
## OAuth
Quepid uses [OmniAuth](https://github.com/intridea/omniauth) for authenticating users against other resources besides it's own email/password database. OmniAuth provides an easy way to authenticate against dozens of outside services. The only ones that are packaged with Quepid are Google and Keycloak, but it's fairly easy to add new ones.
Learn more about setting up Google oAuth at https://support.google.com/cloud/answer/6158849?hl=en.
The built in options are `GOOGLE_CLIENT_ID`, `GOOGLE_CLIENT_SECRET`, `KEYCLOAK_REALM` and `KEYCLOAK_SITE`.
The OmniAuth providers are defined in `config/initializers/devise.rb`. A list of available providers can be viewed on the [OmniAuth Wiki](https://github.com/intridea/omniauth/wiki/List-of-Strategies). To enable a provider you need to add the gem (eg. `omniauth-facebook`) to the `Gemfile` and configure in `devise.rb` and `user.rb`
The existence of `GOOGLE_CLIENT_ID` or `KEYCLOAK_REALM` enables the respective sign in option.
### Keycloak Setup Details
Quepid has a basic Keycloak config file in `/keycloak/realm-config/quepid-realm.json` that is used for development purposes.
We have a Realm called `Quepid`, and it includes a Client called `quepid`. The client is where the specific configuration for how Quepid interacts with Keycloak via oAuth is set up.
We *assume* that the client definition in Keycloak will be named `quepid`, you can't change that. You can pick your Realm name however.
Keycloak 17+ removes the `/auth` portion of the url. If you are using earlier versions of keycloak, you need to set `base_url:'/auth'` in `devise.rb`.
# How to Configure Sign Up Options
In some environments we want to preload the users and only allow those users access to Quepid. This could be applicable to environments with sensitive data like that containing PII. We would not want to allow just anyone to sign up.
By default `.env` file contains:
```
# Whether or not signing up via the UI is enabled.
SIGNUP_ENABLED=true
```
Setting it to `false` prevents you from being able to create an account via the UI.
Instead, an administrator needs to load the user accounts directly into Quepid by using the Thor command line tool. See Quepid Admin CLI in Reference section.
# How to Add a Recency Scorer
A **Recency Scorer** lets you understand the average age of the content you are returning.
1. Go to the Scorers page and choose `Add New` to create the new Scorer.
2. Give it a meaningful name like _Recency_ or _Age of Product_ that works for you.
3. For the actual JavaScript code, start with this basic scorer:
``` javascript
const k = 10; // @Rank
let rank = 0;
let score = 0;
baseDate = new Date("2023-08-15").getTime();
eachDoc(function(doc, i) {
docDate = doc['publish_date'];
const diffTime = (baseDate - new Date(docDate).getTime());
const diff = Math.ceil(diffTime / (1000 * 60 * 60 * 24));
score = score + diff;
rank = rank + 1
}, k);
score = rank > 0 ? score / rank : 0.0;
setScore(score);
```
4. We need to specify what field in the docs has the date field. Change the *publish_date* to your date field.
5. In order to calculate a recency score, we have to decide what is out of date, and that is the `baseDate`. In this example, we have a "frozen" index, so we hard code the base date to 2023-08-15. To use today as your date, you can use `Date.now()`.
6. Since this is a calculated scorer, not one based on ratings, you can ignore the scale settings for this scorer.
***
1. Go to your Case and choose `Select scorer`.
2. You should see the Recency scorer you created listed, pick it for your case and it will run.
3. If you get 0's, make sure that in the field spec you have the date field included, in our example it is `publish_doc`.
4. If you are using Solr, you can test out the scorer by forcing it to sort by recency by adding `&sort=date_released desc`.
5. The lower the score, the more recent the average of the docs being returned.
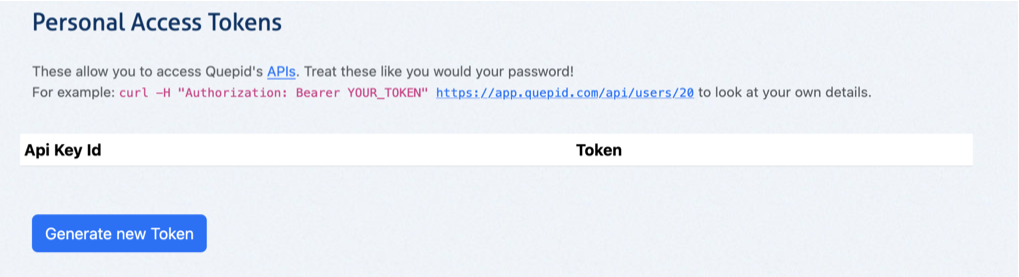
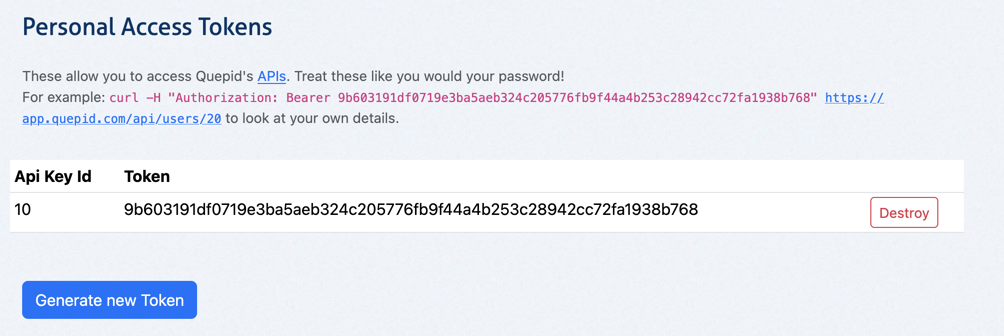
# How to Create a Personal Access Token for API Access
Quepid has a rich set of APIs that let you manipulate all the data in Quepid. To ensure that when you access the APIs you are following the correct permissions structure you have to set up a Personal Access Token.
1. In the top right click on your user icon and from the drop down menu choose **My Profile**.
2. Scroll down to the **Personal Access Tokens** section.
3. Click **Generate New Token** to create a Personal Access Token.
4. You will see an example similar to `curl -H "Authorization: Bearer 9557fac2245f8b5a52897e2ee9dca010dd8f4288c678adb15d43682ef12a4a0f" https://go.quepidapp.com/api/users/20` of how to use the generated token in Curl.
The Personal Access Token is sometimes referred to as a Bearer Token.
# How to Include Images
Image formatting rules are specified via the **Field Specification** defined for a Case.
Assuming you have the full path to the image stored in your search index, then you can specify in your field spec that you either want a thumbnail size image via `thumb:product_image_url` or you can get a larger image via `image:product_image_url`.
Now, if you have relative URL's defined such as `poster_path` then you can specify in the Field Specification a JSON formatted specification:
```json
{
"name": "poster_path",
"type":"thumb",
"prefix": "https://www.example.org/images/thumbs"
}
```
You can specify the `type` as either `thumb` or `image`.
> You literally put the JSON on one long line in the field spec in your try!
### Multiple Images
Quepid can only show a thumbnail and a regular size image, you can't have multiple images or multiple thumbnails. So in that case, index one image as your "hero" image and reference that field.
### Images in Books
When you populate a book, Quepid consults the Field Specification to figure out how to format the links for the images in the Rating interface. It then uses that in the Book judgement interface.
# How to Run a Case Nightly
Running a Case on demand is great when you are debugging an issue, but stinks when you want to build up a profile for how a Case is doing over a period of time! Fortunantly Quepid can do this.
> To use the Nightly feature, the Quepid server MUST be able to connect directly to the Search Endpoint.
1. Go to the Case page and click Tune Relevance.
2. Choose the Settings tabs and scroll down till you see the Evaluate Case Nightly option: 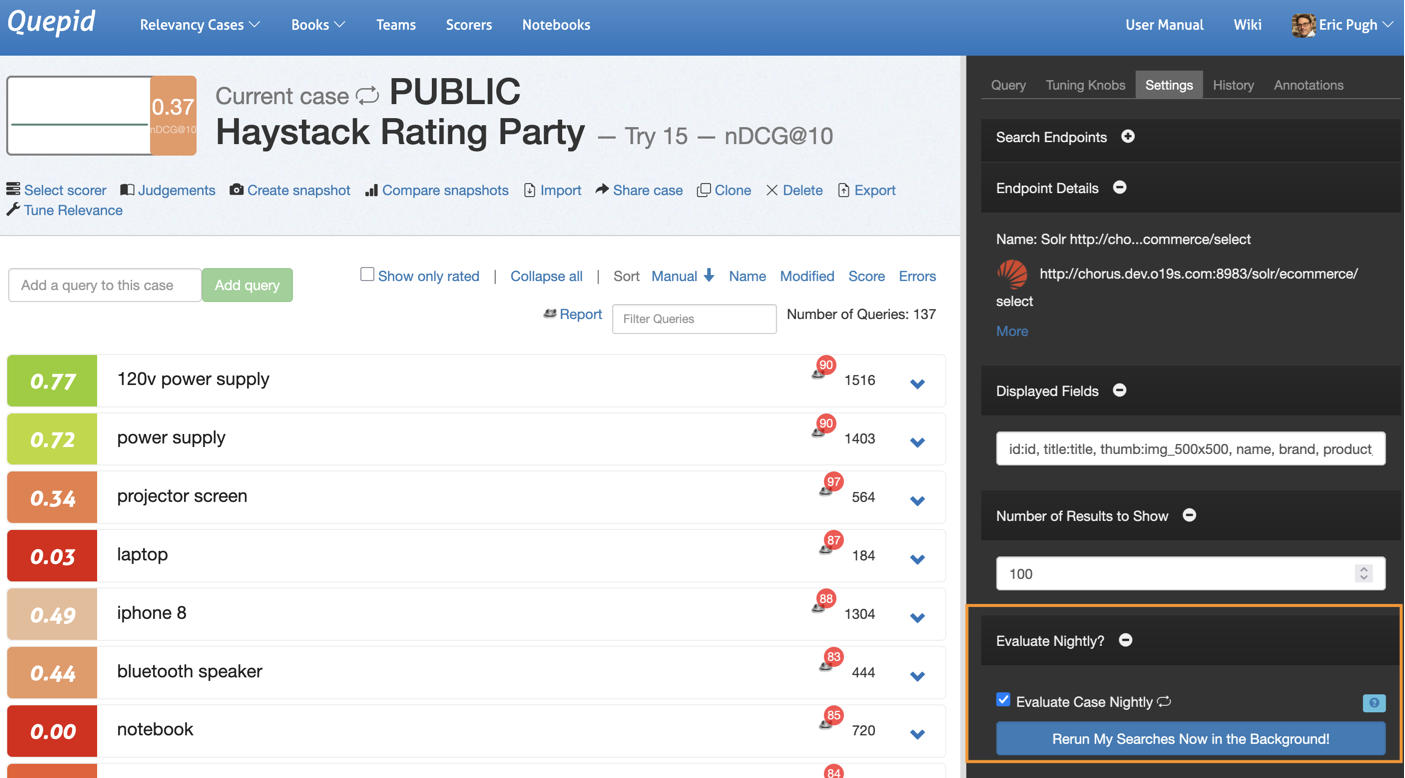
3. Check box the icon and then you will see a "nightly looping" icon flip on next to the Case title: 
4. You can test if the case works in background mode by clicking _Rerun My Searches Now in the Background_ button. This will pop you back to the homepage where you will see some messaging for the case that the queries are being run.
5. The Case will be run every night. Each nightly run produces a new Score and a new Snapshot. However, to prevent blowing up the database, we only store the last five Snapshots! We do keep all the Scores. 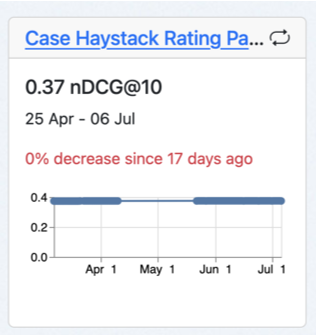
# How to Manage API and Proxy Limits
[Video Walkthrough](https://share.descript.com/view/G0ozoslB2xu)
Have a Case with 100's or 1000's of queries?
Are you hitting API or proxy server limits? Nervous about overloading your search engine with too many requests too quickly? Never fear, that is what the Requests Per Minute setting on a Search Endpoint is for.
Go to the Search Endpoint page and specify how many Requests Per Minute you want to send. 60 means you send one request per second. 600 means 10 per second.
One thing to keep in mind is if you set up a Case to run nightly, or you ask the case to run in the background, then the queries are run in a single threaded one after the other fashion because it's a background process. In that situation the Requests Per Minute don't apply (and are not needed!).
## Prerequisites
1. You have an active Elastic Cloud account
2. You have a deployment with a searchable index
This how to describes the three necessary processes to connect Quepid to your Elastic Cloud deployments:
1. Configure Elastic Cloud deployment to accept browser requests from Quepid
2. Create an API Key in Elastic Cloud
3. Connect Quepid to Elastic Cloud with the appropriate settings
## Configure your Elastic Cloud deployment to accept browser requests from Quepid
1. Log into your Elastic Cloud account at https://cloud.elastic.co/home.
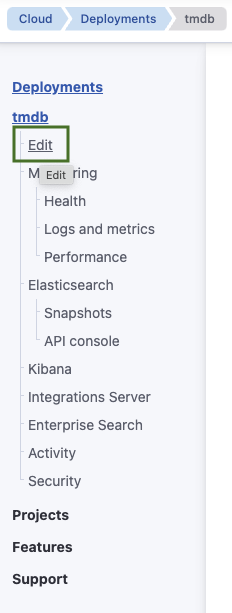
2. Select **Manage** next to the Deployment you want to connect Quepid to.

3. Under your deployment name select **Edit**.
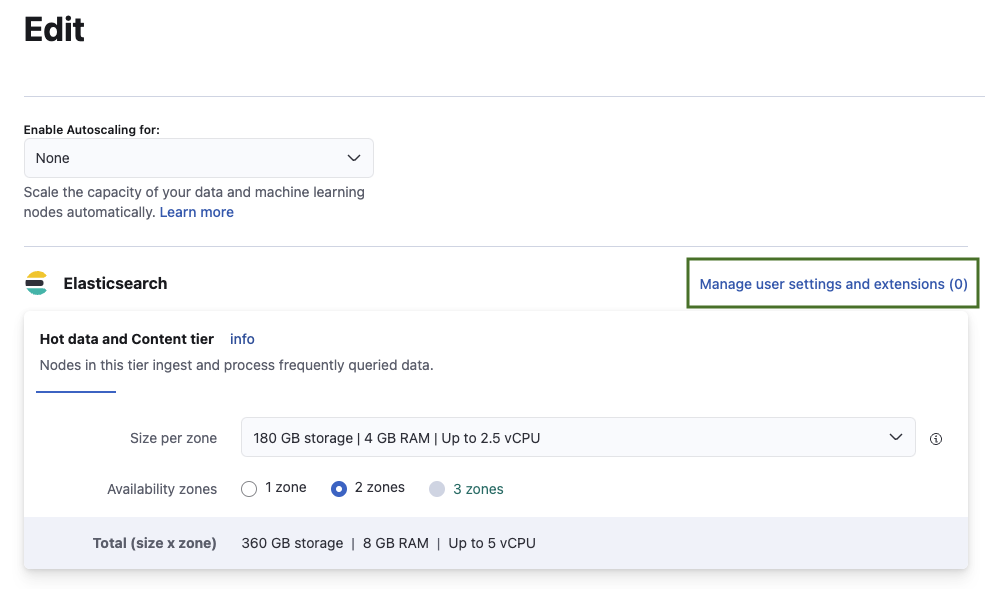
4. Select **Manage user settings and extensions**.
5. Enable and configure CORS with the following settings when connecting to the public Quepid service running at https://app.quepid.com. Change `allow-origin` accordingly when running Quepid on `localhost` or any other host.
```
http.cors:
enabled: true
allow-origin: /https?:\/\/go\.quepidapp\.com/
allow-credentials: true
allow-headers: "X-Requested-With, Content-Type, Content-Length, if-modified-since, Authorization"
```
6. Select **Back** and scroll down to the bottom of the page to confirm and save the changes by selecting **Save**.
7. This triggers a restart of your deployment. Wait until the restart finishes.
## Create an API Key in Elastic Cloud
To authenticate requests to the Elastic Cloud deployment follow these steps:
1. If not logged in, log into your Elastic Cloud account at https://cloud.elastic.co/home.
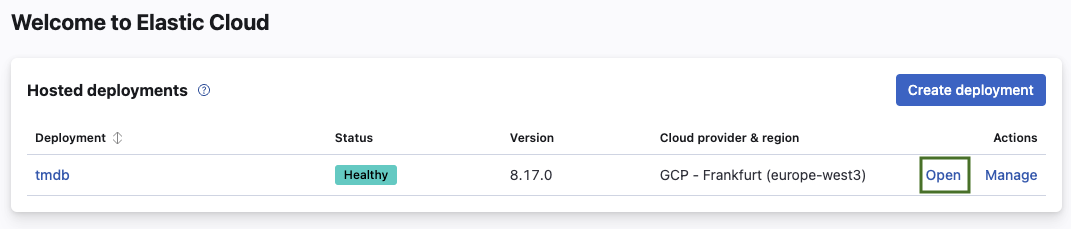
2. Select **Open** next to the Deployment you want to connect Quepid to.
3. Select the **+ New** button.

4. Choose a descriptive name (for example **Quepid**) and choose the settings appropriate to your desired security guidelines or requirements.
5. Create the API Key by selecting **Create API Key**.
6. Your created API should look similar to the following JSON snippet:
```
{
"id": "zbeFaZQBMjrfbP-YfIZh",
"name": "Quepid",
"expiration": 1737023543405,
"api_key": "4dMPumSqTdiTzREUXYQDTA",
"encoded": "emJlRmFaUUJNanJmYlAtWWZJWmg6NGRNUHVtU3FUZGlUelJFVVhZUURUQQ==",
"beats_logstash_format": "zbeFaZQBMjrfbP-YfIZh:4dMPumSqTdiTzREUXYQDTA"
}
```
7. Store your API key in a safe place, for example your company password safe with appropriate access settings.
## Connect Quepid to Elastic Cloud with the appropriate settings
We now create a new case and connect it to the deployment with the created API Key.
1. Log into Quepid.
2. Create by selecting **Relevancy Cases** and **+ Create a case**.
3. Name your case, for example *TMBD on Elastic Cloud*.
4. Select **Create a new Search Endpoint** with the following settings:
1. Choose Elasticsearch and enter your Elasticsearch endpoint including the index name and `_search`. (Note: You find your Elasticsearch endpoint when logging into your Elastic Cloud and selecting **Open** for the deployment you want to connect to.)
2. Select **Advanced** and choose **API Key** in the dropdown for **Custom Headers**.
3. Substitute *XXX* in the generated JSON for the custom header by the API Key you generated. You find the API Key under `encoded`.

5. Click **ping it** below the endpoint input field.
6. A successful configuration is confirmed with the output *Quepid can search this! Hit 'Continue' to keep working through setup.*
Revisit the configuration to make sure you have all settings correct if you don't receive the success message.
7. Continue with the case setup and set the display fields and add the queries you want to have in your case.
8. Done!
# How to Use Quepid's API
> Navigate to https://go.quepidapp.com/api/docs to see the documentation on the API and try it out
Accessing the Quepid API like http://localhost:3000/api/cases/5.json is protected by you logging in and having the appropriate cookies set.
But what if we want to have an automated process? Then you need to create a Personal Access Token.
Go to your Profile page and scroll down to the _Personal Access Tokens_ section:
Click the _Generate New Token_ and you will get a token that is specific to you that lets you interact with Quepid's API:
Here is an example of looking up information about a Case by it's id:
```
curl -X GET -H 'Authorization: Bearer 53e41835979d649775243ababd4312e8' http://localhost:3000/api/cases/5.json
>> {"name":"Book of Ratings","book_id":1,"query_doc_pairs":[{"query_doc_pair_id":1,"position":1,"query":"adsf","doc_id":"asdf","judgements":[]}]}%
```
Here is an example of creating a query doc pair for a book by it's ID:
```
curl -X POST http://localhost:3000/api/books/2/query_doc_pairs/ -H 'Authorization: Bearer 4a82040bf1b2d255c63833cb59fa9275' -H 'Content-Type: application/json' -d '{
"query_doc_pair": {
"document_fields": "{title:My Document}",
"query_text": "my search",
"doc_id": "some_special_doc_id_52",
"position": 1
}
}'
```
And of course an example of programmatically creating a judgement:
```
curl -X POST http://localhost:3000/api/books/2/judgements/ -H 'Authorization: Bearer 4a82040bf1b2d255c63833cb59fa9275' -H 'Content-Type: application/json' -d '{
"judgement": {
"query_doc_pair_id": 201
"rating": 1
}
}'
```
# How to Post Announcements to Users
Sometimes you need to communicate to your users, like the fact that a scorer has been changed or an end point has been updated. You can publish a new announcement to all users via the Announcements page.
You must be an Administrator and you access the page from the Admin pages:
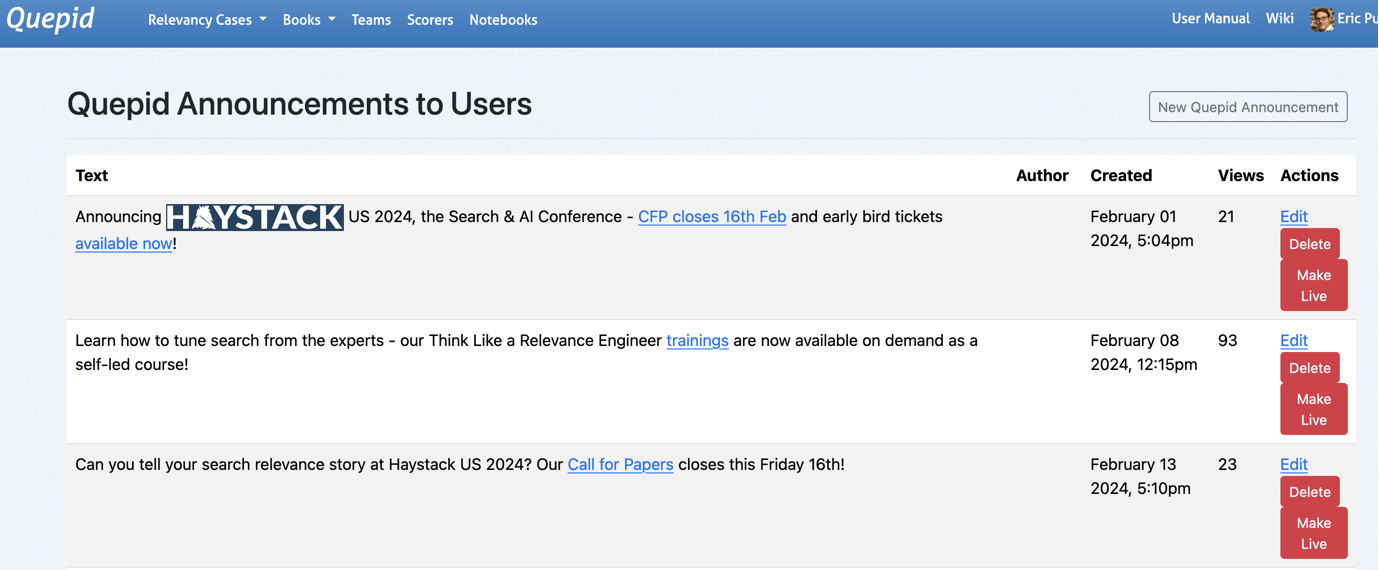
You can use emojis and HTML in the text, like this:
```
🎉 The program for  has been launched!
```
Once they see it, they won't see it again.
You can only have one announcement live at a time, so users won't be bombarded by previous ones. Click _Make Live_ to launch a new announcement and disable any currently live one.
# How to Integrate External Eval Pipeline
If you have an external evaluation pipeline, you can easily post the results of that pipeline into Quepid using the API.
See https://github.com/o19s/quepid/tree/main/docs/examples/external_eval for a simple Python script that demonstrates storing Scores for a Case that are calculated externally to Quepid inside of Quepid.
# How to Trouble Shoot Your Deployment
When errors occur, Quepid logs them and shows a generic page.
However sometimes getting to those logs is difficult, and you just want the message immediately.
You can enable this behavior by setting the follow `ENV` var:
```
QUEPID_CONSIDER_ALL_REQUESTS_LOCAL=true
```
Confirm the setup by visiting `/api/test_exception` which raises an error and will give you the debugging page "RuntimeError in Api::ApiController#test_exception".
# How to Use Ollama as LLM
You can use Ollama hosted models instead of OpenAI as the LLM to power your AI Judges. This how to will walk you through the steps for configuring Quepid to talk to Ollama.
It assumes that you have deployed Quepid using Docker Compose and the `docker-compose.yml` that ships with Quepid. However, the general approach will work as well with any deployed Ollama server.
If you need to start the Ollama server then run `docker compose up ollama`. This starts an empty Ollama service.
Now let's download the [smallest Qwen 2.5 model](https://ollama.com/library/qwen2.5:0.5b), which is just 398 MB, by running `docker exec ollama ollama pull qwen2.5:0.5b`.
Now you are ready to configure you AI Judge to use a local model.
Bring up your AI Judge editing screen:
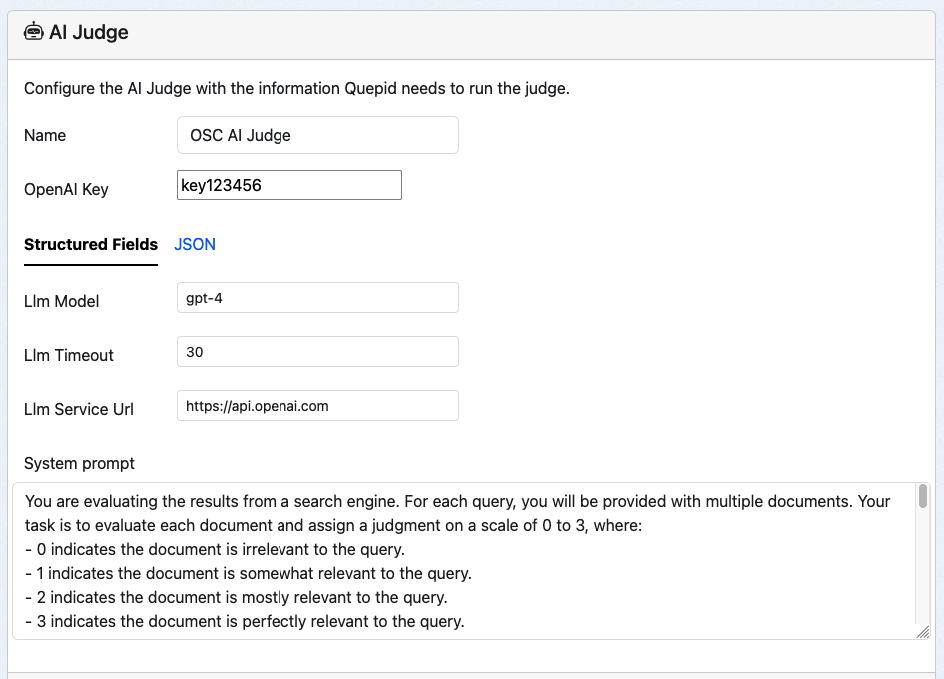
Make the following changes and save them. Local LLM models may run quite slowly, so having a long timeout may be needed.
| Key | Value |
|----------|----------|
|LLM Key| Not used by Ollama, but Quepid requires something. abc123|
| Llm Service Url | http://ollama:11434 |
| Llm Model | qwen2.5:0.5b |
| Llm Timeout | 60 |
Don't forget to go to Book > Settings and add the newly created Judge to the book.
Then go to the Book > Judgement Stats page and try out the AI Judge!
Other models that you may want to play with are https://ollama.com/library/olmo2 and https://ollama.com/library/llama3.2:1b.
You may need to bump up the RAM allocated to Docker to use the larger models!
Some other useful commands are `docker exec ollama ollama stop qwen2.5:0.5b` to unload a model, `docker exec ollama ollama rm qwen2.5:0.5b` to remove a model.
Reference
# Core Concepts
First, let's walk through a few of the core concepts in Quepid.
**Book:** A book refers to a set of queries and documents and their ratings independent of the search engine. A single book can provide the source information for multiple cases.
**Case:** A case refers to all of the queries and relevance tuning settings for a single search engine. If you want to work with multiple instances of Solr or Elasticsearch (or any other search engine or API), you must create a separate case for each one.
**Query:** Within a case, queries are the keywords or other search criteria and their corresponding set of results that will be rated to determine the overall score of a case.
**Rating:** Ratings are the numerical values given to a result that indicates how relevant a particular search result is for the query. How each rating is interpreted depends on the scorer used for the query (or case), but usually the higher the number the more relevant the result is.
**Result:** Within a query are the individual results, which are rated to determine the cumulative score of a query. Sometimes results are also referred to as documents (or docs).
**Scorer:** A scorer refers to the scale used to rate query results. Quepid ships with several classical relevance scorers such as AP, RR, CG, DCG, and NDCG, as well as the ability to create custom scorers.
**Search Endpoint:** A search endpoint refers to the search engine, API, or even static dataset that you are interacting with. A search endpoint has all of the information required for Quepid to interact with it.
**Snapshot:** A snapshot is a capture of all your queries and ratings at a point in time. It is important to take regular snapshots of your case to use as benchmarks and ensure that your search relevancy is improving.
**Team:** A team refers to a group of individual users who can view and share cases and custom scorers.
**Try:** A try is a saved iteration of a case's settings. Quepid is a developer tool and we expect developers to constantly tweak the settings, and sometimes you would want to go back to a previous iteration that had better results, so we've made that an integral part of Quepid.
There are many application level settings for Quepid that you can use to optimize YOUR deployment of Quepid. These are detailed here: https://github.com/o19s/quepid/blob/main/docs/operating_documentation.md
_Hey Eric: You need to reorg that page! It has both operating docs, but also some how to type content._
# Quick Start Wizard
The "Quick Start Wizard", which launches on first login or any time you create a new case, will guide you through configuring your Solr, Elasticsearch, or other search endpoint and setting up your case.
#### What you need to complete the wizard
- A Solr or Elasticsearch instance that is accessible from your browser
- A list of desired fields from your search engine
> *Note: You can use the demo Solr or Elasticsearch instances provided to test Quepid
## Naming Your Case
First you will be required to enter a case name. Select something descriptive to distinguish between your cases.
## Connecting your Search Engine
Quepid does not require any installation on your server. All you need to do is indicate which search engine you are working with, and provide the URL to your search engine. A wide variety of search engines are supported.
You will be able to update this URL at any point in the settings. If you want to try Quepid out without providing your data, feel free to leave the default collection selected.
## Selecting Fields to Display
Specify the _title field_ to use for display purposes. This typically corresponds to the field you use as a clickable title in your application while displaying search results. The application provides an autosuggest list of potential fields, but you are free to use any field in you search engine.
The _ID field_ is the only other required field to use Quepid. This should correspond to the unique identifier specified in your schema and should be a _number_ or _string_. The ID is the only field stored in Quepid, so your sensitive data will remain securely on your servers.
You can select additional fields if you would like to see other data in your Quepid results. You can also specify images with the following syntax: `thumb:field_name` and video/audio with `media:field_name`. Fields that have a value that starts with `http` will be turned into links.
## Adding Queries
At this point the required setup steps are complete. You have the option to provide some initial queries, but you can also add queries at any time in the application. It is helpful to add at least one query here so that your results will be populated when the application initially loads.

## Finishing the Wizard
That's it! Quepid is configured and you can now proceed to exploring the Quepid interface.
## Case Screen
Now that we have the basic setup out of the way, let's take a look at the major elements of Quepid's Case screen.
**1. Relevancy Case Dropdown -** Select or create cases to work on.
**2. Case Information -** Displays case summary including name, average query score, and current iteration in dashboard history.
**3. Case Actions -** Shows available actions including scorer selection, snapshot management, sharing options, and relevancy tuning panel toggle.
**4. Queries -**Add new queries and view existing ones. Click arrow to view and rate individual query results.
**5. Relevancy Tuning Panel -** Modify search relevancy settings and tune searches. Panel is closed by default and accessible via case actions.
**6. Quepid Support -** Access support chat window in bottom right corner for assistance from search relevancy experts.
# Manage Your Queries
## Adding Queries

Adding additional queries is simple. Just type in your search term(s) and click _Add query_ and Quepid will populate the results. A newly added query will display an empty score, the title, and the number of results found. Click on the arrow to expand a single result:
> Want to add a number of queries all at once? Just separate them with a
`;`, like so: `star wars;star trek` and click _Add query_.
## Rating Queries
Queries are rated through the dropdown to the left of each result. Clicking on the dropdown will bring up the rating scale based on the scorer you have selected.
If you haven't picked a specific scorer, then the Quepid system default scorer **AP@10** will be used. It has a binary Irrelevant or Relevant choice.
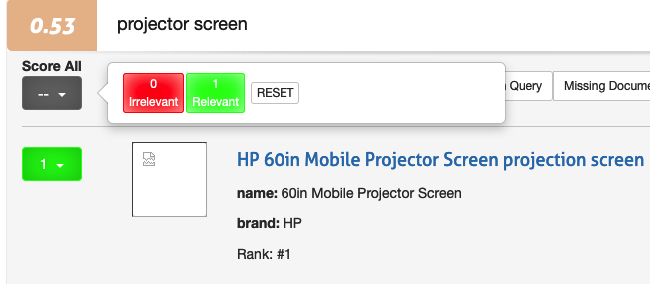
You can give the SAME rating to all the documents via the top level Score All feature. This can be useful when most of the documents are all the same, and then go back and update the few that are different.
Otherwise you can also just score each document individually.
>> This interface unfortunately goes against "best practices" for judging documents because you, the human judge, tend to be biased to give the first documents a higher rating then the further down ones. Also, by seeing multiple documents next to each other it's hard to evaluate them in the platonic ideal of "Is this document a good match for this query". We recommend that you use the dedicated Human Rater interface that is part of the Book concept instead.
## Managing Queries
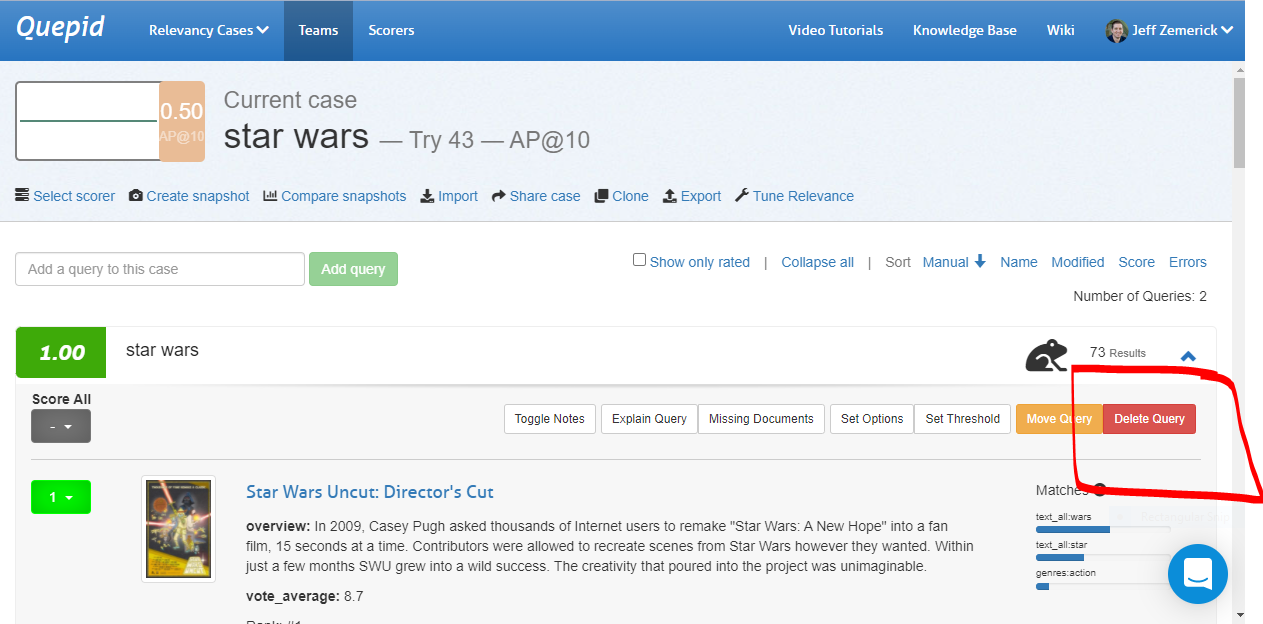
## Moving a Query
A query and its associated search results and ratings can be moved to another case. To move a query, expand the query by clicking the query terms. Next, click the _Move Query_ button. A window will be shown asking you to select the new case for the query. Click the desired case to move the query.

## Deleting a Query
There may be times in which you want to delete a query from your case. Perhaps the query is no longer needed and can be removed. To delete a query expand the query by clicking the query terms and click the _Delete Query_ button. You will be prompted to confirm the deletion of the query.
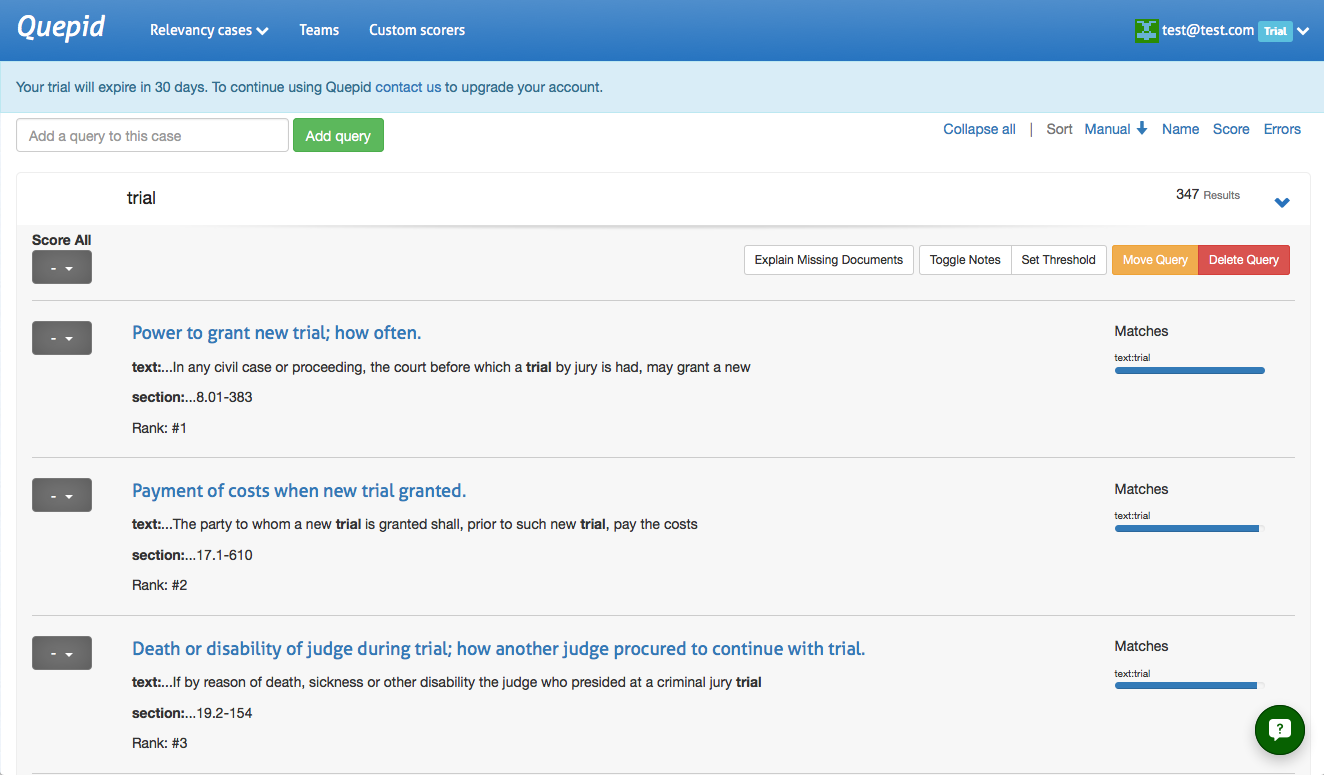
## Rating Missing Documents
You now know how to rate documents that appear in your top ten results.
What happens if good documents you expected to be returned by a
particular query are not even showing up? You will need a way to
indicate that more relevant documents, that do exist in the data, are
missing from this desired results in this result set, and in an ideal
future state of the world, would be found by this same query. Here's how
that is accomplished.
> This is a fairly advanced technique that requires you to really understand the contents of your corpus. It requires you to understand how to write your own search engine queries as well
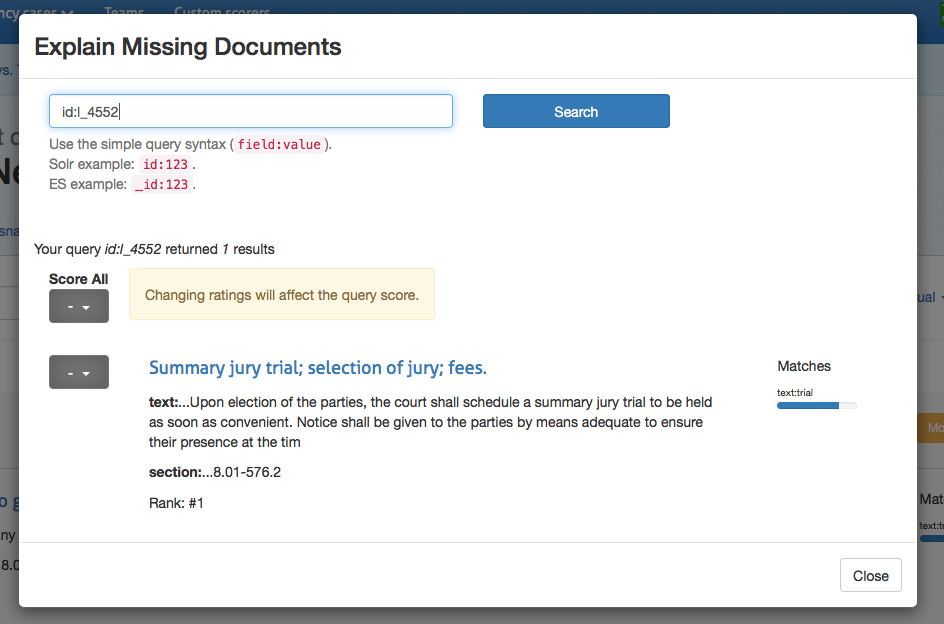
Clicking on _Explain Missing Documents_ will bring up a dialog
box that initially shows you all of the documents that you have rated,
but aren't being returned in your top ten results. Here you can also
find additional documents to rate, just use the Lucene syntax to query
for them. If you're looking for a specific document and you know the ID,
that is the simplest way to locate it. Once you have rated the missing
document, that rating is factored into the algorithm.
# Relevance Panel
To modify your search settings, open the relevancy tuning panel by clicking the _tune relevance_ link in the case actions area.
The default panel allows you to modify the Solr or Elasticsearch query
parameters directly. Update your query here and click _Rerun my
searches_ to see the results update.
## Magic Variables
"Magic variables" are placeholders. You can add a list of queries that Quepid will automatically run against your search engine. While you can specify which parameters are sent with the call, you need to know how to connect your query list to these parameters. This is where "magic variables" come in.
There are 3 types of "magic variables":
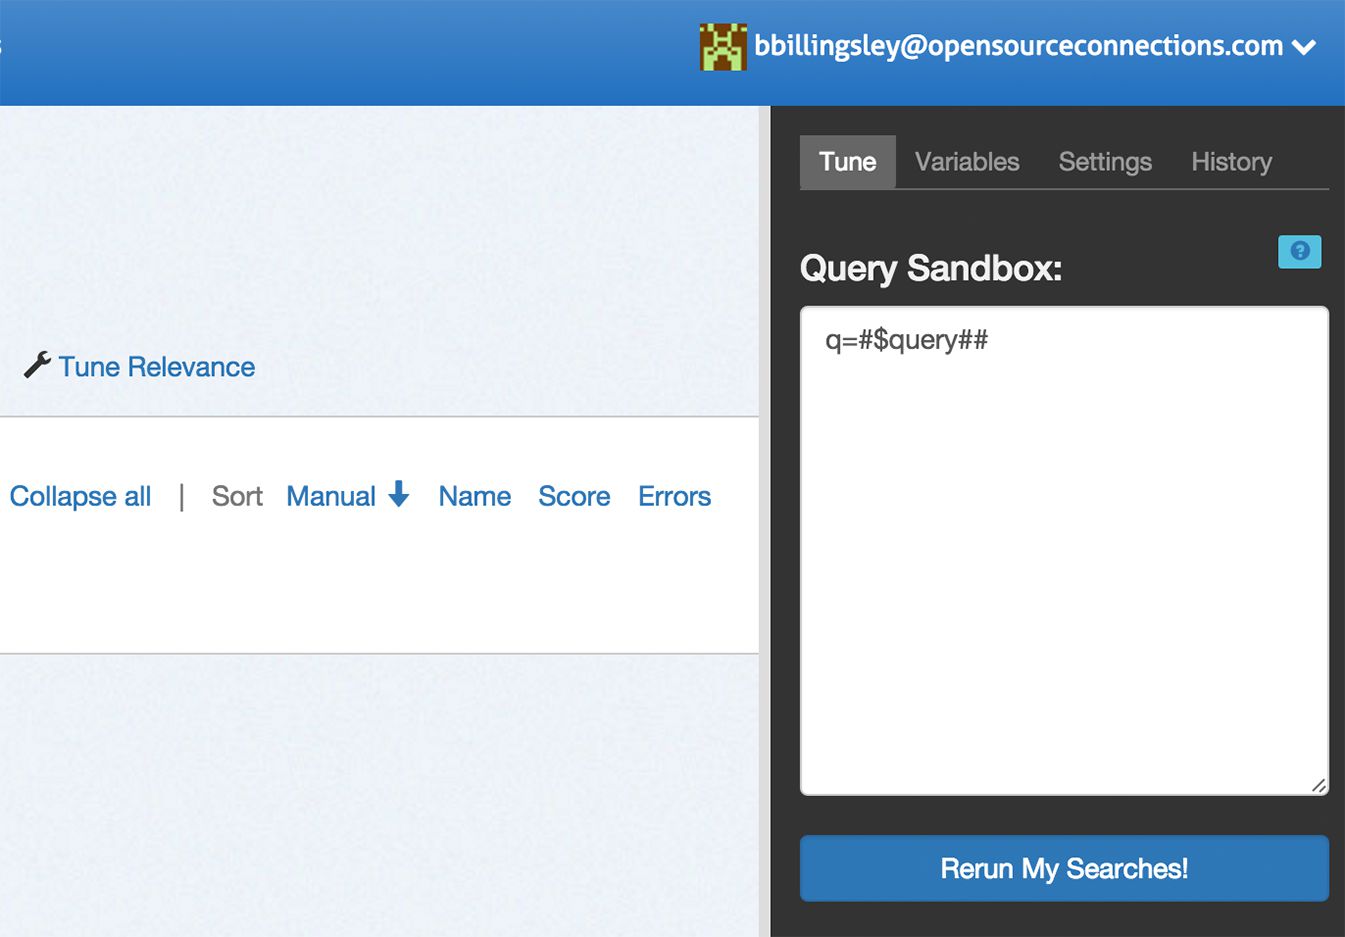
### Query Magic Variable
The `#$query##` string represents the query variable. Quepid replaces this pattern with your full query. This is the simplest and most important "magic variable."
Example:
Let's say you have:
1. A movies index using Solr as the search engine
2. Query parameters set as: `q=#$query##`
3. Two queries in Quepid: "marvel" and "dc comics"
Quepid will call your Solr instance twice:
- First call: `q=marvel`
- Second call: `q=dc comics`
In each case, `#$query##` is replaced with the actual query string.
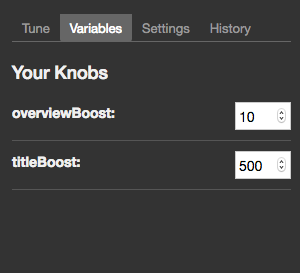
### Curator Variables
Curator variables (pattern: `##variableName##`) allow you to modify query parameters without rewriting the query directly. These variables:
- Work with numerical values only
- Let you easily adjust parameters (like boost values) until you achieve desired results
- Appear in the "Variables" tab of the tuning pane after being defined in query parameters
Example:
If you define `##boost_value##` in your query parameters, you can adjust this value in the Variables tab without editing the query itself.
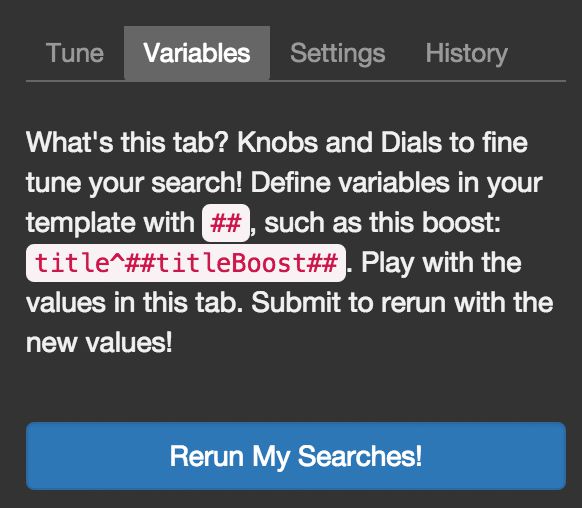
Continuing with the example from above, let's say your initial query parameters are:
```
q=#$query##&defType=edismax&qf=title^500 overview^10 tagline&tie=0.5
```
To experiment with boost values, replace the numbers with curator variables:
```
q=#$query##&defType=edismax&qf=title^##titleBoost## overview^##overviewBoost## tagline&tie=0.5
```
You can then adjust these values in the "Variables" tab:
- `titleBoost`: adjust from 500
- `overviewBoost`: adjust from 10
### Keyword Variables
Keyword variables (`#$keywordN##`) provide more granular control than the basic query variable (`#$query##`). While the query variable is sufficient for 80% of cases, keyword variables let you manipulate individual words within a query.
How it works:
- Pattern is `#$keywordN##` where N starts at 1
- Quepid splits the query on whitespace
- Each `#$keywordN##` is replaced with the corresponding word
Simple Example:
1. Your queries: "marvel" and "dc comics"
2. Query parameter: `q=#$keyword1##`
3. Results:
- First query: `q=marvel`
- Second query: `q=dc` (ignores "comics")
Advanced Usage:
Keyword variables enable complex query transformations. For example, with "Web site developer":
- Individual words: "Web", "site", "developer"
- Combinations: "Web developer", "site developer"
- Phrases: "web site", etc.
This allows you to match different permutations and combine the results for your users.
## Settings

The settings panel allows you to modify the search configuration that you entered during the case's setup.
## History

Each time you rerun your searches, a new "try" is generated in the
search history. Clicking on a try will change the settings to that
iteration, so you can move back and forth between different
settings/configurations. You can also duplicate, rename or delete tries.
> Importing ratings will override your existing ratings. Proceed with caution!
Ratings can be imported into existing queries and cases. You may want to import ratings if you have previously rated search results in another application other than Quepid. Ratings can be imported from CSV, [Rated Ranking Evaluator](https://github.com/SeaseLtd/rated-ranking-evaluator), or in the common Learning To Rank (LTR) format. To import ratings, click the _Import_ link. A window will be shown to begin the import.
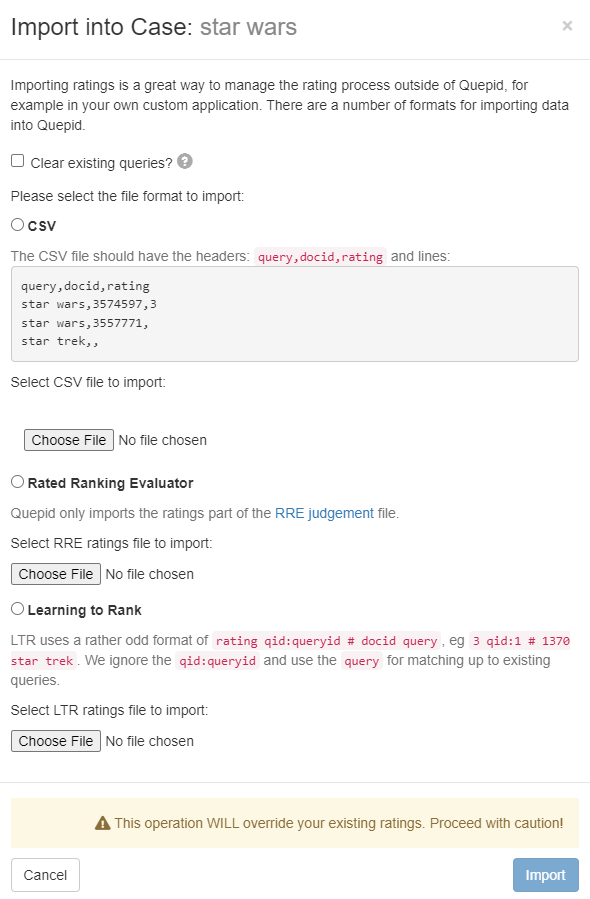
First, importing ratings can clear your existing queries. If all of your work has been done outside of Quepid and you are now bringing your work into Quepid you can select the _Clear existing queries_ option to remove all queries from Quepid prior to the import. Please be sure you want to do this because all queries in Quepid will be lost.
Next, select the format of your ratings to import. Choose either CSV, Rated Ranking Evaluator, or Learning to Rank.
## Importing from CSV
When choosing CSV, a sample of the expected data is shown. The data should be formatted as `query,docid,rating`. Once your CSV file is appropriately formatted, click the Choose File button to upload the file and begin the import.
## Importing from RRE Export
When importing from Rated Ranking Evaluator (RRE), simply click the Choose File button to select and upload your ratings previously exported from RRE.
## Importing from LTR Training File
To import ratings from an LTR training file, click the _Choose File_ button to select and upload an LTR training file. The format of file is expected to be rating `qid:queryid # docid query`. The `qid:queryid` value is ignored in favor of the `query` value and is the value used in Quepid.
# Managing Snapshots
A important step in the benchmarking process for Quepid is taking
regular snapshots of your case over time and comparing them to ensure
that relevancy is improving.
## Creating Snapshots
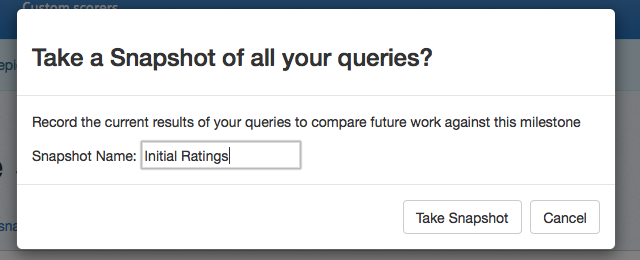
When you are ready to take a snapshot, click on _Create Snapshot_ in the case actions area to bring up the snapshot dialog box. From here, give your snapshot a descriptive name and click _Take Snapshot._ The current ratings for all of your queries are now saved.
## Comparing Snapshots
Once you have made improvements to your search relevancy settings, you will want to judge your improvement. Click on_"Compare snapshots_ to view your current results with a previous snapshot. You can now see the scores and results side-by-side for comparison.
## Managing Cases
Also on the case dashboard, you can manage existing cases. You can see
both the cases you own and those that have been shared with you.

For each set of cases, you can filter the list by name and number of documents per page, and paginate through pages if needed. You can click on any case name to open it in the main Quepid dashboard.
Each case can be archived or renamed. Cases should be archived when no longer active, and you can access archived cases using the _View archived cases_ link at the bottom of the page.
# Manage Your Team
Teams in Quepid allow you to group your users based on their roles and cases. For example, you can create teams for your raters and your search relevance engineers as shown in the screenshot below. Case can be assigned to teams to provide access to your company's search team members. You can also make custom scorers available to a team. Using Quepid's Teams helps keep your search relevancy efforts organized. To access the Teams, click the _Teams_ menu at the top of any page.

To create a team, click the _Add New_ button. You will be asked to give the new team a name. All team names must be unique in each deployment of Quepid.
## Creating a Team
To add users to a team, click the name of the desired team to open the team detail page. On this page, enter the user's email address or display name and click the _Add User_ button.

If the user you enter does not yet have a Quepid account, then it will change to a "send invitation" link. Clicking it will send (if email is configured) an email to the person inviting them to join Quepid. When they join via the invitation URL they will also join the team as well.
If Quepid's email configuration has not been configured, you will be provided an invite link vai the "clipboard" icon you can copy and paste and share with the user you want to invite. The user can use the invite URL to create their account and join the team.

When you are finished adding users to the team, click the _Back to list_ link.
#### What does the email invite look like?
When you invite a user that does not already have an account in Quepid, the user will receive an email inviting them to create an account on Quepid. An example of that invitation email is below.
```
Hello invited.user@gmail.com
John Smith has invited you to join their team on Quepid at https://app.quepid.com/, you can accept it through the link below. https://app.quepid.com/users/invitation/accept?invitation_token=LUkf6k4pa_1234mUiGj6
If you don't want to accept the invitation, please ignore this email. Your account won't be created until you access the link above and set your password.
```
## Team Owner
The team owner is the person who created a team. Any member of a team can invite another user to the team. The team owner can be changed by opening the team and selecting another member of the team. The user selected will become the new owner of the team.
## Adding a Case to a Team
To add a case to a team, open the case. Click the _Share case_ link. You will be shown a window and asked to select a team. Click the desired team to share the case with that team.
## Adding a Scorer to a Team
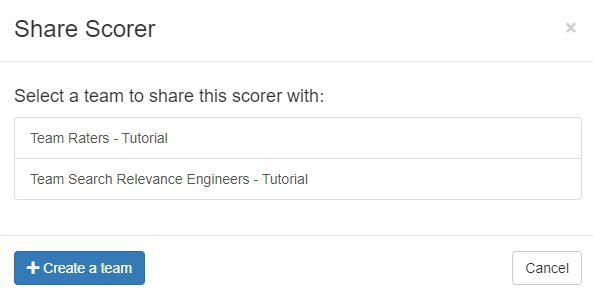
Along with cases, scorers can also be associated with teams. To add a custom scorer to a team, click the _Scorers_ link at the top of any page. On the Scorers page, click the _Custom_ tab to show the scorers that you have created. For the scorer you want to share with a team, click the _Share_ link. A _Share Scorer_ window will be shown and you can click which team to share the scorer.
# Managing Scorers
Scorers are run over all your queries to calculate how good the search results are according to the ratings you've made.
You can specify whatever scale you want, from binary (0 or 1) to graded (0 to 3 or 1 to 10) scales. Each scorer behaves differently depending on whether it handles graded versus binary scales.
## Classical Scorers Shipped with Quepid
These are scorers that come with Quepid. `k` refers to the depth of search results evaluated. Learn more in our "[Choosing Your Search Relevance Metric](https://opensourceconnections.com/blog/2020/02/28/choosing-your-search-relevance-metric/)" blog post.
| Scorer | Scale | Description |
|--------|-------|-------------|
| Precision `P@10` | binary (0 or 1) | Precision measures the relevance of the entire results set. It is the fraction of the documents retrieved that are relevant to the user's information need. Precision is scoped to measure only the top k results. |
| Average Precision `AP@10` | binary (0 or 1) | Average Precision measures the relevance to a user scanning results sequentially. It is similar to precision, but weights the ranking so that a 0 in rank 1 punishes the score more that a 0 in rank 5. |
| Reciprocal Rank `RR@10` | binary (0 or 1) | Reciprocal Rank measures how close to the number one position the first relevant document appears. It is a useful metric for known item search, such as a part number. A relevant document at position 1 scores 1, at positon 2 scores 1/2, and so forth. |
| Cumulative Gain `CG@10` | graded (0 to 3) | Information gain from a results set. It just totals up the grades for the top k results, regardless of ranking. |
| Discount Cumulative Gain `DCG@10` | graded (0 to 3) | Builds on CG, however it includes positional weighting. A 0 in Rank 1 punishes your score significantly more than Rank 5. |
| normalized Discount Cumulative Gain `nDCG@10` | graded (0 to 3) | nDCG takes DCG and then measures it against a *ideal* relevance ranking yielding a score between 0 and 1. Learn more about nDCG (including some gotchas) on the [wiki](https://github.com/o19s/quepid/wiki/How-Scoring-Works-in-Quepid#ndcg). |
## Selecting a Scorer
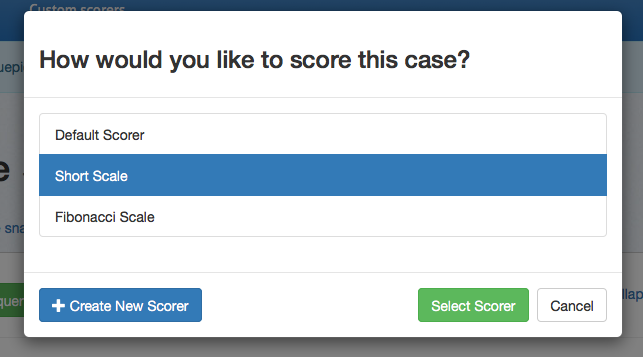
By default, several scorers are available. From the main dashboard, click _Select scorer_ to choose from the available options. If you want to use a different rating scale, click _Create New Scorer_ to access the custom scorers page.
## Creating a Custom Scorer
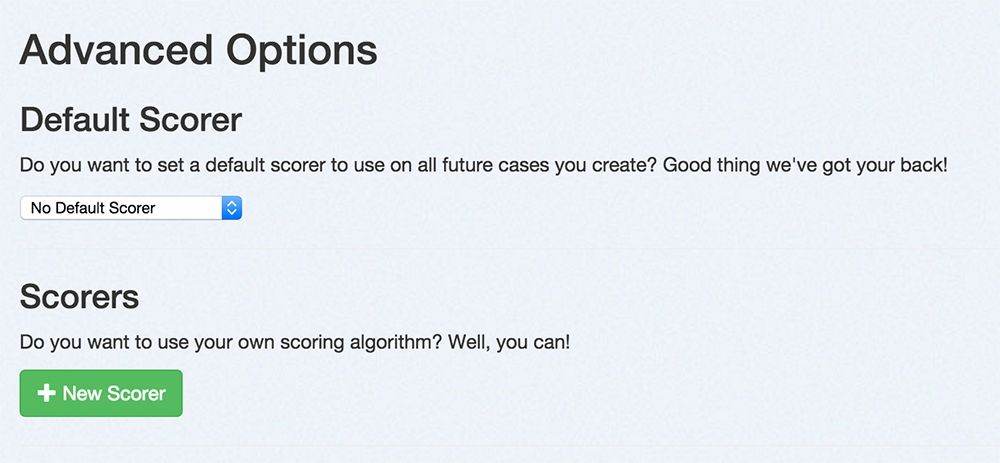
This page lets you change which scorer is your default scorer when you create new Cases.
From the custom scorers page, click _New Scorer_.
From here, you can name your new scorer, provide custom scoring logic in
JavaScript, and select the scoring range.
### What can my code do?
Your code validates the search results that came back. Below is an API available for you to work with:
| Function | Description |
|----------|-------------|
| `docAt(i)` | The document at the i'th location in the displayed search results from the search engine, including all fields displayed on Quepid. Empty object returned on no results. |
| `docExistsAt(i)` | Whether the i'th location has a document. |
| `eachDoc(function(doc, i) {}, num)` | Loop over docs. For each doc, call passed in function with a document, doc, and an index, i. You can pass in an optional `num` parameter to specify how many of the docs you want to use in the scoring (eg. to only use the top 5 results, pass in the number `5` as a second parameter. *Default: `10`* |
| `eachRatedDoc(function(doc, i) {}, num)` | Loop over rated documents only. Same arguments as eachDoc. **Note:** Needs rated documents loaded before usage, see `refreshRatedDocs` |
| `refreshRatedDocs(k)` | Refresh rated documents up to count `k`. This method returns a promise and must be run before using `eachRatedDoc`. You should call `then()` on the promise with a function that kicks off scoring. |
| `numFound()` | Solr has found this many results. |
| `numReturned()` | The total number of search results here. |
| `hasDocRating(i)` | True if a Quepid rating has been applied to this document. |
| `docRating(i)` | A document's rating for this query. This rating is relative to the scale you have chosen for your custom scorer. |
| `avgRating(num)` | The average rating of the returned documents. This rating is relative to the scale you have chosen for your custom scorer. You can pass in an optional `num` parameter to specify how many of the docs you want to use in the scoring (eg. to only use the top 5 results, pass in the number `5` as a second parameter. *Default: `10`* |
| `avgRating100(num)` | The average rating of the returned documents. This rating is on a scale of 100 (i.e. the average score as a percentage). You can pass in an optional `num` parameter to specify how many of the docs you want to use in the scoring (eg. to only use the top 5 results, pass in the number `5` as a second parameter. *Default: `10`* |
| `editDistanceFromBest(num)` | An edit distance from the best rated search results. You can pass in an optional `num` parameter to specify how many of the docs you want to use in the scoring (eg. to only use the top 5 results, pass in the number `5` as a second parameter. *Default: `10`* |
| `setScore(number)` | Sets the query's score to number and immediately exits |
| `pass()` | Pass the test (score it 100), immediately exits |
| `fail()` | Fail the test (score it 0), immediately exits |
| `assert(condition)` | Continues if the condition is true, otherwise immediately fails the test and exits |
| `setScore(number)` | Sets the query's score to number and immediately exits |
## Managing Scorers

After you have created scorers, you can manage them from this page. You
can filter down the list of scorers by name or type. You can share a
scorer with a team. You can edit the settings for a scorer. Finally, you
can delete a scorer.
# Custom Scorers
Quepid comes with classic Information Retrieval **Scorers**, that we refer to as **Communal** scorers. Sometimes however you want your own **Custom Scorer**.
To access the scorers click the _Scorers_ link at the top of any page.
On the scorers page, click the _Communal_ tab to show only the scorers that are available to all users of Quepid. Click the _Custom_ tab to show only scorers that you have created and shared with a team. To create a new scorer, click the _Add New _button. The New Scorer window will be shown.
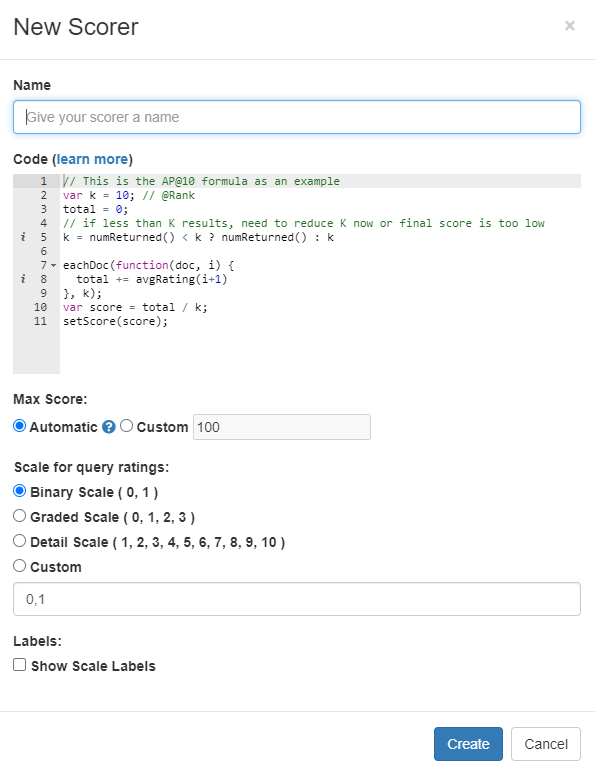
First, give your scorer a name. Next, you can enter the JavaScript code for your scorer. Refer to Creating a Custom Scorer to learn more about the code requirements. Next, choose the scale for the scorer. Finally, you can optionally provide labels for the scale by clicking the _Show Scale Labels_ option. When finished, click the _Create_ button to create the scorer.
### Why would you create a custom scorer?
It is impossible to create a universal pre-set list of scorers that will apply to every possible use-case for search. Each organization's search system is going to be a unique case with a unique set of data and a unique set of requirements for what success looks like for the people using the system, and so it is likely that each organization's search team will need to be able to measure the quality of their results by a unique set of scorers, and quite possibly create one or more custom scorers that act differently than any of the default scorers do. It is for this reason that Quepid provides the ability for you to create a custom scorer. The most common scenario for needing to do so is because you need an **@k** scorer that isn't **@10**.
> Tip! In the case of a custom **@k** scorer, you can simply clone the default **@10** scorer and then update the **k** parameter.
Curious about the API's that Quepid exposes? Check out the documentation at https://go.quepidapp.com/api/docs.
> Note: The generated docs are NOT comprehensive, and you may need to consult the source code or open up your web inspector to see the HTTP traffic to learn about other APIs.
Quepid's APIs enable you to automate processes and integrate Quepid with other products you or your company uses.
The APIs are REST-based. Responses are JSON, and errors are reported via standard HTTP codes in addition to JSON-formatted error information in the HTTP response bodies of relevant requests. We use Personal Access Token for authentication and authorization.
# Quepid Adminstration CLI aka Thor
This CLI tool that you run on the Quepid application lets you script out many processes.
The see available tasks:
```
docker compose run app bundle exec thor list
```
Examples include:
```
case
----
thor case:create NAME SEARCH_ENGINE ENDPOINT_URL API_METHOD FIELD_SPEC QUERY_PARAMS SCORER_NAME OWNER_EMAIL # creates a new case
thor case:load_the_haystack_rating_snapshots # load the haystack rating party data
thor case:share CASEID TEAMID # shares case with an team
ratings
-------
thor ratings:generate SOLRURL FILENAME # generates random ratings into a .csv file
thor ratings:import CASEID FILENAME # imports ratings to a case
sample_data
-----------
thor sample_data:haystack_party # load the haystack rating party data
thor sample_data:large_data # load the very large sample data
thor sample_data:sample_data # load the sample data
snapshots
---------
thor snapshots:generate SOLRURL FILENAME # generates a random snapshot into a .csv file
thor snapshots:import CASEID SNAPSHOTNAME FILENAME # imports a snapshot to a case
user
----
thor user:add_api_key EMAIL # generates and adds an API key to the user
thor user:create EMAIL USERNAME PASSWORD # creates a new user
thor user:grant_administrator EMAIL # grant administrator privileges to user
thor user:reset_password EMAIL NEWPASSWORD # resets user's password
```
To see more details about any of the tasks, run `bin/docker r bundle exec thor help TASKNAME`:
```
thor help user:create
Usage:
thor user:create EMAIL USERNAME PASSWORD
Options:
-a, [--administrator], [--no-administrator]
Description:
`user:create` creates a new user with the passed in email, name and password.
EXAMPLES:
$ thor user:create foo@example.com "Eric Pugh" mysuperstrongpassword
With -a option, will mark the user as Administrator
EXAMPLES:
$ thor user:create -a admin@example.com Administrator mysuperstrongpassword
```
Explanation
# How Many Queries and Documents Do I need?
## How many search results should be judged?
The number of search results you should judge depends on a few factors and your organization's search team can provide guidance. As a general rule of thumb, 100 judgments (10 pages of 10 search results) is a good starting point and likely sufficient for most cases.
You may have noticed the frog icons? The backstory is that we needed an icon to call attention to some queries having unrated documents. Eric's son Asher loves frogs, and when Asher was asked to pick an icon, he picked the frog one! So, we talk about "chasing the frogs" to mean getting rid of unrated documents. The more frogs you have, the less confidence you have in accurate search metrics.
You can click the _Frog Pond_ report link to get a sense of how many ratings you need.
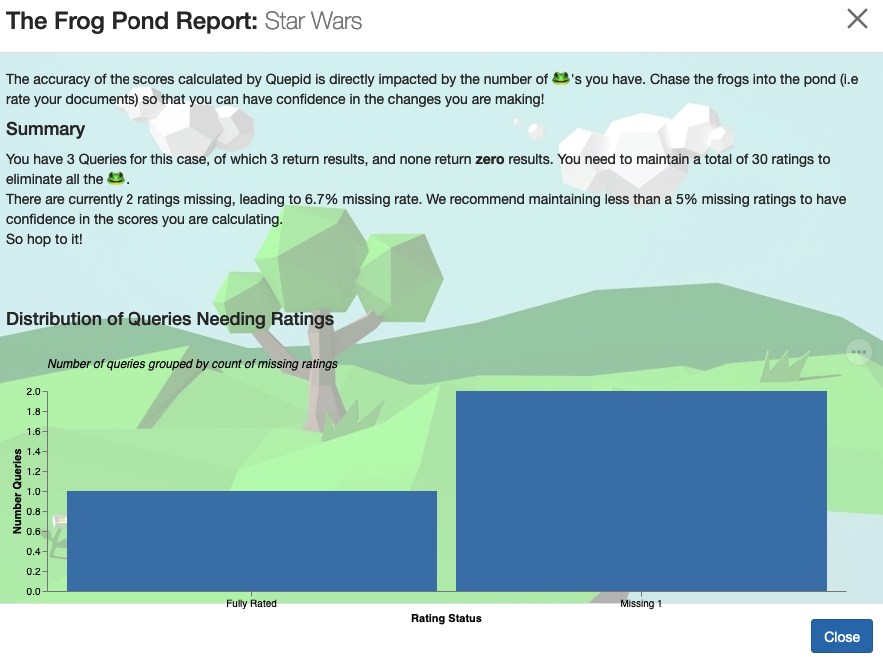
Over time you can figure out how many ratings you need to do per week to stay on top of things.
# Using Notebooks for Analytics
> Data scientists are gonna data science... - Eric
At some point, you decide you want to dig into the data collected by Quepid to do more advanced analytics. Maybe you are curious about Inter Rater Reliablity? Or you want to do some deeper comparison between Cases or Snapshots such as Jaccard comparison? This is what the **Notebooks** interface is for.
Quepid ships with some example Jupyter notebooks that are meant as _starting points_ for analyzing data. Each notebook is runnable, they all leverage a public dataset to demonstrate how they work. You can just click the double arrow *play* button to rerun them. Note, the first time you run the notebooks it takes a bit to load dependencies, and then they run quickly.
To use them, right click on the example notebook and copy it to your own file that is outside the `/examples` directory. Otherwise you may lose your customization's when new versions of the examples are released.
Feel free to change the logic and analytics to meet your teams specific needs.
## How does this all work?
Did you notice some magic? These notebooks ran yet you didn't configure Python or otherwise start up Jupyter! You actually don't have to worry about setting up Jupyter, instead via a bit of magic, we have the Jupyter environment running completely **IN** your browser. Jupyterlite ships as lots of HTML and JavaScript files (almost 1 GB of them), and through the magic of [WASM](https://webassembly.org/) lets you run the Python code in your browser. You can learn more about the Jupyterlite project at https://github.com/jupyterlite/jupyterlite.
We leaned into using Jupyterlite because it lets us use the various APIs that Quepid provides for accessing data without requiring you to set up a **Personal Access Token** first to interact with the APIs since the notebooks are running under your current authenticated browser session. Also, as you edit the notebooks, they are saved in your browser. This let's you get started using the example notebooks without faffing about Python dependencies.
However, if you want to download the notebooks and use them in a local Jupyter setup, that is just fine. Just consult the How To Access APIs for more information on configuring your Personal Access Token.
Working with various teams, we found that every analytics tool we built was too
narrowly defined to a specific teams needs. The more we made it generic, the harder it was to use and the less value it provided. Yet every team wanted it's
own take on the analysis process and that's why we decided to just make Quepid be a great repository of data, and enable Data Scientists to use the tooling they like, Jupyter.
Got a notebook you'd like to share with community? We'd love to have them. Most of the notebooks were contributed by various teams using Quepid.
# How to Integrate Quepid Into Your Eval Workflow
Do you already have an Search Evaluation workflow in place, or parts of it that you want to preserve, but also take advantage of Quepid? There are three main approaches, from least itnegrated to most integrated:
1. Export/Import Data Files between your existing solution and Quepid
2. Leverage Quepid's APIs to integrate Quepid into your existing solution
3. Wrap Quepid's data model directly into your solution
## Export/Import Data Files between your existing solution and Quepid
Do you already have a fairly robust mature solution for doing Search Evaluation? Something homegrown, or maybe you are invested in OpenSearch's "Search Relevance Workbench"? Or you have been using SearchTweak?
Quepid supports exporting and importing data via CSV and JSON formats for almost all of the major data structures (Books, Cases, Users, Queries, Judgements). Yes, you will have to do some data format conversions, and it's a manual integration, but it's also supported in the UI and is pretty easy to use!
## Leverage Quepid's APIs to integrate Quepid
Quepid has a robust set of API's that you can use to make a much deeper integration with Quepid. Yes, you have to learn a LOT more about how Quepid's data model fits together, but this also let's you make Quepid a integral part of your process. You can manage all the data structures using the API.
This is really great when you want to have that integration be an ongoing process. Say you run your evaluation process as part of a CI/CD pipeline, and you want to record the scores? Just make a call to the `PUT /api/cases/:case_id/scores` end point!
Maybe you do judgement calculations using your own implicit judgements pipeline? Do a `PUT /api/books/:book_id/query_doc_pair/:query_doc_pair_id/judgements/:id` to update an existing query doc pair with the new judgement value.
A community member has vibe coded (cool!) a comparison tool across three major public science journal search engines, and is leveraging the API's to store the comparison data over time, but surfacing all that in their own UI.
## Wrap Quepid's data model directly into your solution
The most extreme form of integration is to integrate your application at the database level. There have been a number of examples of folks who have adopted the underlying data model in the database, but otherwise built their own framework around it. For example, see https://github.com/frutik/quepid-api-unofficial for an example.
You might also want to export data from Quepid's database into your own data lake to drive your own analytics dashboards.
# How LLM as a Judge Works
When you attach the AI Judge to a book in Quepid, it automatically sends evaluation requests to the OpenAI API using both your custom prompt and the query/document pair data.
Each request uses a prompt template that you configure in the AI Judge settings. This prompt is dynamically populated with the fields from each query/document pair, allowing the model to evaluate results in context.
**Request Structure**
Quepid uses OpenAI's chat completion API, which requires a messages array to simulate a conversation. For each document/query pair, the following structure is generated:
```
[
{
"role": "system",
"content": ""
},
{
"role": "user",
"content": [
{
"type": "text",
"text": ""
}
]
}
]
```
## How Images are used in Evaluation
If your document contains a field named `image`, or if any field is explicitly tagged with `image:`, Quepid handles it specially. The value of that field is treated as an image URL and is inserted into a separate section of the prompt to provide image context to the model.
This allows you to evaluate results based not only on textual relevance but also on visual content when applicable.
**Request Structure**
```
[
{
"role": "system",
"content": ""
},
{
"role": "user",
"content": [
{
"type": "text",
"text": ""
},
{
"type": "image_url",
"image_url": {
"url": ""
}
}
]
}
]
```
# How Judgements are Averaged into a Rating in a Case
When combining the judgments from multiple judges, we can make a variety of assumptions. If we assume:
1. Judges are generally subject matter experts (SMEs)
1. Judges are rational
1. Judges have individual biases when interpreting relevance
Appealing to 1, we take the three highest out of all the judgments there are. Note, many additional judgments could all agree with these first three. Here we are being optimistic. If the judges do not agree, we appeal to numbers 2 and 3. If a rational judge deems the candidate to be poorer than the other judge or judges, we will trust them, and use their value. Here we are both being pessimistic, concerning the individual judgment, and optimistic, concerning the direction of the bias. That is, we expect judges to overrate, in the general case.
If we only have two judges, then we just average the two judgements. And if we only have one judge, then that is the rating.
As cases grow, and the relative quality of the judges becomes clearer, alternative combinations could be used.
# Thinking about Cases and Books of Judgements
Cases and Books share many, maybe too many, similarities, and can be thought of as two different lenses on the same data.
However they are distinct but interconnected systems for handling search evaluation - and they're quite different in their purposes and design!
## Cases: Live Search Experimentation
Cases are Quepid's dynamic, real-time search testing environment. Think of a Case as your active laboratory where you're constantly tweaking and experimenting with search configurations. Here's how they work:
### Data Storage
Cases store their search queries in the Queries table, with each Query containing just the `query_text`, `information_need`, `notes`, and `options`. The key thing is that Cases don't store search results - they fetch them live from search engines every time you run a query. The only thing they persist about results is Ratings via the Ratings table, which links a `query_id` to a `doc_id` with a rating value.
### Search Engine Interaction
This is where Cases really shine. They're designed for live interaction with search engines through Tries and Search Endpoints. Each Case has multiple Tries that represent different configurations (think of them as saved parameter sets), and each Try connects to a Search Endpoint that knows how to talk to Solr, Elasticsearch, OpenSearch, or even custom APIs via the SearchAPI mapper. When you run a query, it hits the live search engine with your current parameters and gets fresh results.
### Evaluation
Cases use a real-time rating system where you manually rate individual search results on the fly. These Ratings get aggregated into Scores using configurable Scorers, and you get immediate feedback on how your search tuning is performing. We provide all the standard IR retrieval metrics for you, and you can write your own custom Scorer.
## Books: Offline Judgment Collection
Books are the complete opposite - they're designed for systematic, offline evaluation of search quality. Think of them as standardized test datasets.
### Data Storage
Books store everything up front in the Query Doc Pairs table. Unlike Cases, Books actually persist both the queries AND the data that makes up each search result (as `document_fields` JSON). Each Query Doc Pair represents a query-document combination that needs to be judged. This is crucial because Books need to maintain consistency - you can't have the underlying search results changing while people are making judgments.
Everytime a Case is loaded, all of the returned data from the search engine is queued up as an update to the associated Book, and processed in the background. We control what data is stored in `document_fields` JSON attribute by looking at the field specification for the Case. If you define your field specification as `id, title:name, description` then we will store the description in `document_fields` for the Query Doc Pair. If you later change the field specification to `id title:short_name description, url, thumb:image` and run the Case, then the Book will be updated to have the new _short_name_ value used for the title, and the `document_fields` attribute will be updated to store the _url_ and _thumb:image_ attributes as well.
Now, if a Query Doc Pair in a Book is no longer being returned by the associated Case, then of course no content updates will happen.
TL;DR: The data stored in the Book is driven by the search results returned by the Case!
### Search Engine Interaction
Books don't directly interact with search engines during evaluation. Instead, they're populated from a Case every time that Case is run, which captures a snapshot of search results at that point in time. After that, it's all offline - no more live searching. This means that over time you should run a Case periodically to keep the set of Query Doc Pairs in the Book up to date so it represents what your users are seeing.
### Evaluation
Books use a Judgements system where multiple users can independently rate the same query-document pairs. Each Judgement is stored separately (unlike Cases where Ratings overwrite), and they support sophisticated features like explanations, "judge later" flags, and "unrateable" markings.
Books also support a LLM-as-Judge capability that can scale up the judgement process.
They do not provide any measurement of search quality, that is the job of a Case.
## The Key Differences and Why They Matter
### Ratings vs Judgements
This is the big philosophical difference. Cases use Ratings - quick, single value assessment meant for rapid iteration. Books use Judgements - thoughtful, often collaborative evaluations meant for creating gold standard datasets.
We bring these two worlds together by linking a Case to a Book. As judging happens in the Book, the various Judgements are aggregated into a single Rating to be used in a Case. Learn more on the [How Judgements are Averaged into a Rating in a Case](https://quepid-docs.dev.o19s.com/2/quepid/63/how-judgements-are-averaged-into-a-rating-in-a-case).
### Scale
Books have configurable scales (like 0-3 or 0-1) with detailed scoring guidelines built right in. Cases also have a scale that is tied to the specific Scorer that is being used. If your Book has 0-3 graded scale, and your Case has a binary Scorer like Precision, then the Case automatically maps the graded scale to a binary one.
### Data Flow
The integration is brilliant - you can populate a Book from a Case (capturing live search results), collect Judgements from multiple people offline, then refresh that data back into a Case to continue live experimentation as Jdugements flow in. You do need to manually reload the Case screen to see the new aggregated Rating data. Likewise, if you DO create a Rating in the Case, it is recorded as Judgement by you for the corresponding Query Doc Pair in the Book.
### Collaboration
Cases are more individual-focused (though they can be shared via Teams) with the intended audience being Search Relevance Engineers, while Books are designed from the ground up for collaborative evaluation with multiple Subject Matter Experts.
## Data Models Summary
### Case-Related Models
- `Case` - The main container for search experiments
- `Query` - Individual search queries within a Case
- `Rating` - User ratings for query-document pairs (overwrites previous ratings)
- `Try` - Different configuration attempts/versions
- `Search Endpoint` - Connection configuration to search engines
- `Score` - Aggregated scores over time
### Book-Related Models
- `Book` - Container for offline judgment collection
- `Query Doc Pair` - Query-document combinations with stored results
- `Judgement` - Individual user judgments (multiple per query-doc pair)
## Workflow Integration
The typical workflow shows the power of both systems working together:
1. **Development Phase**: Use a Case to experiment with search configurations, tune parameters, and get quick feedback through live search results
2. **Evaluation Phase**: Populate a Book from the Case to capture a snapshot of results for systematic evaluation
3. **Judgment Collection**: Multiple users provide Judgements on the standardized dataset in the Book
4. **Integration Phase**: Refresh the Book data back into Cases to continue development with improved baseline Ratings
### Can I use them Individually?
Of course! For many small relevance investigations, you don't need a Book. A Case with 6 or 8 Queries is enough that you quickly rate yourself to investigate a problem.
Likewise, you may find that you want to source your raw data for evaluation from a different system and import that to your Book. Book's have complete API's that let you manage a book or import the Query Doc Pairs yourself for evaluation. You can also export the data for use in non Quepid evaluation systems.
## Summary
It's really a perfect example of designing different tools for different jobs - Cases for the rapid iteration and experimentation phase of search development, and Books for the rigorous evaluation and benchmarking phase. The fact that data flows seamlessly between them means you get the best of both worlds!
has been launched!
```
Once they see it, they won't see it again.
You can only have one announcement live at a time, so users won't be bombarded by previous ones. Click _Make Live_ to launch a new announcement and disable any currently live one.
# How to Integrate External Eval Pipeline
If you have an external evaluation pipeline, you can easily post the results of that pipeline into Quepid using the API.
See https://github.com/o19s/quepid/tree/main/docs/examples/external_eval for a simple Python script that demonstrates storing Scores for a Case that are calculated externally to Quepid inside of Quepid.
# How to Trouble Shoot Your Deployment
When errors occur, Quepid logs them and shows a generic page.
However sometimes getting to those logs is difficult, and you just want the message immediately.
You can enable this behavior by setting the follow `ENV` var:
```
QUEPID_CONSIDER_ALL_REQUESTS_LOCAL=true
```
Confirm the setup by visiting `/api/test_exception` which raises an error and will give you the debugging page "RuntimeError in Api::ApiController#test_exception".
# How to Use Ollama as LLM
You can use Ollama hosted models instead of OpenAI as the LLM to power your AI Judges. This how to will walk you through the steps for configuring Quepid to talk to Ollama.
It assumes that you have deployed Quepid using Docker Compose and the `docker-compose.yml` that ships with Quepid. However, the general approach will work as well with any deployed Ollama server.
If you need to start the Ollama server then run `docker compose up ollama`. This starts an empty Ollama service.
Now let's download the [smallest Qwen 2.5 model](https://ollama.com/library/qwen2.5:0.5b), which is just 398 MB, by running `docker exec ollama ollama pull qwen2.5:0.5b`.
Now you are ready to configure you AI Judge to use a local model.
Bring up your AI Judge editing screen:

Make the following changes and save them. Local LLM models may run quite slowly, so having a long timeout may be needed.
| Key | Value |
|----------|----------|
|LLM Key| Not used by Ollama, but Quepid requires something. abc123|
| Llm Service Url | http://ollama:11434 |
| Llm Model | qwen2.5:0.5b |
| Llm Timeout | 60 |
Don't forget to go to Book > Settings and add the newly created Judge to the book.
Then go to the Book > Judgement Stats page and try out the AI Judge!
Other models that you may want to play with are https://ollama.com/library/olmo2 and https://ollama.com/library/llama3.2:1b.
You may need to bump up the RAM allocated to Docker to use the larger models!
Some other useful commands are `docker exec ollama ollama stop qwen2.5:0.5b` to unload a model, `docker exec ollama ollama rm qwen2.5:0.5b` to remove a model.
Reference
# Core Concepts
First, let's walk through a few of the core concepts in Quepid.
**Book:** A book refers to a set of queries and documents and their ratings independent of the search engine. A single book can provide the source information for multiple cases.
**Case:** A case refers to all of the queries and relevance tuning settings for a single search engine. If you want to work with multiple instances of Solr or Elasticsearch (or any other search engine or API), you must create a separate case for each one.
**Query:** Within a case, queries are the keywords or other search criteria and their corresponding set of results that will be rated to determine the overall score of a case.
**Rating:** Ratings are the numerical values given to a result that indicates how relevant a particular search result is for the query. How each rating is interpreted depends on the scorer used for the query (or case), but usually the higher the number the more relevant the result is.
**Result:** Within a query are the individual results, which are rated to determine the cumulative score of a query. Sometimes results are also referred to as documents (or docs).
**Scorer:** A scorer refers to the scale used to rate query results. Quepid ships with several classical relevance scorers such as AP, RR, CG, DCG, and NDCG, as well as the ability to create custom scorers.
**Search Endpoint:** A search endpoint refers to the search engine, API, or even static dataset that you are interacting with. A search endpoint has all of the information required for Quepid to interact with it.
**Snapshot:** A snapshot is a capture of all your queries and ratings at a point in time. It is important to take regular snapshots of your case to use as benchmarks and ensure that your search relevancy is improving.
**Team:** A team refers to a group of individual users who can view and share cases and custom scorers.
**Try:** A try is a saved iteration of a case's settings. Quepid is a developer tool and we expect developers to constantly tweak the settings, and sometimes you would want to go back to a previous iteration that had better results, so we've made that an integral part of Quepid.
There are many application level settings for Quepid that you can use to optimize YOUR deployment of Quepid. These are detailed here: https://github.com/o19s/quepid/blob/main/docs/operating_documentation.md
_Hey Eric: You need to reorg that page! It has both operating docs, but also some how to type content._
# Quick Start Wizard
The "Quick Start Wizard", which launches on first login or any time you create a new case, will guide you through configuring your Solr, Elasticsearch, or other search endpoint and setting up your case.
#### What you need to complete the wizard
- A Solr or Elasticsearch instance that is accessible from your browser
- A list of desired fields from your search engine
> *Note: You can use the demo Solr or Elasticsearch instances provided to test Quepid
## Naming Your Case
First you will be required to enter a case name. Select something descriptive to distinguish between your cases.

## Connecting your Search Engine
Quepid does not require any installation on your server. All you need to do is indicate which search engine you are working with, and provide the URL to your search engine. A wide variety of search engines are supported.
You will be able to update this URL at any point in the settings. If you want to try Quepid out without providing your data, feel free to leave the default collection selected.

## Selecting Fields to Display
Specify the _title field_ to use for display purposes. This typically corresponds to the field you use as a clickable title in your application while displaying search results. The application provides an autosuggest list of potential fields, but you are free to use any field in you search engine.
The _ID field_ is the only other required field to use Quepid. This should correspond to the unique identifier specified in your schema and should be a _number_ or _string_. The ID is the only field stored in Quepid, so your sensitive data will remain securely on your servers.
You can select additional fields if you would like to see other data in your Quepid results. You can also specify images with the following syntax: `thumb:field_name` and video/audio with `media:field_name`. Fields that have a value that starts with `http` will be turned into links.

## Adding Queries
At this point the required setup steps are complete. You have the option to provide some initial queries, but you can also add queries at any time in the application. It is helpful to add at least one query here so that your results will be populated when the application initially loads.

## Finishing the Wizard
That's it! Quepid is configured and you can now proceed to exploring the Quepid interface.

## Case Screen
Now that we have the basic setup out of the way, let's take a look at the major elements of Quepid's Case screen.

**1. Relevancy Case Dropdown -** Select or create cases to work on.
**2. Case Information -** Displays case summary including name, average query score, and current iteration in dashboard history.
**3. Case Actions -** Shows available actions including scorer selection, snapshot management, sharing options, and relevancy tuning panel toggle.
**4. Queries -**Add new queries and view existing ones. Click arrow to view and rate individual query results.
**5. Relevancy Tuning Panel -** Modify search relevancy settings and tune searches. Panel is closed by default and accessible via case actions.
**6. Quepid Support -** Access support chat window in bottom right corner for assistance from search relevancy experts.
# Manage Your Queries
## Adding Queries

Adding additional queries is simple. Just type in your search term(s) and click _Add query_ and Quepid will populate the results. A newly added query will display an empty score, the title, and the number of results found. Click on the arrow to expand a single result:

> Want to add a number of queries all at once? Just separate them with a
`;`, like so: `star wars;star trek` and click _Add query_.
## Rating Queries
Queries are rated through the dropdown to the left of each result. Clicking on the dropdown will bring up the rating scale based on the scorer you have selected.
If you haven't picked a specific scorer, then the Quepid system default scorer **AP@10** will be used. It has a binary Irrelevant or Relevant choice.

You can give the SAME rating to all the documents via the top level Score All feature. This can be useful when most of the documents are all the same, and then go back and update the few that are different.
Otherwise you can also just score each document individually.
>> This interface unfortunately goes against "best practices" for judging documents because you, the human judge, tend to be biased to give the first documents a higher rating then the further down ones. Also, by seeing multiple documents next to each other it's hard to evaluate them in the platonic ideal of "Is this document a good match for this query". We recommend that you use the dedicated Human Rater interface that is part of the Book concept instead.
## Managing Queries
## Moving a Query
A query and its associated search results and ratings can be moved to another case. To move a query, expand the query by clicking the query terms. Next, click the _Move Query_ button. A window will be shown asking you to select the new case for the query. Click the desired case to move the query.

## Deleting a Query
There may be times in which you want to delete a query from your case. Perhaps the query is no longer needed and can be removed. To delete a query expand the query by clicking the query terms and click the _Delete Query_ button. You will be prompted to confirm the deletion of the query.

## Rating Missing Documents
You now know how to rate documents that appear in your top ten results.
What happens if good documents you expected to be returned by a
particular query are not even showing up? You will need a way to
indicate that more relevant documents, that do exist in the data, are
missing from this desired results in this result set, and in an ideal
future state of the world, would be found by this same query. Here's how
that is accomplished.
> This is a fairly advanced technique that requires you to really understand the contents of your corpus. It requires you to understand how to write your own search engine queries as well

Clicking on _Explain Missing Documents_ will bring up a dialog
box that initially shows you all of the documents that you have rated,
but aren't being returned in your top ten results. Here you can also
find additional documents to rate, just use the Lucene syntax to query
for them. If you're looking for a specific document and you know the ID,
that is the simplest way to locate it. Once you have rated the missing
document, that rating is factored into the algorithm.
# Relevance Panel
To modify your search settings, open the relevancy tuning panel by clicking the _tune relevance_ link in the case actions area.

The default panel allows you to modify the Solr or Elasticsearch query
parameters directly. Update your query here and click _Rerun my
searches_ to see the results update.
## Magic Variables
"Magic variables" are placeholders. You can add a list of queries that Quepid will automatically run against your search engine. While you can specify which parameters are sent with the call, you need to know how to connect your query list to these parameters. This is where "magic variables" come in.
There are 3 types of "magic variables":
### Query Magic Variable
The `#$query##` string represents the query variable. Quepid replaces this pattern with your full query. This is the simplest and most important "magic variable."
Example:
Let's say you have:
1. A movies index using Solr as the search engine
2. Query parameters set as: `q=#$query##`
3. Two queries in Quepid: "marvel" and "dc comics"
Quepid will call your Solr instance twice:
- First call: `q=marvel`
- Second call: `q=dc comics`
In each case, `#$query##` is replaced with the actual query string.
### Curator Variables
Curator variables (pattern: `##variableName##`) allow you to modify query parameters without rewriting the query directly. These variables:
- Work with numerical values only
- Let you easily adjust parameters (like boost values) until you achieve desired results
- Appear in the "Variables" tab of the tuning pane after being defined in query parameters
Example:
If you define `##boost_value##` in your query parameters, you can adjust this value in the Variables tab without editing the query itself.

Continuing with the example from above, let's say your initial query parameters are:
```
q=#$query##&defType=edismax&qf=title^500 overview^10 tagline&tie=0.5
```
To experiment with boost values, replace the numbers with curator variables:
```
q=#$query##&defType=edismax&qf=title^##titleBoost## overview^##overviewBoost## tagline&tie=0.5
```
You can then adjust these values in the "Variables" tab:
- `titleBoost`: adjust from 500
- `overviewBoost`: adjust from 10

### Keyword Variables
Keyword variables (`#$keywordN##`) provide more granular control than the basic query variable (`#$query##`). While the query variable is sufficient for 80% of cases, keyword variables let you manipulate individual words within a query.
How it works:
- Pattern is `#$keywordN##` where N starts at 1
- Quepid splits the query on whitespace
- Each `#$keywordN##` is replaced with the corresponding word
Simple Example:
1. Your queries: "marvel" and "dc comics"
2. Query parameter: `q=#$keyword1##`
3. Results:
- First query: `q=marvel`
- Second query: `q=dc` (ignores "comics")
Advanced Usage:
Keyword variables enable complex query transformations. For example, with "Web site developer":
- Individual words: "Web", "site", "developer"
- Combinations: "Web developer", "site developer"
- Phrases: "web site", etc.
This allows you to match different permutations and combine the results for your users.
## Settings

The settings panel allows you to modify the search configuration that you entered during the case's setup.
## History

Each time you rerun your searches, a new "try" is generated in the
search history. Clicking on a try will change the settings to that
iteration, so you can move back and forth between different
settings/configurations. You can also duplicate, rename or delete tries.
> Importing ratings will override your existing ratings. Proceed with caution!
Ratings can be imported into existing queries and cases. You may want to import ratings if you have previously rated search results in another application other than Quepid. Ratings can be imported from CSV, [Rated Ranking Evaluator](https://github.com/SeaseLtd/rated-ranking-evaluator), or in the common Learning To Rank (LTR) format. To import ratings, click the _Import_ link. A window will be shown to begin the import.

First, importing ratings can clear your existing queries. If all of your work has been done outside of Quepid and you are now bringing your work into Quepid you can select the _Clear existing queries_ option to remove all queries from Quepid prior to the import. Please be sure you want to do this because all queries in Quepid will be lost.
Next, select the format of your ratings to import. Choose either CSV, Rated Ranking Evaluator, or Learning to Rank.
## Importing from CSV
When choosing CSV, a sample of the expected data is shown. The data should be formatted as `query,docid,rating`. Once your CSV file is appropriately formatted, click the Choose File button to upload the file and begin the import.
## Importing from RRE Export
When importing from Rated Ranking Evaluator (RRE), simply click the Choose File button to select and upload your ratings previously exported from RRE.
## Importing from LTR Training File
To import ratings from an LTR training file, click the _Choose File_ button to select and upload an LTR training file. The format of file is expected to be rating `qid:queryid # docid query`. The `qid:queryid` value is ignored in favor of the `query` value and is the value used in Quepid.
# Managing Snapshots
A important step in the benchmarking process for Quepid is taking
regular snapshots of your case over time and comparing them to ensure
that relevancy is improving.
## Creating Snapshots

When you are ready to take a snapshot, click on _Create Snapshot_ in the case actions area to bring up the snapshot dialog box. From here, give your snapshot a descriptive name and click _Take Snapshot._ The current ratings for all of your queries are now saved.
## Comparing Snapshots

Once you have made improvements to your search relevancy settings, you will want to judge your improvement. Click on_"Compare snapshots_ to view your current results with a previous snapshot. You can now see the scores and results side-by-side for comparison.

## Managing Cases
Also on the case dashboard, you can manage existing cases. You can see
both the cases you own and those that have been shared with you.

For each set of cases, you can filter the list by name and number of documents per page, and paginate through pages if needed. You can click on any case name to open it in the main Quepid dashboard.
Each case can be archived or renamed. Cases should be archived when no longer active, and you can access archived cases using the _View archived cases_ link at the bottom of the page.
# Manage Your Team
Teams in Quepid allow you to group your users based on their roles and cases. For example, you can create teams for your raters and your search relevance engineers as shown in the screenshot below. Case can be assigned to teams to provide access to your company's search team members. You can also make custom scorers available to a team. Using Quepid's Teams helps keep your search relevancy efforts organized. To access the Teams, click the _Teams_ menu at the top of any page.

To create a team, click the _Add New_ button. You will be asked to give the new team a name. All team names must be unique in each deployment of Quepid.

## Creating a Team
To add users to a team, click the name of the desired team to open the team detail page. On this page, enter the user's email address or display name and click the _Add User_ button.

If the user you enter does not yet have a Quepid account, then it will change to a "send invitation" link. Clicking it will send (if email is configured) an email to the person inviting them to join Quepid. When they join via the invitation URL they will also join the team as well.
If Quepid's email configuration has not been configured, you will be provided an invite link vai the "clipboard" icon you can copy and paste and share with the user you want to invite. The user can use the invite URL to create their account and join the team.

When you are finished adding users to the team, click the _Back to list_ link.

#### What does the email invite look like?
When you invite a user that does not already have an account in Quepid, the user will receive an email inviting them to create an account on Quepid. An example of that invitation email is below.
```
Hello invited.user@gmail.com
John Smith has invited you to join their team on Quepid at https://app.quepid.com/, you can accept it through the link below. https://app.quepid.com/users/invitation/accept?invitation_token=LUkf6k4pa_1234mUiGj6
If you don't want to accept the invitation, please ignore this email. Your account won't be created until you access the link above and set your password.
```
## Team Owner
The team owner is the person who created a team. Any member of a team can invite another user to the team. The team owner can be changed by opening the team and selecting another member of the team. The user selected will become the new owner of the team.
## Adding a Case to a Team
To add a case to a team, open the case. Click the _Share case_ link. You will be shown a window and asked to select a team. Click the desired team to share the case with that team.

## Adding a Scorer to a Team
Along with cases, scorers can also be associated with teams. To add a custom scorer to a team, click the _Scorers_ link at the top of any page. On the Scorers page, click the _Custom_ tab to show the scorers that you have created. For the scorer you want to share with a team, click the _Share_ link. A _Share Scorer_ window will be shown and you can click which team to share the scorer.

# Managing Scorers
Scorers are run over all your queries to calculate how good the search results are according to the ratings you've made.
You can specify whatever scale you want, from binary (0 or 1) to graded (0 to 3 or 1 to 10) scales. Each scorer behaves differently depending on whether it handles graded versus binary scales.
## Classical Scorers Shipped with Quepid
These are scorers that come with Quepid. `k` refers to the depth of search results evaluated. Learn more in our "[Choosing Your Search Relevance Metric](https://opensourceconnections.com/blog/2020/02/28/choosing-your-search-relevance-metric/)" blog post.
| Scorer | Scale | Description |
|--------|-------|-------------|
| Precision `P@10` | binary (0 or 1) | Precision measures the relevance of the entire results set. It is the fraction of the documents retrieved that are relevant to the user's information need. Precision is scoped to measure only the top k results. |
| Average Precision `AP@10` | binary (0 or 1) | Average Precision measures the relevance to a user scanning results sequentially. It is similar to precision, but weights the ranking so that a 0 in rank 1 punishes the score more that a 0 in rank 5. |
| Reciprocal Rank `RR@10` | binary (0 or 1) | Reciprocal Rank measures how close to the number one position the first relevant document appears. It is a useful metric for known item search, such as a part number. A relevant document at position 1 scores 1, at positon 2 scores 1/2, and so forth. |
| Cumulative Gain `CG@10` | graded (0 to 3) | Information gain from a results set. It just totals up the grades for the top k results, regardless of ranking. |
| Discount Cumulative Gain `DCG@10` | graded (0 to 3) | Builds on CG, however it includes positional weighting. A 0 in Rank 1 punishes your score significantly more than Rank 5. |
| normalized Discount Cumulative Gain `nDCG@10` | graded (0 to 3) | nDCG takes DCG and then measures it against a *ideal* relevance ranking yielding a score between 0 and 1. Learn more about nDCG (including some gotchas) on the [wiki](https://github.com/o19s/quepid/wiki/How-Scoring-Works-in-Quepid#ndcg). |
## Selecting a Scorer
By default, several scorers are available. From the main dashboard, click _Select scorer_ to choose from the available options. If you want to use a different rating scale, click _Create New Scorer_ to access the custom scorers page.

## Creating a Custom Scorer
This page lets you change which scorer is your default scorer when you create new Cases.

From the custom scorers page, click _New Scorer_.
From here, you can name your new scorer, provide custom scoring logic in
JavaScript, and select the scoring range.

### What can my code do?
Your code validates the search results that came back. Below is an API available for you to work with:
| Function | Description |
|----------|-------------|
| `docAt(i)` | The document at the i'th location in the displayed search results from the search engine, including all fields displayed on Quepid. Empty object returned on no results. |
| `docExistsAt(i)` | Whether the i'th location has a document. |
| `eachDoc(function(doc, i) {}, num)` | Loop over docs. For each doc, call passed in function with a document, doc, and an index, i. You can pass in an optional `num` parameter to specify how many of the docs you want to use in the scoring (eg. to only use the top 5 results, pass in the number `5` as a second parameter. *Default: `10`* |
| `eachRatedDoc(function(doc, i) {}, num)` | Loop over rated documents only. Same arguments as eachDoc. **Note:** Needs rated documents loaded before usage, see `refreshRatedDocs` |
| `refreshRatedDocs(k)` | Refresh rated documents up to count `k`. This method returns a promise and must be run before using `eachRatedDoc`. You should call `then()` on the promise with a function that kicks off scoring. |
| `numFound()` | Solr has found this many results. |
| `numReturned()` | The total number of search results here. |
| `hasDocRating(i)` | True if a Quepid rating has been applied to this document. |
| `docRating(i)` | A document's rating for this query. This rating is relative to the scale you have chosen for your custom scorer. |
| `avgRating(num)` | The average rating of the returned documents. This rating is relative to the scale you have chosen for your custom scorer. You can pass in an optional `num` parameter to specify how many of the docs you want to use in the scoring (eg. to only use the top 5 results, pass in the number `5` as a second parameter. *Default: `10`* |
| `avgRating100(num)` | The average rating of the returned documents. This rating is on a scale of 100 (i.e. the average score as a percentage). You can pass in an optional `num` parameter to specify how many of the docs you want to use in the scoring (eg. to only use the top 5 results, pass in the number `5` as a second parameter. *Default: `10`* |
| `editDistanceFromBest(num)` | An edit distance from the best rated search results. You can pass in an optional `num` parameter to specify how many of the docs you want to use in the scoring (eg. to only use the top 5 results, pass in the number `5` as a second parameter. *Default: `10`* |
| `setScore(number)` | Sets the query's score to number and immediately exits |
| `pass()` | Pass the test (score it 100), immediately exits |
| `fail()` | Fail the test (score it 0), immediately exits |
| `assert(condition)` | Continues if the condition is true, otherwise immediately fails the test and exits |
| `setScore(number)` | Sets the query's score to number and immediately exits |
## Managing Scorers

After you have created scorers, you can manage them from this page. You
can filter down the list of scorers by name or type. You can share a
scorer with a team. You can edit the settings for a scorer. Finally, you
can delete a scorer.
# Custom Scorers
Quepid comes with classic Information Retrieval **Scorers**, that we refer to as **Communal** scorers. Sometimes however you want your own **Custom Scorer**.
To access the scorers click the _Scorers_ link at the top of any page.

On the scorers page, click the _Communal_ tab to show only the scorers that are available to all users of Quepid. Click the _Custom_ tab to show only scorers that you have created and shared with a team. To create a new scorer, click the _Add New _button. The New Scorer window will be shown.

First, give your scorer a name. Next, you can enter the JavaScript code for your scorer. Refer to Creating a Custom Scorer to learn more about the code requirements. Next, choose the scale for the scorer. Finally, you can optionally provide labels for the scale by clicking the _Show Scale Labels_ option. When finished, click the _Create_ button to create the scorer.
### Why would you create a custom scorer?
It is impossible to create a universal pre-set list of scorers that will apply to every possible use-case for search. Each organization's search system is going to be a unique case with a unique set of data and a unique set of requirements for what success looks like for the people using the system, and so it is likely that each organization's search team will need to be able to measure the quality of their results by a unique set of scorers, and quite possibly create one or more custom scorers that act differently than any of the default scorers do. It is for this reason that Quepid provides the ability for you to create a custom scorer. The most common scenario for needing to do so is because you need an **@k** scorer that isn't **@10**.
> Tip! In the case of a custom **@k** scorer, you can simply clone the default **@10** scorer and then update the **k** parameter.
Curious about the API's that Quepid exposes? Check out the documentation at https://go.quepidapp.com/api/docs.
> Note: The generated docs are NOT comprehensive, and you may need to consult the source code or open up your web inspector to see the HTTP traffic to learn about other APIs.
Quepid's APIs enable you to automate processes and integrate Quepid with other products you or your company uses.
The APIs are REST-based. Responses are JSON, and errors are reported via standard HTTP codes in addition to JSON-formatted error information in the HTTP response bodies of relevant requests. We use Personal Access Token for authentication and authorization.
# Quepid Adminstration CLI aka Thor
This CLI tool that you run on the Quepid application lets you script out many processes.
The see available tasks:
```
docker compose run app bundle exec thor list
```
Examples include:
```
case
----
thor case:create NAME SEARCH_ENGINE ENDPOINT_URL API_METHOD FIELD_SPEC QUERY_PARAMS SCORER_NAME OWNER_EMAIL # creates a new case
thor case:load_the_haystack_rating_snapshots # load the haystack rating party data
thor case:share CASEID TEAMID # shares case with an team
ratings
-------
thor ratings:generate SOLRURL FILENAME # generates random ratings into a .csv file
thor ratings:import CASEID FILENAME # imports ratings to a case
sample_data
-----------
thor sample_data:haystack_party # load the haystack rating party data
thor sample_data:large_data # load the very large sample data
thor sample_data:sample_data # load the sample data
snapshots
---------
thor snapshots:generate SOLRURL FILENAME # generates a random snapshot into a .csv file
thor snapshots:import CASEID SNAPSHOTNAME FILENAME # imports a snapshot to a case
user
----
thor user:add_api_key EMAIL # generates and adds an API key to the user
thor user:create EMAIL USERNAME PASSWORD # creates a new user
thor user:grant_administrator EMAIL # grant administrator privileges to user
thor user:reset_password EMAIL NEWPASSWORD # resets user's password
```
To see more details about any of the tasks, run `bin/docker r bundle exec thor help TASKNAME`:
```
thor help user:create
Usage:
thor user:create EMAIL USERNAME PASSWORD
Options:
-a, [--administrator], [--no-administrator]
Description:
`user:create` creates a new user with the passed in email, name and password.
EXAMPLES:
$ thor user:create foo@example.com "Eric Pugh" mysuperstrongpassword
With -a option, will mark the user as Administrator
EXAMPLES:
$ thor user:create -a admin@example.com Administrator mysuperstrongpassword
```
Explanation
# How Many Queries and Documents Do I need?
## How many search results should be judged?
The number of search results you should judge depends on a few factors and your organization's search team can provide guidance. As a general rule of thumb, 100 judgments (10 pages of 10 search results) is a good starting point and likely sufficient for most cases.
You may have noticed the frog icons? The backstory is that we needed an icon to call attention to some queries having unrated documents. Eric's son Asher loves frogs, and when Asher was asked to pick an icon, he picked the frog one! So, we talk about "chasing the frogs" to mean getting rid of unrated documents. The more frogs you have, the less confidence you have in accurate search metrics.
You can click the _Frog Pond_ report link to get a sense of how many ratings you need.

Over time you can figure out how many ratings you need to do per week to stay on top of things.
# Using Notebooks for Analytics
> Data scientists are gonna data science... - Eric
At some point, you decide you want to dig into the data collected by Quepid to do more advanced analytics. Maybe you are curious about Inter Rater Reliablity? Or you want to do some deeper comparison between Cases or Snapshots such as Jaccard comparison? This is what the **Notebooks** interface is for.

Quepid ships with some example Jupyter notebooks that are meant as _starting points_ for analyzing data. Each notebook is runnable, they all leverage a public dataset to demonstrate how they work. You can just click the double arrow *play* button to rerun them. Note, the first time you run the notebooks it takes a bit to load dependencies, and then they run quickly.
To use them, right click on the example notebook and copy it to your own file that is outside the `/examples` directory. Otherwise you may lose your customization's when new versions of the examples are released.
Feel free to change the logic and analytics to meet your teams specific needs.
## How does this all work?
Did you notice some magic? These notebooks ran yet you didn't configure Python or otherwise start up Jupyter! You actually don't have to worry about setting up Jupyter, instead via a bit of magic, we have the Jupyter environment running completely **IN** your browser. Jupyterlite ships as lots of HTML and JavaScript files (almost 1 GB of them), and through the magic of [WASM](https://webassembly.org/) lets you run the Python code in your browser. You can learn more about the Jupyterlite project at https://github.com/jupyterlite/jupyterlite.
We leaned into using Jupyterlite because it lets us use the various APIs that Quepid provides for accessing data without requiring you to set up a **Personal Access Token** first to interact with the APIs since the notebooks are running under your current authenticated browser session. Also, as you edit the notebooks, they are saved in your browser. This let's you get started using the example notebooks without faffing about Python dependencies.
However, if you want to download the notebooks and use them in a local Jupyter setup, that is just fine. Just consult the How To Access APIs for more information on configuring your Personal Access Token.
Working with various teams, we found that every analytics tool we built was too
narrowly defined to a specific teams needs. The more we made it generic, the harder it was to use and the less value it provided. Yet every team wanted it's
own take on the analysis process and that's why we decided to just make Quepid be a great repository of data, and enable Data Scientists to use the tooling they like, Jupyter.
Got a notebook you'd like to share with community? We'd love to have them. Most of the notebooks were contributed by various teams using Quepid.
# How to Integrate Quepid Into Your Eval Workflow
Do you already have an Search Evaluation workflow in place, or parts of it that you want to preserve, but also take advantage of Quepid? There are three main approaches, from least itnegrated to most integrated:
1. Export/Import Data Files between your existing solution and Quepid
2. Leverage Quepid's APIs to integrate Quepid into your existing solution
3. Wrap Quepid's data model directly into your solution
## Export/Import Data Files between your existing solution and Quepid
Do you already have a fairly robust mature solution for doing Search Evaluation? Something homegrown, or maybe you are invested in OpenSearch's "Search Relevance Workbench"? Or you have been using SearchTweak?
Quepid supports exporting and importing data via CSV and JSON formats for almost all of the major data structures (Books, Cases, Users, Queries, Judgements). Yes, you will have to do some data format conversions, and it's a manual integration, but it's also supported in the UI and is pretty easy to use!
## Leverage Quepid's APIs to integrate Quepid
Quepid has a robust set of API's that you can use to make a much deeper integration with Quepid. Yes, you have to learn a LOT more about how Quepid's data model fits together, but this also let's you make Quepid a integral part of your process. You can manage all the data structures using the API.
This is really great when you want to have that integration be an ongoing process. Say you run your evaluation process as part of a CI/CD pipeline, and you want to record the scores? Just make a call to the `PUT /api/cases/:case_id/scores` end point!
Maybe you do judgement calculations using your own implicit judgements pipeline? Do a `PUT /api/books/:book_id/query_doc_pair/:query_doc_pair_id/judgements/:id` to update an existing query doc pair with the new judgement value.
A community member has vibe coded (cool!) a comparison tool across three major public science journal search engines, and is leveraging the API's to store the comparison data over time, but surfacing all that in their own UI.
## Wrap Quepid's data model directly into your solution
The most extreme form of integration is to integrate your application at the database level. There have been a number of examples of folks who have adopted the underlying data model in the database, but otherwise built their own framework around it. For example, see https://github.com/frutik/quepid-api-unofficial for an example.
You might also want to export data from Quepid's database into your own data lake to drive your own analytics dashboards.
# How LLM as a Judge Works
When you attach the AI Judge to a book in Quepid, it automatically sends evaluation requests to the OpenAI API using both your custom prompt and the query/document pair data.
Each request uses a prompt template that you configure in the AI Judge settings. This prompt is dynamically populated with the fields from each query/document pair, allowing the model to evaluate results in context.
**Request Structure**
Quepid uses OpenAI's chat completion API, which requires a messages array to simulate a conversation. For each document/query pair, the following structure is generated:
```
[
{
"role": "system",
"content": ""
},
{
"role": "user",
"content": [
{
"type": "text",
"text": ""
}
]
}
]
```
## How Images are used in Evaluation
If your document contains a field named `image`, or if any field is explicitly tagged with `image:`, Quepid handles it specially. The value of that field is treated as an image URL and is inserted into a separate section of the prompt to provide image context to the model.
This allows you to evaluate results based not only on textual relevance but also on visual content when applicable.
**Request Structure**
```
[
{
"role": "system",
"content": ""
},
{
"role": "user",
"content": [
{
"type": "text",
"text": ""
},
{
"type": "image_url",
"image_url": {
"url": ""
}
}
]
}
]
```
# How Judgements are Averaged into a Rating in a Case
When combining the judgments from multiple judges, we can make a variety of assumptions. If we assume:
1. Judges are generally subject matter experts (SMEs)
1. Judges are rational
1. Judges have individual biases when interpreting relevance
Appealing to 1, we take the three highest out of all the judgments there are. Note, many additional judgments could all agree with these first three. Here we are being optimistic. If the judges do not agree, we appeal to numbers 2 and 3. If a rational judge deems the candidate to be poorer than the other judge or judges, we will trust them, and use their value. Here we are both being pessimistic, concerning the individual judgment, and optimistic, concerning the direction of the bias. That is, we expect judges to overrate, in the general case.
If we only have two judges, then we just average the two judgements. And if we only have one judge, then that is the rating.
As cases grow, and the relative quality of the judges becomes clearer, alternative combinations could be used.
# Thinking about Cases and Books of Judgements
Cases and Books share many, maybe too many, similarities, and can be thought of as two different lenses on the same data.
However they are distinct but interconnected systems for handling search evaluation - and they're quite different in their purposes and design!
## Cases: Live Search Experimentation
Cases are Quepid's dynamic, real-time search testing environment. Think of a Case as your active laboratory where you're constantly tweaking and experimenting with search configurations. Here's how they work:
### Data Storage
Cases store their search queries in the Queries table, with each Query containing just the `query_text`, `information_need`, `notes`, and `options`. The key thing is that Cases don't store search results - they fetch them live from search engines every time you run a query. The only thing they persist about results is Ratings via the Ratings table, which links a `query_id` to a `doc_id` with a rating value.
### Search Engine Interaction
This is where Cases really shine. They're designed for live interaction with search engines through Tries and Search Endpoints. Each Case has multiple Tries that represent different configurations (think of them as saved parameter sets), and each Try connects to a Search Endpoint that knows how to talk to Solr, Elasticsearch, OpenSearch, or even custom APIs via the SearchAPI mapper. When you run a query, it hits the live search engine with your current parameters and gets fresh results.
### Evaluation
Cases use a real-time rating system where you manually rate individual search results on the fly. These Ratings get aggregated into Scores using configurable Scorers, and you get immediate feedback on how your search tuning is performing. We provide all the standard IR retrieval metrics for you, and you can write your own custom Scorer.
## Books: Offline Judgment Collection
Books are the complete opposite - they're designed for systematic, offline evaluation of search quality. Think of them as standardized test datasets.
### Data Storage
Books store everything up front in the Query Doc Pairs table. Unlike Cases, Books actually persist both the queries AND the data that makes up each search result (as `document_fields` JSON). Each Query Doc Pair represents a query-document combination that needs to be judged. This is crucial because Books need to maintain consistency - you can't have the underlying search results changing while people are making judgments.
Everytime a Case is loaded, all of the returned data from the search engine is queued up as an update to the associated Book, and processed in the background. We control what data is stored in `document_fields` JSON attribute by looking at the field specification for the Case. If you define your field specification as `id, title:name, description` then we will store the description in `document_fields` for the Query Doc Pair. If you later change the field specification to `id title:short_name description, url, thumb:image` and run the Case, then the Book will be updated to have the new _short_name_ value used for the title, and the `document_fields` attribute will be updated to store the _url_ and _thumb:image_ attributes as well.
Now, if a Query Doc Pair in a Book is no longer being returned by the associated Case, then of course no content updates will happen.
TL;DR: The data stored in the Book is driven by the search results returned by the Case!
### Search Engine Interaction
Books don't directly interact with search engines during evaluation. Instead, they're populated from a Case every time that Case is run, which captures a snapshot of search results at that point in time. After that, it's all offline - no more live searching. This means that over time you should run a Case periodically to keep the set of Query Doc Pairs in the Book up to date so it represents what your users are seeing.
### Evaluation
Books use a Judgements system where multiple users can independently rate the same query-document pairs. Each Judgement is stored separately (unlike Cases where Ratings overwrite), and they support sophisticated features like explanations, "judge later" flags, and "unrateable" markings.
Books also support a LLM-as-Judge capability that can scale up the judgement process.
They do not provide any measurement of search quality, that is the job of a Case.
## The Key Differences and Why They Matter
### Ratings vs Judgements
This is the big philosophical difference. Cases use Ratings - quick, single value assessment meant for rapid iteration. Books use Judgements - thoughtful, often collaborative evaluations meant for creating gold standard datasets.
We bring these two worlds together by linking a Case to a Book. As judging happens in the Book, the various Judgements are aggregated into a single Rating to be used in a Case. Learn more on the [How Judgements are Averaged into a Rating in a Case](https://quepid-docs.dev.o19s.com/2/quepid/63/how-judgements-are-averaged-into-a-rating-in-a-case).
### Scale
Books have configurable scales (like 0-3 or 0-1) with detailed scoring guidelines built right in. Cases also have a scale that is tied to the specific Scorer that is being used. If your Book has 0-3 graded scale, and your Case has a binary Scorer like Precision, then the Case automatically maps the graded scale to a binary one.
### Data Flow
The integration is brilliant - you can populate a Book from a Case (capturing live search results), collect Judgements from multiple people offline, then refresh that data back into a Case to continue live experimentation as Jdugements flow in. You do need to manually reload the Case screen to see the new aggregated Rating data. Likewise, if you DO create a Rating in the Case, it is recorded as Judgement by you for the corresponding Query Doc Pair in the Book.
### Collaboration
Cases are more individual-focused (though they can be shared via Teams) with the intended audience being Search Relevance Engineers, while Books are designed from the ground up for collaborative evaluation with multiple Subject Matter Experts.
## Data Models Summary
### Case-Related Models
- `Case` - The main container for search experiments
- `Query` - Individual search queries within a Case
- `Rating` - User ratings for query-document pairs (overwrites previous ratings)
- `Try` - Different configuration attempts/versions
- `Search Endpoint` - Connection configuration to search engines
- `Score` - Aggregated scores over time
### Book-Related Models
- `Book` - Container for offline judgment collection
- `Query Doc Pair` - Query-document combinations with stored results
- `Judgement` - Individual user judgments (multiple per query-doc pair)
## Workflow Integration
The typical workflow shows the power of both systems working together:
1. **Development Phase**: Use a Case to experiment with search configurations, tune parameters, and get quick feedback through live search results
2. **Evaluation Phase**: Populate a Book from the Case to capture a snapshot of results for systematic evaluation
3. **Judgment Collection**: Multiple users provide Judgements on the standardized dataset in the Book
4. **Integration Phase**: Refresh the Book data back into Cases to continue development with improved baseline Ratings
### Can I use them Individually?
Of course! For many small relevance investigations, you don't need a Book. A Case with 6 or 8 Queries is enough that you quickly rate yourself to investigate a problem.
Likewise, you may find that you want to source your raw data for evaluation from a different system and import that to your Book. Book's have complete API's that let you manage a book or import the Query Doc Pairs yourself for evaluation. You can also export the data for use in non Quepid evaluation systems.
## Summary
It's really a perfect example of designing different tools for different jobs - Cases for the rapid iteration and experimentation phase of search development, and Books for the rigorous evaluation and benchmarking phase. The fact that data flows seamlessly between them means you get the best of both worlds!