Prerequisites
- You have an active Elastic Cloud account
- You have a deployment with a searchable index
This how to describes the three necessary processes to connect Quepid to your Elastic Cloud deployments:
- Configure Elastic Cloud deployment to accept browser requests from Quepid
- Create an API Key in Elastic Cloud
Connect Quepid to Elastic Cloud with the appropriate settings
Configure your Elastic Cloud deployment to accept browser requests from Quepid
Log into your Elastic Cloud account at https://cloud.elastic.co/home.
Select Manage next to the Deployment you want to connect Quepid to.

Under your deployment name select Edit.
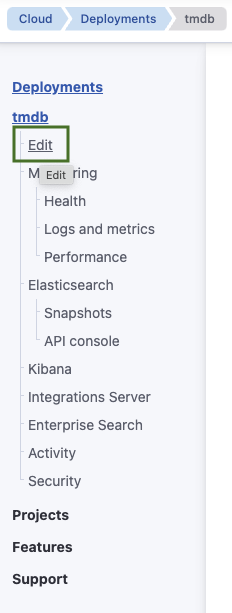
Select Manage user settings and extensions.
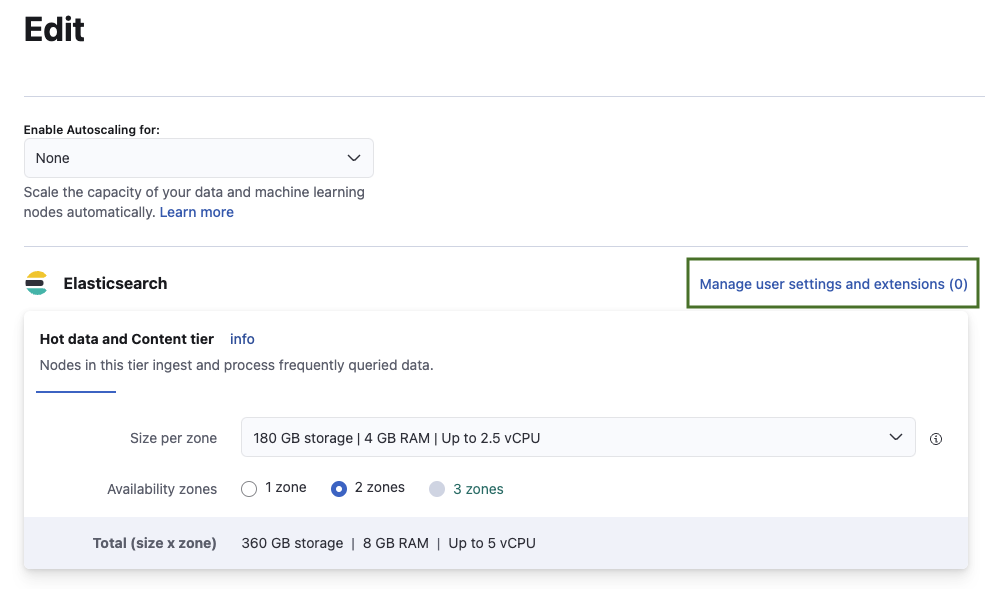
Enable and configure CORS with the following settings when connecting to the public Quepid service running at https://app.quepid.com. Change
allow-originaccordingly when running Quepid onlocalhostor any other host.http.cors: enabled: true allow-origin: /https?:\/\/go\.quepidapp\.com/ allow-credentials: true allow-headers: "X-Requested-With, Content-Type, Content-Length, if-modified-since, Authorization"- Select Back and scroll down to the bottom of the page to confirm and save the changes by selecting Save.
- This triggers a restart of your deployment. Wait until the restart finishes. ## Create an API Key in Elastic Cloud To authenticate requests to the Elastic Cloud deployment follow these steps:
If not logged in, log into your Elastic Cloud account at https://cloud.elastic.co/home.
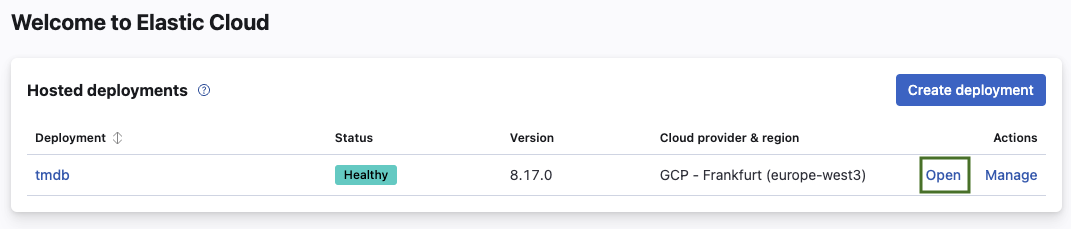
Select Open next to the Deployment you want to connect Quepid to.
Select the + New button.

Choose a descriptive name (for example Quepid) and choose the settings appropriate to your desired security guidelines or requirements.
Create the API Key by selecting Create API Key.
Your created API should look similar to the following JSON snippet:
{
"id": "zbeFaZQBMjrfbP-YfIZh",
"name": "Quepid",
"expiration": 1737023543405,
"api_key": "4dMPumSqTdiTzREUXYQDTA",
"encoded": "emJlRmFaUUJNanJmYlAtWWZJWmg6NGRNUHVtU3FUZGlUelJFVVhZUURUQQ==",
"beats_logstash_format": "zbeFaZQBMjrfbP-YfIZh:4dMPumSqTdiTzREUXYQDTA"
}
Store your API key in a safe place, for example your company password safe with appropriate access settings.
Connect Quepid to Elastic Cloud with the appropriate settings
We now create a new case and connect it to the deployment with the created API Key.
Log into Quepid.
Create by selecting Relevancy Cases and + Create a case.
Name your case, for example TMBD on Elastic Cloud.
Select Create a new Search Endpoint with the following settings:
- Choose Elasticsearch and enter your Elasticsearch endpoint including the index name and
_search. (Note: You find your Elasticsearch endpoint when logging into your Elastic Cloud and selecting Open for the deployment you want to connect to.) - Select Advanced and choose API Key in the dropdown for Custom Headers.
- Substitute XXX in the generated JSON for the custom header by the API Key you generated. You find the API Key under
encoded.
- Choose Elasticsearch and enter your Elasticsearch endpoint including the index name and
Click ping it below the endpoint input field.
A successful configuration is confirmed with the output Quepid can search this! Hit 'Continue' to keep working through setup. Revisit the configuration to make sure you have all settings correct if you don't receive the success message.
Continue with the case setup and set the display fields and add the queries you want to have in your case.
Done!